
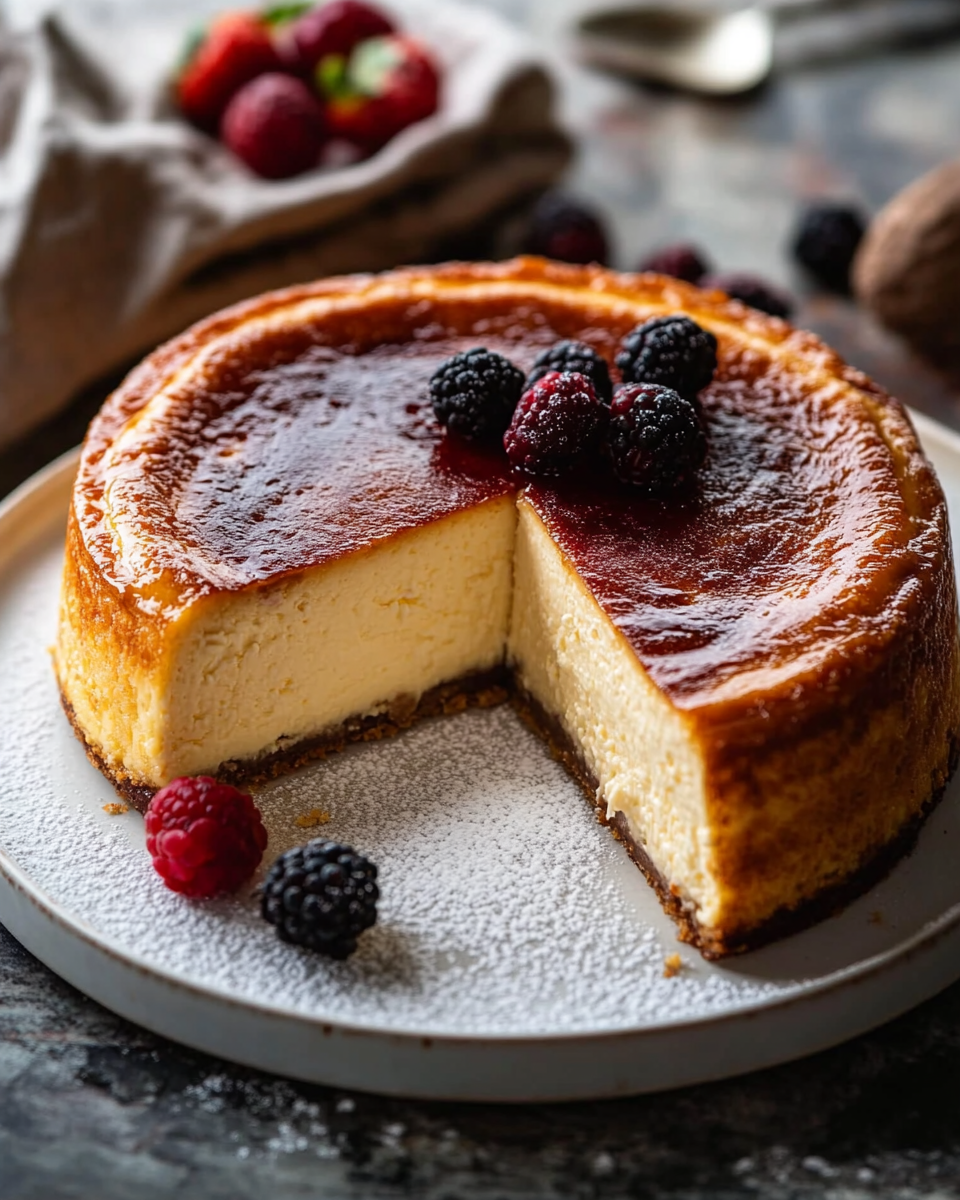
Introduction to Tarta de Queso Quemada de San Sebastián
Hey there, fellow food lovers! If you’re anything like me, you know that life can get pretty hectic, especially when juggling work, family, and everything in between. That’s why I’m excited to share my go-to recipe for Tarta de Queso Quemada de San Sebastián. This delightful cheesecake is not only a showstopper but also a quick solution for those busy days when you want to impress your loved ones without spending hours in the kitchen. With its creamy texture and caramelized top, this dessert is sure to become a favorite in your home!
Why You’ll Love This Tarta de Queso Quemada de San Sebastián
Let’s be honest—who doesn’t love a dessert that’s both easy to make and absolutely delicious? This Tarta de Queso Quemada de San Sebastián checks all the boxes! It’s quick to whip up, requiring just a handful of ingredients, and the baking time is a breeze. Plus, the rich, creamy flavor paired with that gorgeous caramelized top will have your family and friends raving. It’s the perfect treat for any occasion!
Ingredients for Tarta de Queso Quemada de San Sebastián
Now, let’s dive into the ingredients that make this Tarta de Queso Quemada de San Sebastián so irresistible! You’ll find that most of these items are staples in your kitchen, making it easy to whip up this delightful dessert whenever the craving strikes. Here’s what you’ll need:
- Queso crema: This is the star of the show! Cream cheese gives the cheesecake its rich and creamy texture. Make sure it’s at room temperature for easy mixing.
- Azúcar: A little sweetness goes a long way! Sugar balances the tanginess of the cream cheese and helps create that lovely caramelized top.
- Huevos grandes: Eggs are essential for binding the ingredients together. They also contribute to the cheesecake’s smooth texture. Remember to add them one at a time for the best results!
- Nata para montar: This heavy cream adds richness and creaminess to the cheesecake. It’s what makes each bite feel indulgent and luxurious.
- Extracto de vainilla: A splash of vanilla extract enhances the flavor profile, giving the cheesecake a warm, inviting aroma. You can also use vanilla bean paste for an extra touch of elegance.
- Harina de trigo: Just a tablespoon helps stabilize the cheesecake, ensuring it holds its shape while baking. If you’re gluten-free, you can substitute with almond flour or a gluten-free blend.
- Pizca de sal: A pinch of salt is crucial! It balances the sweetness and enhances the overall flavor of the cheesecake.
For those of you who like to get creative, consider adding some optional ingredients like lemon zest for a citrusy twist or a swirl of fruit puree for a pop of color and flavor. You can find the exact measurements for each ingredient at the bottom of the article, ready for you to print out and take to the kitchen!
How to Make Tarta de Queso Quemada de San Sebastián
Now that we have our ingredients ready, let’s get into the fun part—making this delicious Tarta de Queso Quemada de San Sebastián! Follow these simple steps, and you’ll have a creamy, dreamy cheesecake that will wow your family and friends.
Step 1: Preheat the Oven
First things first, let’s get that oven preheating to 200°C (about 400°F). Preheating is crucial because it ensures that your cheesecake bakes evenly from the start. While the oven warms up, grab a 23 cm (9-inch) round baking pan and line it with parchment paper. Make sure to leave some overhang on the sides; this will make it easier to lift the cheesecake out later. Trust me, you’ll thank yourself for this little trick!
Step 2: Mix the Cream Cheese and Sugar
In a large mixing bowl, combine the cream cheese and sugar. Using an electric mixer, beat them together until the mixture is smooth and creamy. This step is essential because a well-mixed batter means a velvety cheesecake. You want to avoid any lumps, so take your time here. If you don’t have a mixer, a whisk will do, but it might take a bit more elbow grease!
Step 3: Add the Eggs
Next, it’s time to add the eggs. Crack them in one at a time, mixing well after each addition. This method helps the eggs integrate smoothly into the batter, creating that luscious texture we all love. If you toss them all in at once, you might end up with a clumpy cheesecake, and nobody wants that! So, patience is key here.
Step 4: Incorporate Remaining Ingredients
Now, let’s add the heavy cream, vanilla extract, flour, and a pinch of salt. Gently fold these ingredients into the mixture until everything is well combined. Be careful not to overmix; we want to keep that airy texture. The cream adds richness, while the flour helps stabilize the cheesecake as it bakes. It’s like a little insurance policy for your dessert!
Step 5: Pour and Level the Mixture
Once your batter is ready, pour it into the prepared baking pan. Use a spatula to level the top, ensuring an even surface. This step is important for even baking, so take a moment to make it nice and smooth. If you’re feeling fancy, you can give it a little shake to settle the batter, but don’t go overboard—no one wants a cheesecake earthquake!
Step 6: Bake to Perfection
Pop your cheesecake into the preheated oven and bake for 40-45 minutes. Keep an eye on it! You want the top to turn a beautiful golden brown while the center remains slightly jiggly. This is the sweet spot for that creamy texture. If the edges start to brown too quickly, you can cover them with a bit of foil. Remember, every oven is different, so check for doneness a few minutes early if you’re unsure.
Step 7: Cooling and Serving
Once your cheesecake is baked to perfection, remove it from the oven and let it cool at room temperature. This step is crucial because it allows the cheesecake to set properly. After it’s cooled, refrigerate it for at least 4 hours (or overnight if you can wait!). When you’re ready to serve, carefully lift it out of the pan using the parchment overhang. Slice it up, and enjoy this delightful Tarta de Queso Quemada de San Sebastián with your favorite toppings, like fresh fruit or a drizzle of caramel. You’ve earned it!
Tips for Success
- Always use room temperature cream cheese for a smoother batter.
- Don’t skip the parchment paper; it makes removing the cheesecake a breeze!
- Keep an eye on the baking time; every oven is different, and you want that perfect golden top.
- Let the cheesecake cool completely before refrigerating for the best texture.
- For a fun twist, try adding a hint of lemon zest to the batter!
Equipment Needed
- 23 cm (9-inch) round baking pan: A springform pan works great for easy removal.
- Electric mixer: A hand mixer is perfect, but a whisk will do in a pinch.
- Mixing bowls: Use at least two—one for mixing and one for holding the batter.
- Spatula: A rubber spatula helps with leveling and folding ingredients.
- Parchment paper: Essential for easy removal; aluminum foil can be a substitute.
Variations
- Chocolate Swirl: Add melted dark chocolate to the batter for a rich, chocolatey twist. Swirl it in before baking for a marbled effect.
- Fruit-Infused: Mix in fresh berries or a fruit puree like raspberry or mango for a burst of flavor. This adds a refreshing touch to the creamy cheesecake.
- Gluten-Free: Substitute the all-purpose flour with almond flour or a gluten-free flour blend to make this dessert suitable for gluten-sensitive friends.
- Vegan Option: Use a vegan cream cheese alternative and replace eggs with flaxseed meal mixed with water for a plant-based version.
- Citrus Zest: Incorporate lemon or orange zest into the batter for a zesty kick that brightens the flavors beautifully.
Serving Suggestions
- Fresh Berries: Serve with a side of mixed berries for a pop of color and freshness.
- Coffee or Tea: Pair with a warm cup of coffee or herbal tea to complement the rich flavors.
- Presentation: Dust with powdered sugar or drizzle with caramel sauce for an elegant touch.
- Whipped Cream: A dollop of whipped cream adds a delightful creaminess to each slice.
FAQs about Tarta de Queso Quemada de San Sebastián
As you embark on your journey to create the perfect Tarta de Queso Quemada de San Sebastián, you might have a few questions. Don’t worry; I’ve got you covered! Here are some common queries that pop up when making this delightful cheesecake:
1. Can I make Tarta de Queso Quemada de San Sebastián ahead of time?
Absolutely! In fact, this cheesecake tastes even better after it has chilled in the fridge for a few hours or overnight. Just make sure to cover it well to keep it fresh. It’s a great make-ahead dessert for busy days!
2. What can I use instead of cream cheese?
If you’re looking for a substitute, you can try using mascarpone cheese for a similar creamy texture. For a lighter option, Greek yogurt can work, but it may alter the flavor slightly. Just keep in mind that the taste will differ from the traditional Tarta de Queso Quemada de San Sebastián.
3. How do I know when the cheesecake is done baking?
The key is to look for that beautiful golden-brown top! The center should still be slightly jiggly when you gently shake the pan. It will continue to set as it cools, so don’t worry if it seems a bit underbaked when you take it out.
4. Can I freeze Tarta de Queso Quemada de San Sebastián?
Yes, you can freeze this cheesecake! Just make sure it’s completely cooled and wrapped tightly in plastic wrap and then aluminum foil. It can be frozen for up to three months. When you’re ready to enjoy it, let it thaw in the fridge overnight.
5. What toppings go well with Tarta de Queso Quemada de San Sebastián?
There are so many delicious options! Fresh berries, a drizzle of caramel or chocolate sauce, or even a dollop of whipped cream can elevate your cheesecake. You can also serve it with a side of fruit compote for a refreshing contrast to the rich flavors.
Final Thoughts
Making a Tarta de Queso Quemada de San Sebastián is more than just baking; it’s about creating a moment of joy in your busy life. The creamy texture and caramelized top are sure to bring smiles to your family’s faces, making it a perfect dessert for any occasion. Whether you’re celebrating a special event or simply treating yourself after a long day, this cheesecake is a delightful way to indulge. So, roll up your sleeves, gather your ingredients, and let the magic happen in your kitchen. You deserve this sweet moment of happiness!
“` Print
Tarta de Queso Quemada de San Sebastián: ¡Descubre su Sabor!
- Total Time: 4 horas 5 minutos
- Yield: 8 porciones 1x
- Diet: Vegetarian
Description
Delicious San Sebastián burnt cheesecake with a creamy texture and a caramelized top.
Ingredients
- 600 g de queso crema
- 200 g de azúcar
- 4 huevos grandes
- 200 ml de nata para montar
- 1 cucharadita de extracto de vainilla
- 1 cucharada de harina de trigo
- Pizca de sal
Instructions
- Comienza precalentando el horno a 200°C y prepara un molde de 23 cm forrándolo con papel de hornear, dejando que sobresalga por los lados.
- En un bol grande, mezcla el queso crema con el azúcar hasta que la mezcla esté completamente homogénea y cremosa.
- Añade los huevos de uno en uno, asegurándote de mezclar bien después de cada adición para que se integren perfectamente.
- Incorpora la nata, el extracto de vainilla, la harina y la pizca de sal, batiendo hasta que todo esté bien combinado y sin grumos.
- Vierte la mezcla en el molde preparado y utiliza una espátula para nivelar la superficie.
- Hornea durante 40-45 minutos, vigilando que la parte superior adquiera un bonito color dorado, mientras que el centro debe permanecer ligeramente tembloroso.
- Una vez horneada, deja que la tarta se enfríe a temperatura ambiente antes de refrigerarla por al menos 4 horas.
- Para servir, desmolda con cuidado, retira el papel y disfruta de esta deliciosa tarta de queso, perfecta para cualquier ocasión.
Notes
- Se recomienda usar queso crema a temperatura ambiente para una mejor mezcla.
- La tarta puede ser refrigerada por más tiempo para un sabor más intenso.
- Se puede servir con frutas frescas o mermelada si se desea.
- Prep Time: 20 minutos
- Cook Time: 45 minutos
- Category: Postre
- Method: Horneado
- Cuisine: Española
Nutrition
- Serving Size: 1 porción
- Calories: 400
- Sugar: 30 g
- Sodium: 200 mg
- Fat: 30 g
- Saturated Fat: 15 g
- Unsaturated Fat: 10 g
- Trans Fat: 0 g
- Carbohydrates: 30 g
- Fiber: 0 g
- Protein: 6 g
- Cholesterol: 150 mg