
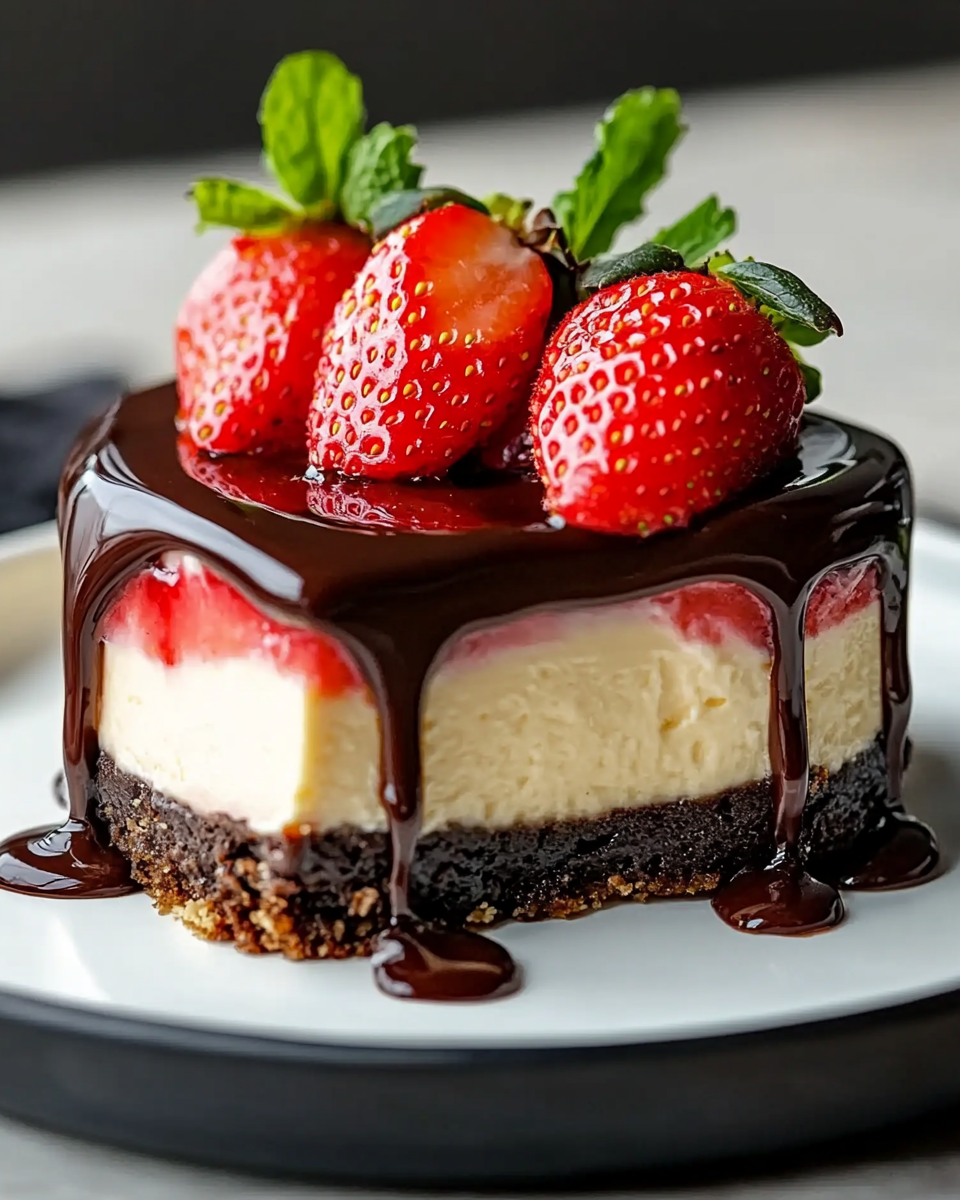
Introduction to Tarta de Queso de Fresa con Chocolate
Hey there, fellow busy bees! If you’re anything like me, juggling work, family, and a million other things, you know how precious time can be. That’s why I’m excited to share my go-to dessert: Tarta de Queso de Fresa con Chocolate. This delightful cheesecake is not just a treat for the taste buds; it’s a quick solution for those hectic days when you want to impress your loved ones without spending hours in the kitchen. Trust me, this recipe will have everyone asking for seconds, and you’ll feel like a superstar chef!
Why You’ll Love This Tarta de Queso de Fresa con Chocolate
This Tarta de Queso de Fresa con Chocolate is a dream come true for busy women like us! It’s incredibly easy to whip up, taking just a little over four hours from start to finish, including chilling time. The combination of creamy cheesecake, fresh strawberries, and rich chocolate creates a flavor explosion that will make your taste buds dance. Plus, it’s a showstopper for any gathering, making you the star of the dessert table!
Ingredients for Tarta de Queso de Fresa con Chocolate
Let’s dive into the delicious components that make up this Tarta de Queso de Fresa con Chocolate. Each ingredient plays a vital role in creating that creamy, dreamy dessert we all crave. Here’s what you’ll need:
- Galletas tipo digestive: These crunchy cookies form the perfect base for our cheesecake. They add a delightful texture and a hint of sweetness.
- Mantequilla derretida: This buttery goodness binds the cookie crust together, giving it that rich flavor we love.
- Queso crema: The star of the show! Cream cheese provides that luscious, creamy texture that makes cheesecake so irresistible.
- Azúcar: A little sweetness goes a long way in balancing the flavors. It enhances the creaminess of the cheese and complements the strawberries.
- Nata para montar: Also known as heavy cream, this ingredient adds richness and helps create a smooth filling that melts in your mouth.
- Huevos: Eggs are essential for binding the filling together and giving it that perfect, custardy texture.
- Extracto de vainilla: A splash of vanilla elevates the flavor profile, adding warmth and depth to the cheesecake.
- Fresas frescas: These juicy gems not only add a pop of color but also a refreshing sweetness that pairs beautifully with the chocolate.
- Chocolate negro: Rich and decadent, dark chocolate is drizzled over the strawberries, creating a delightful contrast to the creamy cheesecake.
- Chocolate blanco (opcional): If you want to get fancy, a drizzle of white chocolate adds a beautiful touch and a hint of sweetness.
For those of you who might be wondering, all the exact measurements for these ingredients are listed at the bottom of the article, ready for you to print out and take to the kitchen. Feel free to get creative with substitutions—like using graham crackers instead of digestive biscuits or opting for a dairy-free cream cheese if needed. The possibilities are endless!
How to Make Tarta de Queso de Fresa con Chocolate
Now that we have our ingredients ready, let’s get down to the fun part—making this Tarta de Queso de Fresa con Chocolate! I promise, it’s easier than you think. Just follow these simple steps, and you’ll have a stunning dessert that will wow your family and friends.
Step 1: Prepare the Crust
First things first, we need to create that delicious crust. Grab your digestive biscuits and toss them into a food processor. If you don’t have one, a good old-fashioned zip-top bag and a rolling pin will do the trick! Crush those cookies until they resemble fine crumbs—think sand, but tastier.
Next, melt your butter in the microwave or on the stove. Once it’s nice and gooey, mix it with the cookie crumbs until everything is well combined. It should look like wet sand. Now, press this mixture firmly into the bottom of a springform pan. Use the back of a measuring cup or your fingers to make sure it’s even. Pop it in the oven at 180°C (350°F) for about 10 minutes. This little bake will help the crust hold its shape. Let it cool completely before moving on!
Step 2: Make the Cheese Filling
While the crust is cooling, let’s whip up that creamy cheese filling! In a large mixing bowl, beat the cream cheese and sugar together until it’s smooth and fluffy. I like to use an electric mixer for this, but a whisk works too—just be prepared for a workout!
Once it’s creamy, add the eggs one at a time, mixing well after each addition. This is where the magic happens! Then, pour in the heavy cream and vanilla extract. Mix until everything is well blended and you have a luscious filling that looks like a cloud. It’s so good, you might be tempted to eat it straight from the bowl—just don’t forget to save some for the cake!
Step 3: Bake the Tarta
Now it’s time to bring it all together! Pour the cheese filling over your cooled crust, smoothing the top with a spatula. Pop it in the oven and bake for 40 to 45 minutes. You want the edges to be set, but the center should still have a slight jiggle. This is key for that creamy texture we all love!
Once it’s done, turn off the oven and crack the door open. Let the tarta cool in there for about an hour. This gentle cooling helps prevent cracks. After that, transfer it to the fridge and let it chill for at least four hours, or overnight if you can wait. Trust me, the longer it chills, the better it gets!
Step 4: Prepare the Chocolate-Dipped Strawberries
While your tarta is chilling, let’s get those chocolate-dipped strawberries ready! Start by melting the dark chocolate. You can do this in a double boiler or in the microwave—just be sure to stir it every 30 seconds to avoid burning.
Once melted, dip each fresh strawberry into the chocolate, making sure to coat it well. Place them on a sheet of parchment paper to cool and harden. If you’re feeling fancy, drizzle some melted white chocolate over the top for a beautiful finish. These strawberries will not only look gorgeous on your tarta but will also add a burst of flavor!
Step 5: Assemble and Chill
Finally, it’s time to assemble your masterpiece! Carefully remove the tarta from the springform pan. Place it on a serving platter and arrange your chocolate-dipped strawberries on top. You can get creative here—make a pretty pattern or just scatter them around for a more casual look.
For an extra touch, drizzle some melted white chocolate over the strawberries. It adds a lovely contrast and makes everything look even more tempting. Once you’ve decorated it to your heart’s content, pop it back in the fridge for a little while to set everything. And there you have it—your Tarta de Queso de Fresa con Chocolate is ready to impress!
Tips for Success
- Make sure your cream cheese is at room temperature for easy mixing.
- Don’t skip the chilling time; it’s crucial for the perfect texture.
- Use fresh strawberries for the best flavor, but frozen ones work in a pinch.
- For a smoother filling, sift the sugar before adding it to the cream cheese.
- Experiment with different chocolates for dipping—milk chocolate is a sweet alternative!
Equipment Needed
- Springform pan: Essential for easy removal of the tarta. If you don’t have one, a regular pie dish works too!
- Food processor: Great for crushing cookies. A zip-top bag and rolling pin can do the job just as well.
- Mixing bowls: You’ll need a couple for mixing the filling and melting chocolate.
- Electric mixer: Makes beating the cream cheese a breeze, but a whisk works fine if you’re up for a workout!
- Spatula: Perfect for smoothing the filling and decorating your tarta.
Variations
- Fruit Swap: Try using different fruits like raspberries, blueberries, or even mango for a tropical twist. Each fruit brings its own unique flavor!
- Chocolate Choices: If dark chocolate isn’t your thing, feel free to use milk chocolate or even white chocolate for dipping the strawberries. Each option offers a different sweetness level.
- Gluten-Free Option: Substitute the digestive biscuits with gluten-free cookies or almond flour for a gluten-free crust that everyone can enjoy.
- Vegan Version: Use a dairy-free cream cheese alternative and coconut cream instead of heavy cream. You can also replace eggs with flaxseed meal mixed with water for binding.
- Nutty Crust: Add crushed nuts like almonds or pecans to the crust mixture for an extra crunch and flavor boost.
Serving Suggestions
- Pair your Tarta de Queso de Fresa con Chocolate with a dollop of whipped cream for an extra touch of indulgence.
- Serve alongside a scoop of vanilla ice cream for a delightful contrast in temperature and texture.
- Complement with a refreshing glass of iced tea or a fruity mocktail to balance the richness.
- For a beautiful presentation, garnish with fresh mint leaves or a dusting of cocoa powder.
FAQs about Tarta de Queso de Fresa con Chocolate
1. Can I make Tarta de Queso de Fresa con Chocolate ahead of time?
Absolutely! In fact, making it a day in advance is a great idea. The flavors meld beautifully overnight, and the texture becomes even creamier. Just keep it covered in the fridge until you’re ready to serve.
2. What can I use instead of fresh strawberries?
If fresh strawberries aren’t available, frozen strawberries work just fine! Just make sure to thaw and drain them before dipping in chocolate. You can also try other fruits like raspberries or cherries for a different twist.
3. How do I store leftovers of Tarta de Queso de Fresa con Chocolate?
Store any leftovers in an airtight container in the fridge. It should stay fresh for about 3 to 4 days. Just be prepared for the family to keep sneaking bites!
4. Can I freeze Tarta de Queso de Fresa con Chocolate?
Yes, you can freeze it! Just make sure it’s well-wrapped in plastic wrap and then in aluminum foil. It can last up to 2 months in the freezer. Thaw it in the fridge overnight before serving.
5. What’s the best way to serve Tarta de Queso de Fresa con Chocolate?
Serve it chilled, straight from the fridge. A dollop of whipped cream or a scoop of vanilla ice cream on the side elevates the experience. And don’t forget to garnish with extra chocolate or fresh fruit for that wow factor!
Final Thoughts
Making Tarta de Queso de Fresa con Chocolate is more than just baking; it’s about creating sweet memories with your loved ones. The joy of slicing into that creamy cheesecake, revealing the vibrant strawberries and rich chocolate, is simply unmatched. Whether it’s a family gathering, a special occasion, or just a treat for yourself after a long week, this dessert brings smiles all around. Plus, it’s a reminder that even on our busiest days, we can whip up something truly special. So, roll up your sleeves, and let’s make some delicious memories together!
“` Print
Tarta de Queso de Fresa con Chocolate: Delicia Irresistible
- Total Time: 4 horas 25 minutos
- Yield: 8 porciones 1x
- Diet: Vegetarian
Description
Deliciosa tarta de queso con fresas y chocolate, perfecta para cualquier ocasión.
Ingredients
- 200 g de galletas tipo digestive
- 100 g de mantequilla derretida
- 400 g de queso crema
- 150 g de azúcar
- 200 ml de nata para montar
- 2 huevos
- 1 cucharadita de extracto de vainilla
- 250 g de fresas frescas, limpias y sin tallo
- 200 g de chocolate negro
- 50 g de chocolate blanco (opcional, para decorar)
Instructions
- Comienza triturando las galletas en un procesador hasta que queden como un polvo fino. Mezcla este polvo con la mantequilla derretida y presiona la mezcla en el fondo de un molde desmontable. Hornea la base a 180°C durante 10 minutos y deja enfriar completamente.
- En un tazón grande, bate el queso crema junto con el azúcar hasta que la mezcla esté suave y cremosa. Incorpora los huevos uno a uno, asegurándote de mezclar bien después de cada adición. Añade la nata y el extracto de vainilla, y mezcla hasta que todo esté homogéneo.
- Vierte la mezcla de queso sobre la base de galleta ya enfriada, alisando la superficie con una espátula. Hornea durante 40-45 minutos, o hasta que el centro esté firme pero aún un poco tembloroso. Apaga el horno y deja que la tarta se enfríe dentro del horno con la puerta entreabierta durante aproximadamente una hora. Después, refrigera por un mínimo de 4 horas o toda la noche.
- Mientras la tarta se enfría, derrite el chocolate negro utilizando el método de baño maría o en el microondas, removiendo cada poco tiempo hasta que esté completamente derretido. Sumerge las fresas en el chocolate derretido y colócalas sobre papel encerado para que se endurezcan.
- Cuando la tarta esté bien fría y firme, desmóldala con cuidado. Decora la parte superior con las fresas bañadas en chocolate. Si lo prefieres, derrite el chocolate blanco y rocíalo sobre las fresas para dar un toque especial.
- Sirve la tarta de queso bien fría y disfruta de esta exquisita combinación de sabores.
Notes
- Es recomendable dejar la tarta en la nevera durante toda la noche para obtener una mejor textura.
- Puedes usar fresas congeladas si no tienes fresas frescas disponibles.
- El chocolate blanco es opcional, pero añade un bonito contraste visual.
- Prep Time: 30 minutos
- Cook Time: 55 minutos
- Category: Postre
- Method: Horneado
- Cuisine: Española
Nutrition
- Serving Size: 1 porción
- Calories: 350
- Sugar: 25 g
- Sodium: 150 mg
- Fat: 22 g
- Saturated Fat: 12 g
- Unsaturated Fat: 8 g
- Trans Fat: 0 g
- Carbohydrates: 30 g
- Fiber: 2 g
- Protein: 5 g
- Cholesterol: 80 mg