
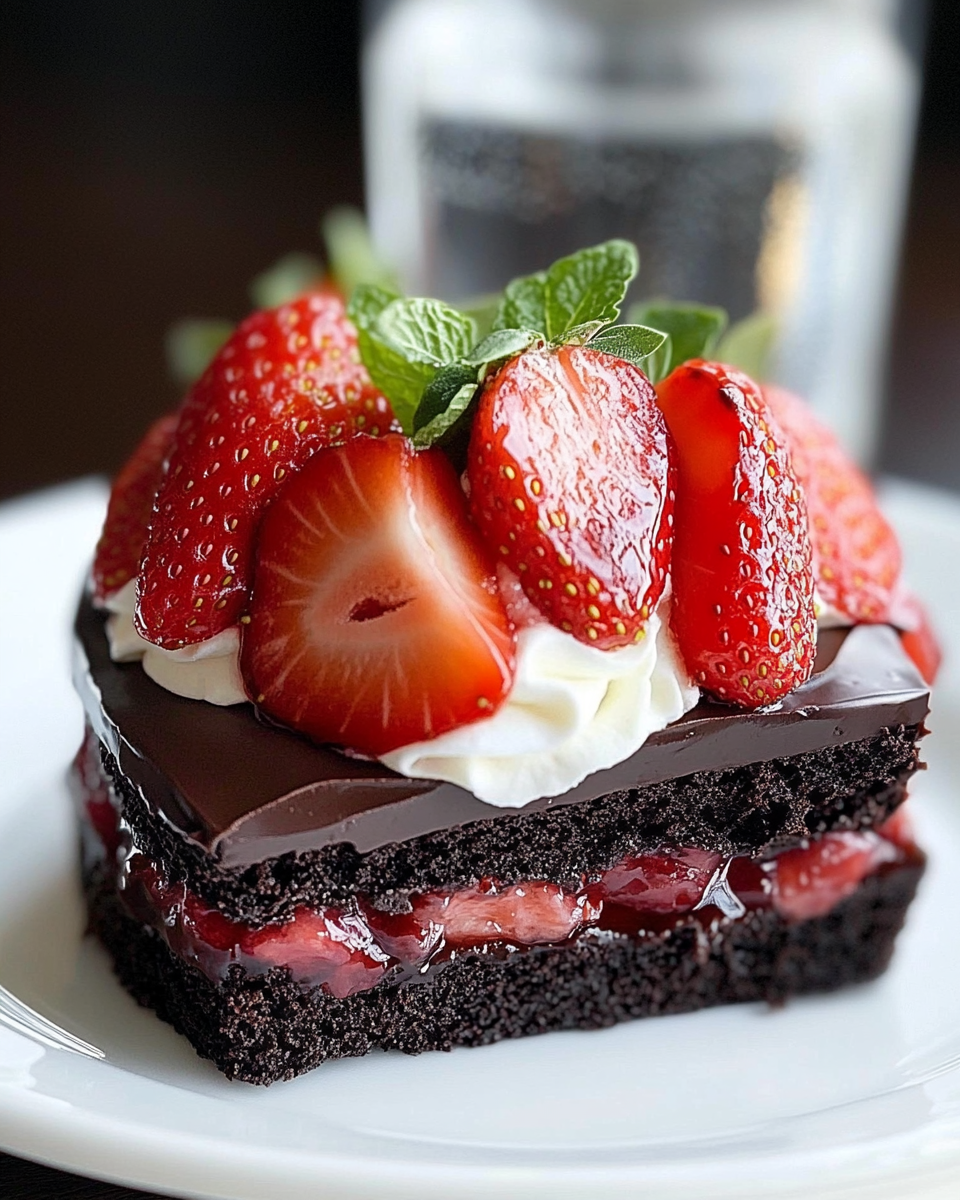
Introduction to Tarta de Fresas Cubiertas de Chocolate
¡Hola, amigas! If you’re anything like me, your days are a whirlwind of work, family, and a million little tasks that seem to multiply by the minute. That’s why I’m excited to share my recipe for Tarta de Fresas Cubiertas de Chocolate. This delightful dessert is not just a feast for the eyes; it’s a quick solution for those busy days when you want to impress your loved ones without spending hours in the kitchen. With its luscious layers of chocolate and fresh strawberries, it’s sure to bring smiles to your table and make you feel like a culinary superstar!
Why You’ll Love This Tarta de Fresas Cubiertas de Chocolate
Let’s be real—life can get hectic, and finding time to whip up something special can feel impossible. That’s where this Tarta de Fresas Cubiertas de Chocolate shines! It’s incredibly easy to make, requiring minimal effort while delivering maximum flavor. Plus, the combination of rich chocolate and fresh strawberries is simply irresistible. Whether it’s a family gathering or a cozy night in, this dessert is sure to impress without the stress!
Ingredients for Tarta de Fresas Cubiertas de Chocolate
Now, let’s dive into the delicious components that make up our Tarta de Fresas Cubiertas de Chocolate. Each ingredient plays a vital role in creating that perfect balance of flavors and textures. Here’s what you’ll need:
- Base de tarta de galleta: Puedes usar galletas tipo Digestive o graham. Esta base crujiente es la base perfecta para sostener toda esa deliciosa mezcla de chocolate y fresas.
- Chocolate negro: Este es el alma de la tarta. El chocolate negro aporta un sabor profundo y rico que complementa la dulzura de las fresas. Si prefieres un toque más dulce, ¡puedes optar por chocolate con leche!
- Fresas frescas: Asegúrate de elegir fresas jugosas y maduras. Son el toque fresco y frutal que contrasta maravillosamente con el chocolate. ¡No escatimes en la calidad!
- Crema para batir: Esta es la clave para lograr esa textura suave y cremosa. La crema batida le da a la tarta una ligereza que la hace irresistible.
- Azúcar en polvo: Un poco de azúcar en polvo endulza la crema y ayuda a estabilizarla. Si estás buscando una opción más saludable, puedes usar edulcorantes naturales.
- Esencia de vainilla: Este ingrediente añade un toque de calidez y profundidad al sabor. La vainilla y el chocolate son una combinación clásica que nunca falla.
- Pizca de sal: No subestimes el poder de la sal. Realza todos los sabores y hace que el chocolate brille aún más.
- Chocolate blanco (opcional): Si quieres darle un toque decorativo, derrite un poco de chocolate blanco para rociarlo sobre la tarta antes de servir. ¡Es un detalle que encantará a todos!
Recuerda, las cantidades exactas de cada ingrediente están al final del artículo, listas para que las imprimas y las lleves a la cocina. ¡Vamos a hacer magia en la cocina!
How to Make Tarta de Fresas Cubiertas de Chocolate
Now that we have our ingredients ready, let’s get to the fun part—making this Tarta de Fresas Cubiertas de Chocolate! I promise, it’s easier than you think. Just follow these simple steps, and you’ll have a stunning dessert that will wow your family and friends.
Step 1: Melt the Chocolate
First things first, we need to melt that rich chocolate. You can do this using a double boiler or simply pop it in the microwave. If you’re using the microwave, heat it in short bursts of 20 seconds, stirring in between to avoid burning. Once melted, let it cool slightly. This step is crucial because if the chocolate is too hot, it can ruin the whipped cream later. Trust me, I’ve learned this the hard way!
Step 2: Prepare the Whipped Cream
While the chocolate is cooling, grab a large mixing bowl and pour in the heavy cream. Using an electric mixer, whip the cream until it starts to thicken. Add the powdered sugar, vanilla extract, and a pinch of salt. Keep whipping until you reach soft peaks. This means when you lift the beaters, the cream should hold its shape but still be soft and fluffy. It’s like a cloud of deliciousness!
Step 3: Combine Chocolate and Cream
Now, it’s time to bring the chocolate and whipped cream together. Gently fold the melted chocolate into the whipped cream using a spatula. Be careful not to deflate the cream; we want to keep that light and airy texture. This is where the magic happens—the chocolate will create a luscious, creamy filling that’s simply irresistible!
Step 4: Assemble the Tart
Take your cookie crust and pour the chocolate-cream mixture into it. Use a spatula to smooth the top, making it as even as possible. This is your canvas, so take a moment to make it look pretty. Remember, we eat with our eyes first, right? Once it’s all smoothed out, it’s time for the strawberries!
Step 5: Add the Strawberries
Now comes the fun part—adding the strawberries! Place the fresh strawberries on top of the chocolate mixture, gently pressing them in so they’re nestled nicely. You can arrange them in a pattern or just scatter them around. Either way, they’ll add a pop of color and freshness to your tart. Plus, who can resist that juicy bite of strawberry with chocolate?
Step 6: Refrigerate
Once you’ve added the strawberries, it’s time to let the tart chill. Cover it with plastic wrap and pop it in the refrigerator for at least 4 hours. This step is essential for the tart to set properly. If you can, make it the night before. That way, you’ll have a delicious dessert ready to go when you need it!
Step 7: Decorate and Serve
After the tart has chilled and set, it’s time to add the finishing touches. If you want to get fancy, melt some white chocolate and drizzle it over the top for a beautiful decoration. Slice the tart into generous portions and serve it cold. Watch as your family’s eyes light up with delight! This Tarta de Fresas Cubiertas de Chocolate is not just a dessert; it’s a moment of joy that you’ve created with love.
Tips for Success
- Make sure your cream is cold before whipping for better volume.
- Use high-quality chocolate for the best flavor—trust me, it makes a difference!
- Don’t rush the chilling time; it’s crucial for the tart to set properly.
- Feel free to experiment with different fruits like raspberries or blueberries for a twist.
- For a gluten-free option, use gluten-free cookies for the crust.
Equipment Needed
- Mixing bowls: A large bowl for whipping cream and a smaller one for melting chocolate. Any size will do!
- Electric mixer: A hand mixer works great, but a whisk can do the job if you’re feeling strong!
- Spatula: Essential for folding and smoothing the mixture.
- Measuring cups and spoons: For accurate ingredient measurements.
- Refrigerator: To chill the tart until it’s perfectly set.
Variations
- Chocolate Options: Swap the dark chocolate for milk chocolate or even white chocolate if you prefer a sweeter flavor profile.
- Fruit Alternatives: Try using other fruits like raspberries, blueberries, or even sliced bananas for a different twist on the classic tart.
- Nutty Crunch: Add crushed nuts like almonds or hazelnuts to the crust for an extra crunch and flavor boost.
- Dairy-Free Version: Use coconut cream instead of heavy cream and dairy-free chocolate for a delicious vegan option.
- Flavor Infusions: Experiment with adding a splash of orange or almond extract to the chocolate mixture for a unique flavor twist.
Serving Suggestions
- Pair with Coffee: A cup of freshly brewed coffee or espresso complements the rich chocolate beautifully.
- Fresh Mint: Garnish with mint leaves for a pop of color and a refreshing taste.
- Whipped Cream: Serve with a dollop of extra whipped cream on the side for added indulgence.
- Fruit Salad: A light fruit salad can balance the richness of the tart.
- Presentation: Use a decorative cake stand to showcase your tart and impress your guests!
FAQs about Tarta de Fresas Cubiertas de Chocolate
As you embark on your journey to create this delightful Tarta de Fresas Cubiertas de Chocolate, you might have a few questions. Don’t worry; I’ve got you covered! Here are some common queries that pop up, along with my friendly advice.
1. Can I make the Tarta de Fresas Cubiertas de Chocolate ahead of time?
Absolutely! In fact, I recommend making it a day in advance. This allows the flavors to meld beautifully and ensures the tart is perfectly chilled when you’re ready to serve. Just keep it covered in the fridge, and you’ll be all set!
2. What can I substitute for heavy cream?
If you’re looking for a lighter option, you can use whipped coconut cream or a dairy-free alternative. Just make sure it’s suitable for whipping. The texture might be slightly different, but it will still taste delicious!
3. How do I store leftovers?
Store any leftover Tarta de Fresas Cubiertas de Chocolate in an airtight container in the refrigerator. It should stay fresh for about 3-4 days. Just be prepared for the family to sneak bites when they think you’re not looking!
4. Can I use frozen strawberries instead of fresh?
While fresh strawberries are ideal for this tart, you can use frozen ones in a pinch. Just make sure to thaw and drain them well to avoid excess moisture. They might not have the same crunch, but they’ll still add that fruity goodness!
5. What’s the best way to serve this tart?
Slice the tart into generous portions and serve it cold. You can add a dollop of whipped cream or a sprinkle of cocoa powder on top for an extra touch. Pair it with a cup of coffee or tea for a delightful dessert experience!
Final Thoughts
Creating this Tarta de Fresas Cubiertas de Chocolate is more than just baking; it’s about crafting moments of joy and connection with your loved ones. The delightful combination of rich chocolate and fresh strawberries brings a smile to everyone’s face, making it the perfect treat for any occasion. Whether you’re celebrating a special event or simply enjoying a cozy night in, this tart is sure to impress. So, roll up your sleeves, gather your ingredients, and let the magic happen in your kitchen. Trust me, the happiness it brings is worth every minute spent!
“` Print
Tarta de Fresas Cubiertas de Chocolate: ¡Delicia irresistible!
- Total Time: 4 horas 30 minutos
- Yield: 8 porciones 1x
- Diet: Vegetarian
Description
Deliciosa tarta de fresas cubiertas de chocolate, perfecta para cualquier ocasión.
Ingredients
- 1 base de tarta de galleta (puedes usar galletas tipo Digestive o graham)
- 200 g de chocolate negro
- 250 g de fresas frescas, limpias y sin tallo
- 300 ml de crema para batir
- 100 g de azúcar en polvo
- 1 cucharadita de esencia de vainilla
- 1 pizca de sal
- 50 g de chocolate blanco (opcional, para decorar)
Instructions
- Primero, prepara el chocolate negro derritiéndolo en un recipiente resistente al calor colocado sobre agua caliente o en el microondas, vigilando para que no se queme. Deja que se enfríe un poco antes de usarlo.
- En un bol grande, bate la crema para batir junto con el azúcar en polvo, la esencia de vainilla y la pizca de sal hasta que obtengas picos suaves.
- Agrega el chocolate derretido a la crema batida, mezclando con cuidado para mantener la ligereza de la mezcla.
- Vierte la mezcla de chocolate y crema sobre la base de galleta, alisando la parte superior con una espátula.
- Coloca las fresas sobre la mezcla de chocolate, empujándolas suavemente para que se integren bien.
- Refrigera la tarta durante un mínimo de 4 horas, o hasta que esté bien firme al tacto.
- Si lo prefieres, derrite el chocolate blanco y, una vez que la tarta esté lista, rocíalo sobre la parte superior para darle un toque decorativo.
- Corta en porciones y sirve fría, disfrutando de la deliciosa combinación de fresas y chocolate. ¡A disfrutar!
Notes
- Se puede usar chocolate con leche si prefieres un sabor más dulce.
- La tarta se puede preparar un día antes para que esté bien fría al momento de servir.
- Prep Time: 30 minutos
- Cook Time: 0 minutos
- Category: Postre
- Method: Refrigeración
- Cuisine: Mexicana
Nutrition
- Serving Size: 1 porción
- Calories: 350
- Sugar: 25 g
- Sodium: 50 mg
- Fat: 22 g
- Saturated Fat: 12 g
- Unsaturated Fat: 8 g
- Trans Fat: 0 g
- Carbohydrates: 30 g
- Fiber: 2 g
- Protein: 4 g
- Cholesterol: 30 mg