
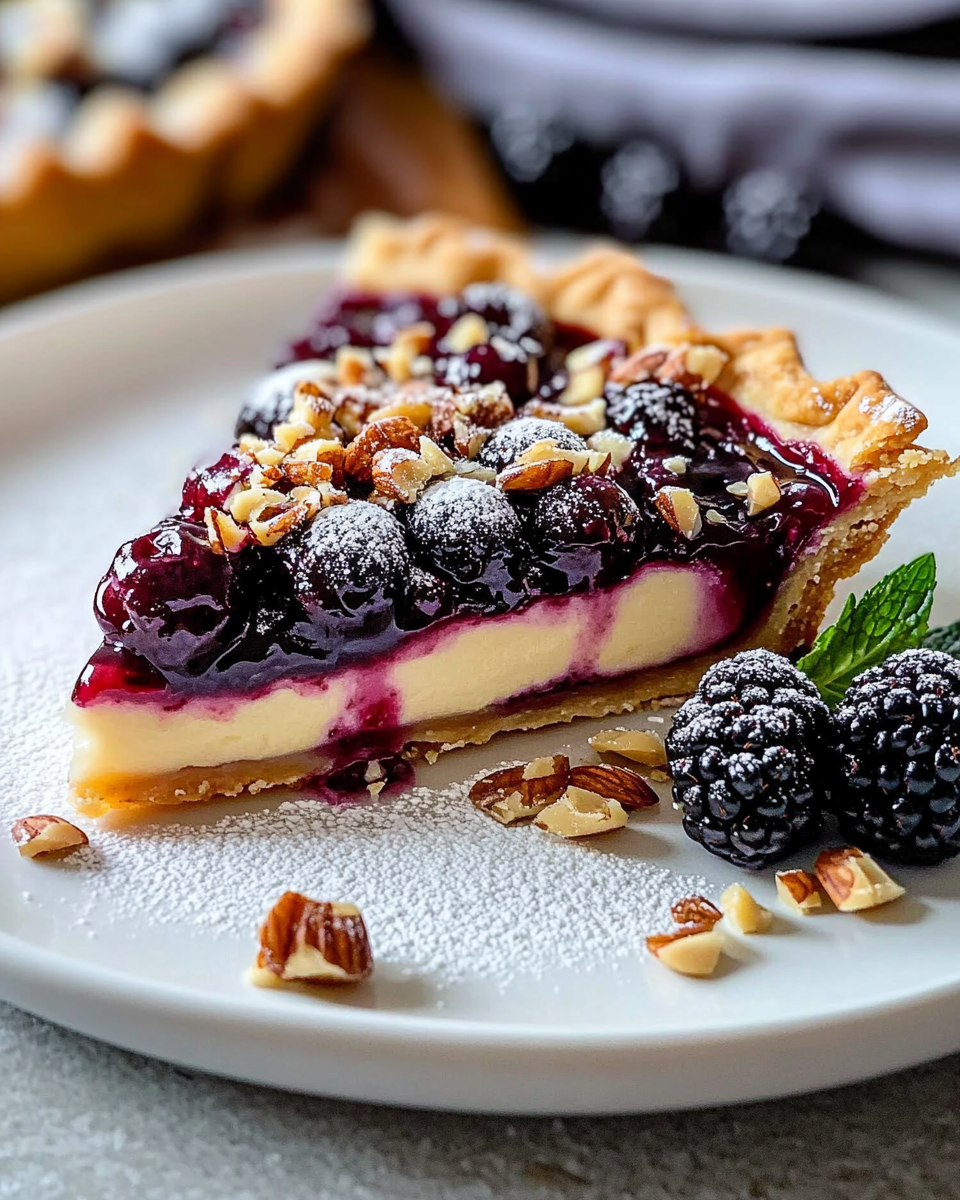
Introduction to Tarta de Moras, Vainilla y Avellanas
¡Hola, amigas! If you’re anything like me, your days are a whirlwind of work, family, and a million little tasks that seem to multiply like rabbits. That’s why I’m excited to share my recipe for Tarta de Moras, Vainilla y Avellanas. This delightful tart is not just a treat for the taste buds; it’s a quick solution for those busy days when you want to impress your loved ones without spending hours in the kitchen. With its creamy filling and the sweet-tart burst of blackberries, this dessert is sure to become a favorite in your home!
Why You’ll Love This Tarta de Moras, Vainilla y Avellanas
Let’s be honest—life can get hectic, and finding time to whip up something special can feel like a daunting task. That’s where this Tarta de Moras, Vainilla y Avellanas shines! It’s incredibly easy to make, requiring just a handful of ingredients and minimal prep time. Plus, the combination of creamy vanilla, crunchy hazelnuts, and juicy blackberries creates a flavor explosion that will have your family asking for seconds. Trust me, this tart is a game-changer!
Ingredients for Tarta de Moras, Vainilla y Avellanas
Now, let’s dive into the delicious components that make up this Tarta de Moras, Vainilla y Avellanas. Each ingredient plays a vital role in creating that perfect balance of flavors and textures. Here’s what you’ll need:
- Galletas de avellana molidas: These crushed hazelnut cookies form the base of our tart, giving it a nutty flavor and a delightful crunch. If you can’t find hazelnut cookies, feel free to substitute with graham crackers or any other cookie you love!
- Mantequilla derretida: This melted butter binds the cookie crumbs together, creating a sturdy crust. It also adds richness to the base. Make sure it’s warm but not bubbling when you mix it in.
- Moras frescas: Fresh blackberries are the star of this tart! Their sweet-tart flavor complements the creamy filling beautifully. If blackberries aren’t in season, you can swap them for raspberries or blueberries for a similar effect.
- Queso crema: Cream cheese gives the filling its luscious, creamy texture. If you’re looking for a lighter option, ricotta cheese can be a great substitute, offering a different but equally delightful taste.
- Azúcar moreno: Brown sugar adds a hint of caramel flavor and moisture to the filling. If you’re out of brown sugar, you can use granulated sugar, but the taste will be slightly different.
- Esencia de vainilla: This vanilla extract enhances the overall flavor, making it more aromatic and delicious. Always opt for pure vanilla extract if you can; it makes a world of difference!
- Huevos grandes: Eggs are essential for binding the filling together and giving it structure. They also contribute to the creamy texture. Make sure they’re at room temperature for the best results.
- Avellanas tostadas y picadas: Chopped toasted hazelnuts add a lovely crunch and nutty flavor to the filling. If you’re not a fan of hazelnuts, feel free to use walnuts or pecans instead.
- Pizca de sal: A pinch of salt balances the sweetness and enhances all the flavors in the tart. Don’t skip this step; it’s a small but mighty ingredient!
For exact measurements, you can find them at the bottom of the article, ready for printing. Happy baking!
How to Make Tarta de Moras, Vainilla y Avellanas
Now that we have all our ingredients ready, let’s get down to the fun part—making this scrumptious Tarta de Moras, Vainilla y Avellanas! Follow these simple steps, and you’ll have a delightful dessert that will impress everyone at the table.
Step 1: Prepare the Base
First things first, we need to create that delicious crust. In a large bowl, combine the crushed hazelnut cookies with the melted butter. Mix them together until the crumbs are fully coated and the mixture resembles wet sand. This is where the magic begins!
Next, take a tart pan and press the cookie mixture firmly into the bottom and up the sides. You want it to be compact, so don’t be shy—use the back of a measuring cup or your fingers to really pack it in. Once it’s nice and even, pop it in a preheated oven at 180°C (350°F) for about 10 minutes. This will help set the crust and give it a lovely golden color. After baking, let it cool completely before adding the filling. Trust me, this step is crucial for a perfect tart!
Step 2: Make the Cream Cheese Filling
While the crust is cooling, let’s whip up that creamy filling! In a separate bowl, beat the cream cheese until it’s smooth and creamy. I like to use an electric mixer for this, but a whisk works just fine if you’re feeling strong! Gradually add the brown sugar and vanilla extract, mixing until everything is well combined.
Now, it’s time to add the eggs. Crack them in one at a time, mixing well after each addition. This helps to create a silky texture that will melt in your mouth. Make sure there are no lumps—smooth is the name of the game here!
Step 3: Add Berries and Nuts
Here comes the fun part! Gently fold in the fresh blackberries and the chopped hazelnuts into the cream cheese mixture. Use a spatula and be careful not to crush the berries too much; we want those beautiful bursts of flavor in every bite. The hazelnuts will add a delightful crunch, making this tart even more irresistible!
Step 4: Assemble and Bake
Now that our filling is ready, it’s time to bring everything together. Pour the cream cheese mixture over the cooled crust, spreading it evenly with a spatula. Make sure the top is nice and level; this will help it bake evenly. Pop the tart back into the oven and bake for about 30 to 35 minutes. You’ll know it’s done when the center is set and slightly golden. The aroma wafting through your kitchen will be heavenly!
Step 5: Cool and Serve
Once the tart is out of the oven, let it cool at room temperature for a bit. Then, transfer it to the fridge and chill for at least 2 hours. This step is essential for the flavors to meld together and for the tart to set properly. When you’re ready to serve, feel free to decorate the top with some fresh blackberries and a sprinkle of whole hazelnuts for that extra touch. Slice it up, and watch your family’s eyes light up with delight!
Tips for Success
- Make sure your cream cheese is at room temperature for easy mixing.
- Don’t skip cooling the crust; it prevents a soggy bottom!
- Use fresh, ripe blackberries for the best flavor.
- For a smoother filling, blend the cream cheese thoroughly before adding other ingredients.
- Chill the tart overnight for even better flavor development.
Equipment Needed
- Tart pan: A standard 9-inch tart pan works best, but a pie dish can be a great alternative.
- Mixing bowls: Use a large bowl for the crust and a medium bowl for the filling.
- Electric mixer or whisk: An electric mixer makes it easier, but a whisk will do the job just fine.
- Spatula: A rubber spatula is perfect for folding in ingredients and leveling the filling.
- Measuring cups and spoons: Essential for accurate ingredient measurements.
Variations
- Frutos Rojos Mixtos: Si no tienes moras a mano, prueba con una mezcla de fresas, frambuesas y arándanos. ¡La combinación de sabores será igualmente deliciosa!
- Sin Gluten: Para una versión sin gluten, utiliza galletas de avellana sin gluten o galletas de arroz como base. Asegúrate de que todos los ingredientes sean certificados sin gluten.
- Vegana: Sustituye el queso crema por un queso crema vegano y los huevos por un sustituto de huevo a base de plantas, como el puré de plátano o el yogur de soya.
- Chocolate: Agrega trocitos de chocolate negro a la mezcla de queso crema para un toque extra de indulgencia. ¡El chocolate y las moras son una combinación ganadora!
- Ralladura de Limón: Añade un poco de ralladura de limón a la mezcla de queso crema para un toque cítrico refrescante que realzará los sabores de la tarta.
Serving Suggestions
- Helado de Vainilla: Sirve la tarta con una bola de helado de vainilla para un contraste cremoso y refrescante.
- Crema Batida: Un poco de crema batida en la parte superior añade un toque ligero y aireado.
- Té o Café: Acompaña con una taza de té o café para un postre perfecto después de la cena.
- Frutas Frescas: Decora con más moras o frutas de temporada para un toque colorido y fresco.
FAQs about Tarta de Moras, Vainilla y Avellanas
¿Puedo usar otros tipos de frutas en lugar de moras?
¡Claro que sí! Si las moras no están disponibles o si simplemente quieres variar un poco, puedes usar frambuesas, arándanos o incluso fresas. Cada fruta aportará su propio sabor único, así que siéntete libre de experimentar.
¿Es posible hacer la Tarta de Moras, Vainilla y Avellanas con anticipación?
Definitivamente. De hecho, esta tarta sabe aún mejor después de un día en el refrigerador, ya que los sabores se mezclan y se intensifican. Puedes prepararla un día antes de servirla, lo que la convierte en una opción perfecta para eventos o cenas familiares.
¿Puedo sustituir el queso crema por otro tipo de queso?
Sí, puedes usar ricotta si prefieres una textura más ligera. También hay opciones de queso crema vegano disponibles en el mercado que funcionan bien si buscas una alternativa sin lácteos. Solo asegúrate de que la textura sea cremosa para que la tarta mantenga su forma.
¿Cuánto tiempo se puede conservar la tarta en el refrigerador?
La Tarta de Moras, Vainilla y Avellanas se puede conservar en el refrigerador por hasta 4 días. Asegúrate de cubrirla bien para que no absorba olores de otros alimentos. ¡Pero te advierto, es tan deliciosa que probablemente no durará tanto!
¿Puedo congelar la tarta?
Sí, puedes congelar la tarta, pero es mejor hacerlo antes de decorarla. Envuelve bien la tarta en papel film y luego en papel de aluminio. Cuando estés lista para disfrutarla, déjala descongelar en el refrigerador durante la noche. ¡Así podrás disfrutar de esta delicia en cualquier momento!
Final Thoughts
Making a Tarta de Moras, Vainilla y Avellanas is more than just baking; it’s about creating sweet memories with your loved ones. The joy of pulling a beautifully baked tart from the oven, the aroma filling your kitchen, and the smiles on your family’s faces as they take that first bite—priceless! This recipe is a reminder that even on the busiest days, we can carve out a little time for something special. So, gather your ingredients, roll up your sleeves, and let this delightful tart bring a touch of sweetness to your life!
“` Print
Tarta de Moras, Vainilla y Avellanas: ¡Delicia Casera!
- Total Time: 2 horas y 5 minutos
- Yield: 8 porciones 1x
- Diet: Vegetarian
Description
Deliciosa tarta de moras, vainilla y avellanas, perfecta para cualquier ocasión.
Ingredients
- 200 g de galletas de avellana molidas
- 100 g de mantequilla derretida
- 300 g de moras frescas
- 250 g de queso crema
- 100 g de azúcar moreno
- 2 cucharaditas de esencia de vainilla
- 3 huevos grandes
- 50 g de avellanas tostadas y picadas
- 1 pizca de sal
Instructions
- Comienza precalentando el horno a 180°C. En un bol grande, combina las galletas molidas con la mantequilla derretida hasta que se integren bien. Distribuye esta mezcla en el fondo de un molde para tartas, presionando firmemente para formar una base compacta. Hornea durante 10 minutos y luego retira para que se enfríe.
- En un recipiente aparte, bate el queso crema junto con el azúcar moreno y la esencia de vainilla hasta que la mezcla esté suave y cremosa. Agrega los huevos de uno en uno, asegurándote de mezclar bien después de cada adición.
- Añade las moras frescas y las avellanas picadas a la mezcla de queso crema, mezclando suavemente para que se distribuyan de manera uniforme.
- Vierte la mezcla de queso crema sobre la base de galleta ya enfriada, alisando la parte superior con una espátula para que quede nivelada.
- Hornea la tarta durante 30 a 35 minutos, o hasta que el centro esté firme y ligeramente dorado. Una vez horneada, deja enfriar a temperatura ambiente antes de refrigerar por un mínimo de 2 horas.
- Al momento de servir, decora la tarta con moras frescas y algunas avellanas enteras si lo prefieres. ¡Disfruta de este exquisito postre!
Notes
- Se puede sustituir el queso crema por un queso ricotta para una textura diferente.
- Las moras pueden ser reemplazadas por otros frutos rojos si se desea.
- Para un toque extra, se puede añadir un poco de ralladura de limón a la mezcla de queso crema.
- Prep Time: 20 minutos
- Cook Time: 45 minutos
- Category: Postre
- Method: Horneado
- Cuisine: Internacional
Nutrition
- Serving Size: 1 porción
- Calories: 320
- Sugar: 15 g
- Sodium: 150 mg
- Fat: 22 g
- Saturated Fat: 10 g
- Unsaturated Fat: 8 g
- Trans Fat: 0 g
- Carbohydrates: 30 g
- Fiber: 3 g
- Protein: 5 g
- Cholesterol: 80 mg