
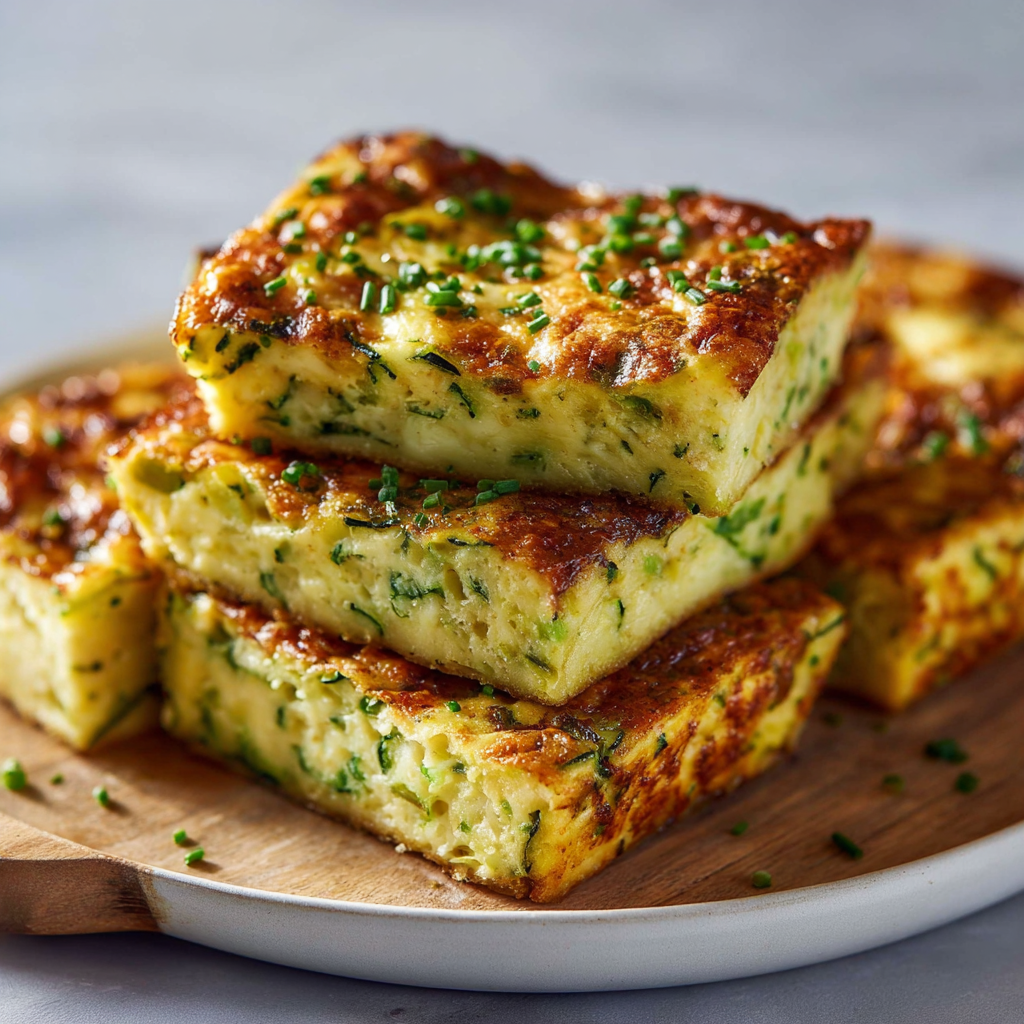
Introduction to Tarta de Calabacín y Queso
Hey there, fellow home cooks! If you’re anything like me, juggling work, family, and a million other responsibilities can feel like a circus act. That’s why I’m excited to share my go-to recipe for Tarta de Calabacín y Queso. This delightful dish is not only easy to whip up, but it’s also a fantastic way to sneak in some veggies without anyone batting an eye. Whether you need a quick dinner solution or a dish to impress your loved ones at a gathering, this tarta is your new best friend. Let’s dive in!
Why You’ll Love This Tarta de Calabacín y Queso
This Tarta de Calabacín y Queso is a lifesaver for busy days! It comes together in just about 50 minutes, making it perfect for those evenings when time is tight. Plus, it’s packed with flavor and can be served warm or at room temperature, so you can make it ahead of time. Your family will love the cheesy goodness, and you’ll love how easy it is to prepare!
Ingredients for Tarta de Calabacín y Queso
Let’s gather our ingredients for this scrumptious Tarta de Calabacín y Queso. Don’t worry; it’s a simple list, and I promise you’ll find everything at your local grocery store. Here’s what you’ll need:
- Calabacines medianos: These zucchini are the star of the show! They add moisture and a subtle flavor that pairs beautifully with cheese.
- Queso mozzarella rallado: This cheese melts like a dream, giving the tarta that gooey, cheesy goodness we all crave.
- Queso parmesano rallado: A sprinkle of this sharp cheese adds a delightful depth of flavor. It’s like the cherry on top of your cheesy creation!
- Huevos: These little wonders bind everything together, ensuring your tarta holds its shape while baking.
- Harina de trigo: This is the backbone of your tarta, providing structure. You can use whole wheat flour for a healthier twist!
- Leche: A splash of milk keeps the mixture creamy and helps everything blend smoothly.
- Aceite de oliva: This adds richness and flavor. Plus, it’s a healthier fat option! You can substitute it with melted butter if you prefer.
- Polvo de hornear: This is your secret weapon for a fluffy tarta. It helps it rise beautifully in the oven.
- Sal y pimienta: These are essential for seasoning. Don’t skip them; they elevate the flavors!
- Cebolla picada: Sautéing onions brings out their sweetness, adding a lovely aroma and taste to your dish.
- Ajo picado: A little garlic goes a long way in enhancing the overall flavor profile. It’s like a warm hug for your taste buds!
- Perejil fresco picado: This is optional but highly recommended for a fresh, vibrant finish. It adds a pop of color and flavor!
For exact measurements, check the bottom of the article where you can find everything listed for easy printing. Now that we have our ingredients ready, let’s get cooking!
How to Make Tarta de Calabacín y Queso
Now that we have our ingredients ready, let’s roll up our sleeves and get cooking! Making this Tarta de Calabacín y Queso is a breeze, and I promise you’ll feel like a kitchen superstar by the end. Follow these simple steps, and you’ll have a delicious dish that your family will rave about!
Step 1: Preheat the Oven
First things first, let’s get that oven preheating to 180°C (350°F). Preheating is crucial because it ensures that your tarta cooks evenly. While the oven warms up, grab a round tart pan and grease it with a bit of olive oil or cooking spray. This will help your tarta slide out easily once it’s baked. Trust me, you don’t want to be wrestling with a stuck tarta!
Step 2: Sauté the Vegetables
Next, let’s sauté our veggies! In a skillet, heat a splash of olive oil over medium heat. Toss in the chopped onion and minced garlic, stirring them around until they’re golden and fragrant—about 3-4 minutes. This step is like giving your tarta a flavor boost! Once the onions are soft, add the grated zucchini. Cook for another 3-5 minutes until the zucchini has released some of its moisture. This helps prevent your tarta from becoming soggy. Once done, remove the skillet from heat and let it cool for a few minutes.
Step 3: Prepare the Egg Mixture
In a large mixing bowl, crack the eggs and whisk them until they’re frothy. Then, pour in the milk and olive oil, mixing until everything is well combined. This mixture is the glue that holds your tarta together, so make sure it’s smooth and creamy. If you’re feeling adventurous, you can even add a pinch of nutmeg for a little extra warmth!
Step 4: Combine Dry Ingredients
Now, let’s tackle the dry ingredients. In another bowl, combine the flour, baking powder, and both cheeses—mozzarella and parmesan. Mixing these together first helps distribute the baking powder evenly, ensuring your tarta rises beautifully. Plus, who doesn’t love a cheesy tarta? It’s like a warm hug for your taste buds!
Step 5: Mix Everything Together
Time to bring it all together! Gradually add the dry mixture to the egg mixture, stirring gently until just combined. Then, fold in the sautéed vegetables. Be careful not to overmix; we want a tender tarta, not a tough one! Season with salt and pepper to taste. This is your chance to adjust the flavors, so don’t be shy!
Step 6: Bake the Tarta
Pour the mixture into your prepared tart pan, smoothing the top with a spatula. Pop it in the preheated oven and bake for 30-35 minutes. You’ll know it’s done when the top is golden brown and a toothpick inserted in the center comes out clean. Once baked, let it cool for about 10 minutes before slicing. This cooling time helps the tarta set, making it easier to cut. Serve it warm or at room temperature, and don’t forget to sprinkle some fresh parsley on top for that extra pop of color!
Tips for Success
- Make sure to squeeze out excess moisture from the grated zucchini to avoid a soggy tarta.
- Feel free to experiment with different cheeses like feta or goat cheese for a unique twist!
- For added flavor, try incorporating herbs like thyme or oregano into the mixture.
- Let the tarta cool slightly before slicing to ensure clean cuts.
- Store leftovers in an airtight container in the fridge for up to three days.
Equipment Needed
- Tart pan: A round tart pan is ideal, but a pie dish works too!
- Skillet: Any non-stick skillet will do for sautéing the veggies.
- Mixing bowls: Use a large bowl for the egg mixture and a smaller one for dry ingredients.
- Whisk: A whisk is great for mixing, but a fork can work in a pinch!
- Spatula: A rubber spatula helps in folding and smoothing the mixture.
Variations
- Herb-Infused: Add fresh herbs like basil, thyme, or dill to the mixture for an aromatic twist.
- Cheese Lovers: Swap out mozzarella for gouda or add a layer of feta cheese for a tangy flavor.
- Veggie Boost: Incorporate other vegetables like bell peppers, spinach, or mushrooms for added nutrition and color.
- Gluten-Free: Use a gluten-free flour blend to make this tarta suitable for those with gluten sensitivities.
- Spicy Kick: Add a pinch of red pepper flakes or diced jalapeños for a spicy version that packs a punch!
Serving Suggestions
- Pair your Tarta de Calabacín y Queso with a fresh green salad drizzled with lemon vinaigrette for a light meal.
- Serve it alongside a chilled glass of white wine or sparkling water with a slice of lemon.
- For a beautiful presentation, garnish with extra parsley and serve on a colorful platter.
FAQs about Tarta de Calabacín y Queso
As you embark on your culinary adventure with Tarta de Calabacín y Queso, you might have a few questions. Don’t worry; I’ve got you covered! Here are some common queries I’ve encountered, along with helpful answers to guide you along the way.
1. Can I make Tarta de Calabacín y Queso ahead of time?
Absolutely! This tarta is perfect for meal prep. You can prepare it a day in advance and store it in the fridge. Just reheat it in the oven for a few minutes before serving. It tastes just as delicious, if not better, the next day!
2. What can I serve with Tarta de Calabacín y Queso?
This tarta pairs wonderfully with a light salad or some roasted vegetables. You can also serve it with a dollop of yogurt or a tangy sauce for an extra flavor boost. It’s versatile enough to be a main dish or a side!
3. Can I freeze leftovers of Tarta de Calabacín y Queso?
Yes, you can! Just make sure to let it cool completely before wrapping it tightly in plastic wrap and then in aluminum foil. It can be frozen for up to three months. When you’re ready to enjoy it again, thaw it in the fridge overnight and reheat in the oven.
4. What if my family doesn’t like zucchini?
No problem! You can substitute zucchini with other vegetables like grated carrots, spinach, or even finely chopped broccoli. Just make sure to adjust the cooking time if you’re using different veggies, as some may require more or less time to cook.
5. Is Tarta de Calabacín y Queso suitable for a vegetarian diet?
Yes, indeed! This tarta is a fantastic vegetarian option, packed with nutrients and flavor. It’s a great way to incorporate more vegetables into your meals without sacrificing taste. Enjoy it guilt-free!
Final Thoughts
Making Tarta de Calabacín y Queso is more than just preparing a meal; it’s about creating a moment of joy in the kitchen. This recipe brings together simple ingredients and transforms them into a comforting dish that warms the heart and satisfies the taste buds. Whether you’re serving it for a family dinner or enjoying a slice solo with a cup of tea, it’s bound to bring smiles all around. So, roll up your sleeves, embrace the process, and let this delightful tarta become a cherished part of your culinary repertoire. Happy cooking!
“` Print
Tarta de Calabacín y Queso: Deliciosa y fácil de hacer
- Total Time: 50 minutos
- Yield: 8 porciones 1x
- Diet: Vegetarian
Description
Deliciosa tarta de calabacín y queso, fácil de hacer y perfecta para cualquier ocasión.
Ingredients
- 2 calabacines medianos, rallados
- 1 taza de queso mozzarella rallado
- 1/2 taza de queso parmesano rallado
- 4 huevos
- 1 taza de harina de trigo
- 1/2 taza de leche
- 1/4 de taza de aceite de oliva
- 1 cucharadita de polvo de hornear
- Sal y pimienta al gusto
- 1/2 cebolla picada
- 1 diente de ajo picado
- Perejil fresco picado para decorar
Instructions
- Precalienta el horno a 180°C y engrasa un molde para tarta.
- En un sartén, calienta un poco de aceite de oliva y sofríe la cebolla y el ajo hasta que estén dorados. Agrega los calabacines rallados y cocina por unos minutos hasta que suelten su agua. Retira del fuego y deja enfriar.
- En un bol grande, bate los huevos y añade la leche y el aceite de oliva. Mezcla bien.
- Incorpora la harina, el polvo de hornear, el queso mozzarella y el queso parmesano. Mezcla hasta obtener una masa homogénea.
- Agrega los calabacines enfriados a la mezcla y sazona con sal y pimienta. Mezcla bien.
- Vierte la mezcla en el molde preparado y alisa la superficie.
- Hornea durante 30-35 minutos o hasta que la tarta esté dorada y firme al tacto.
- Deja enfriar un poco antes de cortar en porciones y decora con perejil fresco picado. ¡Disfruta!
Notes
- Se puede servir caliente o a temperatura ambiente.
- Ideal como plato principal o acompañamiento.
- Se puede añadir otros vegetales al gusto.
- Prep Time: 15 minutos
- Cook Time: 35 minutos
- Category: Plato principal
- Method: Horneado
- Cuisine: Mediterránea
Nutrition
- Serving Size: 1 porción
- Calories: 250
- Sugar: 3g
- Sodium: 300mg
- Fat: 15g
- Saturated Fat: 4g
- Unsaturated Fat: 10g
- Trans Fat: 0g
- Carbohydrates: 20g
- Fiber: 2g
- Protein: 10g
- Cholesterol: 150mg