
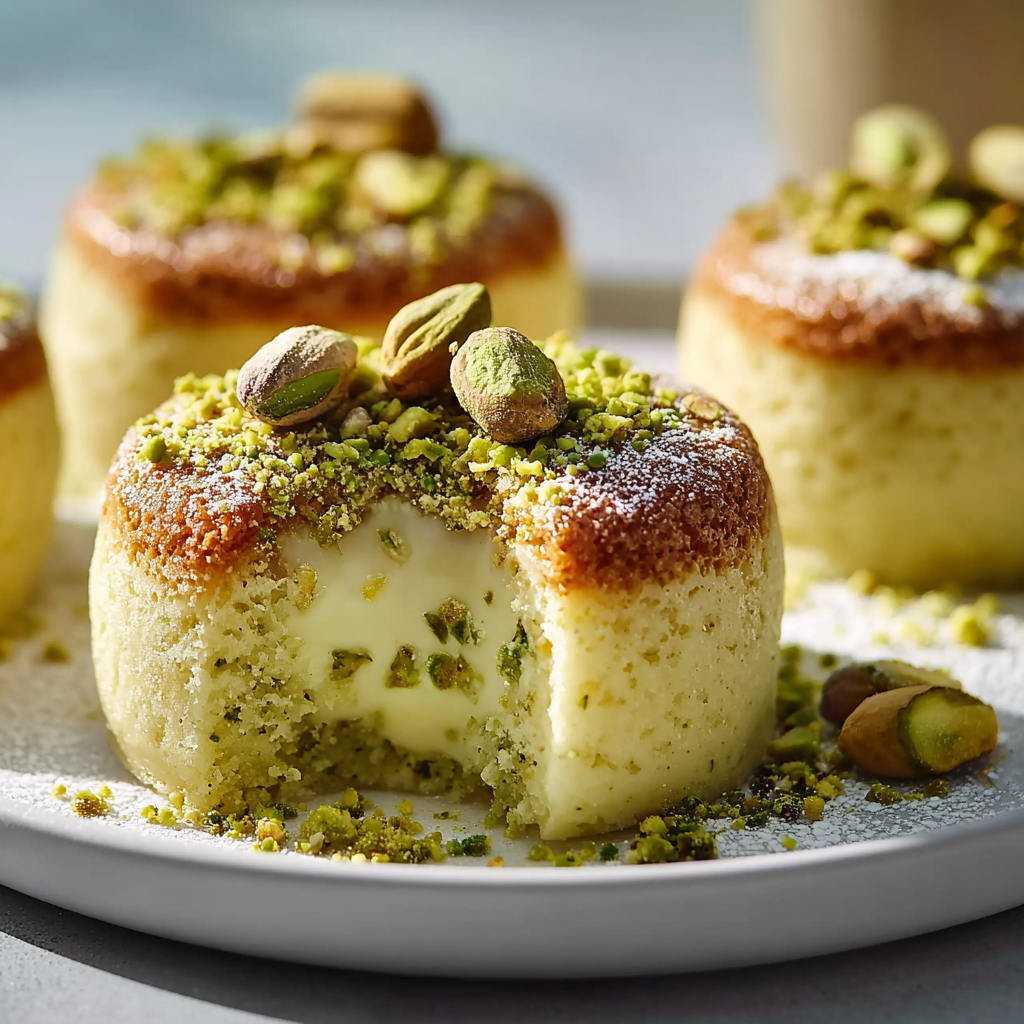
Introduction to Mi-Cuits de Pistacho y Chocolate Blanco
Hola, amigas! If you’re anything like me, your days can feel like a whirlwind of work, family, and endless to-do lists. That’s why I’m excited to share my recipe for Mi-Cuits de Pistacho y Chocolate Blanco. This delightful dessert is not just a treat; it’s a quick solution for those busy evenings when you want to impress your loved ones without spending hours in the kitchen. Imagine the joy on their faces as they savor the creamy white chocolate paired with the crunch of pistachios. Trust me, this recipe is a game-changer!
Why You’ll Love This Mi-Cuits de Pistacho y Chocolate Blanco
Let’s be real: life is busy, and finding time to whip up something special can feel impossible. That’s where these Mi-Cuits de Pistacho y Chocolate Blanco come in! They’re quick to prepare, taking just about 15 minutes of your time. Plus, the combination of rich white chocolate and crunchy pistachios creates a flavor explosion that will have your family begging for seconds. It’s a dessert that’s as easy as it is delicious!
Ingredients for Mi-Cuits de Pistacho y Chocolate Blanco
Now, let’s dive into the delicious components that make up our Mi-Cuits de Pistacho y Chocolate Blanco. Each ingredient plays a vital role in creating that perfect balance of flavors and textures. Here’s what you’ll need:
- Pistachos sin cáscara: These little green gems add a delightful crunch and a nutty flavor. You can find them in most grocery stores, or if you’re feeling adventurous, try toasting them lightly for an extra depth of flavor.
- Chocolate blanco: The star of the show! Its creamy sweetness pairs beautifully with the pistachios. Look for high-quality chocolate for the best results—trust me, it makes a difference!
- Mantequilla: Butter brings richness and moisture to our Mi-Cuits. I always opt for unsalted butter, as it allows me to control the saltiness of the dessert.
- Huevos grandes: Eggs are essential for binding the ingredients together and giving the Mi-Cuits their lovely structure. Fresh eggs will yield the best results, so check your fridge!
- Azúcar moreno: This adds a hint of caramel flavor and moisture. If you’re out of brown sugar, you can substitute it with white sugar, but the taste will be slightly different.
- Harina de trigo: Flour is the backbone of many baked goods, providing structure. You can use all-purpose flour, but if you’re looking for a gluten-free option, almond flour works well too!
- Sal marina: Just a pinch enhances all the flavors. It’s amazing how a little salt can elevate a sweet dish!
- Pistachos picados (para decorar): These are for that final touch! They not only look pretty but also add an extra crunch on top. Feel free to sprinkle them generously!
For exact measurements, check the bottom of the article where you can find everything listed for easy printing. Now that we have our ingredients ready, let’s get cooking!
How to Make Mi-Cuits de Pistacho y Chocolate Blanco
Now that we have our ingredients ready, let’s get into the fun part—making these delightful Mi-Cuits de Pistacho y Chocolate Blanco! Follow these simple steps, and you’ll have a dessert that’s sure to impress. Trust me, it’s easier than you think!
Step 1: Preheat the Oven and Prepare Molds
First things first, preheat your oven to 180°C (350°F). This step is crucial because it ensures that your Mi-Cuits bake evenly. While the oven is warming up, grab your individual molds. I love using silicone molds for this recipe because they make it super easy to pop the Mi-Cuits out once they’re baked. Just grease them lightly with some butter to prevent sticking. Trust me, you don’t want to lose any of that deliciousness!
Step 2: Melt Chocolate and Butter
Next, let’s melt the chocolate and butter together. In a small saucepan, combine the butter and white chocolate over low heat. Stir gently as they melt, making sure not to let them burn. This is where patience pays off! You want a smooth, creamy mixture that’s perfectly blended. Once melted, remove it from the heat and let it cool slightly. This step is key to avoid scrambling the eggs later!
Step 3: Beat Eggs and Sugar
In a separate bowl, crack those fresh eggs and add the brown sugar. Using a whisk or an electric mixer, beat them together until the mixture becomes light and fluffy. You’re looking for a pale color and a texture that’s almost airy. This step is important because it helps to incorporate air into the batter, giving your Mi-Cuits that lovely, soft center. It’s like giving them a little love before they go into the oven!
Step 4: Combine Chocolate Mixture with Eggs
Now, it’s time to bring the chocolate mixture into the fold! Gently pour the melted chocolate and butter into the egg and sugar mixture. Here’s the trick: use a spatula to fold the two mixtures together. Be gentle! You want to keep that airiness we just created. Think of it like a dance—slow and steady wins the race!
Step 5: Add Flour and Salt
Once your chocolate and egg mixtures are combined, it’s time to add the flour and a pinch of salt. Sift the flour over the mixture to avoid lumps, then fold it in gently. The salt is a secret weapon here; it enhances the sweetness and balances the flavors. Just like a pinch of salt can elevate a dish, it does wonders for our Mi-Cuits!
Step 6: Fold in Pistachios
Now for the fun part—adding the pistachios! Gently fold in the whole pistachios, making sure they’re evenly distributed throughout the batter. This is where the texture comes into play. You want those crunchy bits to shine through, giving each bite a delightful crunch. Just be careful not to overmix; we want to keep that lovely airy texture!
Step 7: Fill Molds and Bake
With your batter ready, it’s time to fill those prepared molds. Use a spoon or a ladle to pour the mixture into each mold, filling them about three-quarters full. This allows room for the Mi-Cuits to rise without overflowing. Pop them into the preheated oven and bake for about 10 to 12 minutes. Keep an eye on them! You want the edges to be firm while the center remains slightly soft. It’s like a warm hug in dessert form!
Step 8: Cool and Serve
Once they’re done baking, remove the molds from the oven and let them cool for a few minutes. This is the hardest part—waiting! After a short cooling period, gently remove the Mi-Cuits from the molds. Serve them warm, and don’t forget to sprinkle some chopped pistachios on top for that extra crunch. You can even add a dollop of whipped cream or a scoop of vanilla ice cream if you’re feeling indulgent. Enjoy every bite of this heavenly treat!
Tips for Success
- Always preheat your oven! It ensures even baking and perfect texture.
- Use high-quality chocolate for the best flavor—trust me, it makes a difference!
- Don’t overmix the batter; gentle folding keeps your Mi-Cuits light and airy.
- Experiment with toasting the pistachios for an extra layer of flavor.
- Let the Mi-Cuits cool slightly before removing them from the molds for easier handling.
Equipment Needed
- Mixing bowls: A couple of medium-sized bowls will do. You can use glass or stainless steel—both work great!
- Whisk or electric mixer: A whisk is perfect for beating eggs, but an electric mixer saves time.
- Small saucepan: For melting chocolate and butter. A microwave-safe bowl is a good alternative.
- Silicone molds: These make for easy removal. If you don’t have them, use regular muffin tins lined with paper cups.
- Spatula: Essential for folding ingredients together without deflating the batter.
Variations
- Nut-Free Option: If you or your loved ones have nut allergies, simply omit the pistachios. You can replace them with chocolate chips for a delightful twist!
- Dark Chocolate Delight: Swap out the white chocolate for dark chocolate for a richer flavor. This variation pairs beautifully with the pistachios!
- Gluten-Free Version: Use almond flour or a gluten-free all-purpose flour blend instead of regular flour to make these Mi-Cuits gluten-free.
- Fruit Infusion: Add a handful of dried cranberries or cherries to the batter for a fruity burst of flavor that complements the chocolate and pistachios.
- Minty Fresh: Incorporate a few drops of peppermint extract into the batter for a refreshing minty twist that’s perfect for the holidays!
Serving Suggestions
- Pair with Coffee: A warm cup of coffee or espresso complements the sweetness of the Mi-Cuits beautifully.
- Ice Cream Delight: Serve with a scoop of vanilla or pistachio ice cream for an indulgent treat.
- Fresh Berries: Add a side of fresh berries for a pop of color and a refreshing contrast.
- Elegant Plating: Dust with powdered sugar and garnish with mint leaves for a stunning presentation.
FAQs about Mi-Cuits de Pistacho y Chocolate Blanco
As you embark on your journey to create these delightful Mi-Cuits de Pistacho y Chocolate Blanco, you might have a few questions. Don’t worry; I’ve got you covered! Here are some common queries that pop up, along with my friendly advice.
1. Can I make Mi-Cuits de Pistacho y Chocolate Blanco ahead of time?
Absolutely! You can prepare the batter in advance and store it in the fridge for up to 24 hours. Just remember to bring it back to room temperature before filling your molds and baking. This is a great time-saver for busy days!
2. How do I know when the Mi-Cuits are done baking?
Keep an eye on them! You want the edges to be firm while the center remains slightly soft. A toothpick inserted into the center should come out with a few moist crumbs, not wet batter. This ensures that you get that perfect gooey texture!
3. Can I substitute the pistachios with another nut?
Of course! If you’re not a fan of pistachios or have allergies, feel free to swap them out for walnuts, almonds, or even hazelnuts. Just make sure to chop them up if they’re larger, so they mix well into the batter.
4. What’s the best way to store leftover Mi-Cuits?
Store any leftovers in an airtight container at room temperature for up to two days. If you want to keep them longer, you can refrigerate them for up to a week. Just warm them up slightly in the microwave before serving for that fresh-baked taste!
5. Can I freeze Mi-Cuits de Pistacho y Chocolate Blanco?
Yes, you can! Once they’ve cooled completely, wrap them tightly in plastic wrap and place them in a freezer-safe container. They’ll keep well for up to three months. When you’re ready to enjoy, just thaw them in the fridge overnight and warm them up before serving!
Final Thoughts
Making Mi-Cuits de Pistacho y Chocolate Blanco is more than just baking; it’s about creating moments of joy in our busy lives. The delightful combination of creamy white chocolate and crunchy pistachios brings a smile to my face every time I serve them. Whether it’s a special occasion or a simple family dinner, these little treats are sure to impress. Plus, they’re quick and easy to whip up, making them the perfect solution for busy days. So, gather your loved ones, share a laugh, and enjoy every delicious bite of this irresistible dessert!
“` Print
Mi-Cuits de Pistacho y Chocolate Blanco: ¡Delicia irresistible!
- Total Time: 27 minutos
- Yield: 6 porciones 1x
- Diet: Vegetarian
Description
Delicias de Pistacho y Chocolate Blanco, un postre irresistible que combina la suavidad del chocolate blanco con el crujiente de los pistachos.
Ingredients
- 100 g de pistachos sin cáscara
- 150 g de chocolate blanco
- 100 g de mantequilla
- 3 huevos grandes
- 100 g de azúcar moreno
- 50 g de harina de trigo
- Una pizca de sal marina
- 50 g de pistachos picados (para decorar)
Instructions
- Comienza precalentando el horno a 180°C y prepara los moldes individuales engrasándolos con un poco de mantequilla.
- En una cacerola a fuego bajo, combina la mantequilla y el chocolate blanco, removiendo hasta que se derritan y se integren completamente. Retira del fuego y deja que se enfríe un poco.
- En un bol aparte, bate los huevos junto con el azúcar moreno hasta que la mezcla se vuelva clara y espumosa.
- Vierte la mezcla de chocolate y mantequilla en el bol con los huevos, y mezcla con cuidado para no perder el aire.
- Añade la harina y la sal, y mezcla suavemente con una espátula hasta que todo esté bien combinado.
- Incorpora los pistachos enteros a la mezcla y revuelve con movimientos suaves.
- Rellena los moldes preparados con la mezcla, asegurándote de no llenarlos más de tres cuartas partes.
- Hornea durante 10 a 12 minutos, observando que los bordes estén firmes mientras el centro permanezca ligeramente blando.
- Una vez horneados, deja que se enfríen en los moldes durante unos minutos antes de desmoldar con cuidado.
- Sirve tibios, decorando cada porción con pistachos picados por encima. ¡Disfruta de esta exquisita fusión de sabores!
Notes
- Se pueden usar moldes de silicona para facilitar el desmoldeo.
- Para un sabor más intenso, se pueden tostar ligeramente los pistachos antes de incorporarlos.
- Prep Time: 15 minutos
- Cook Time: 12 minutos
- Category: Postre
- Method: Horneado
- Cuisine: Francesa
Nutrition
- Serving Size: 1 porción
- Calories: 250
- Sugar: 15 g
- Sodium: 50 mg
- Fat: 15 g
- Saturated Fat: 8 g
- Unsaturated Fat: 5 g
- Trans Fat: 0 g
- Carbohydrates: 25 g
- Fiber: 2 g
- Protein: 5 g
- Cholesterol: 100 mg