
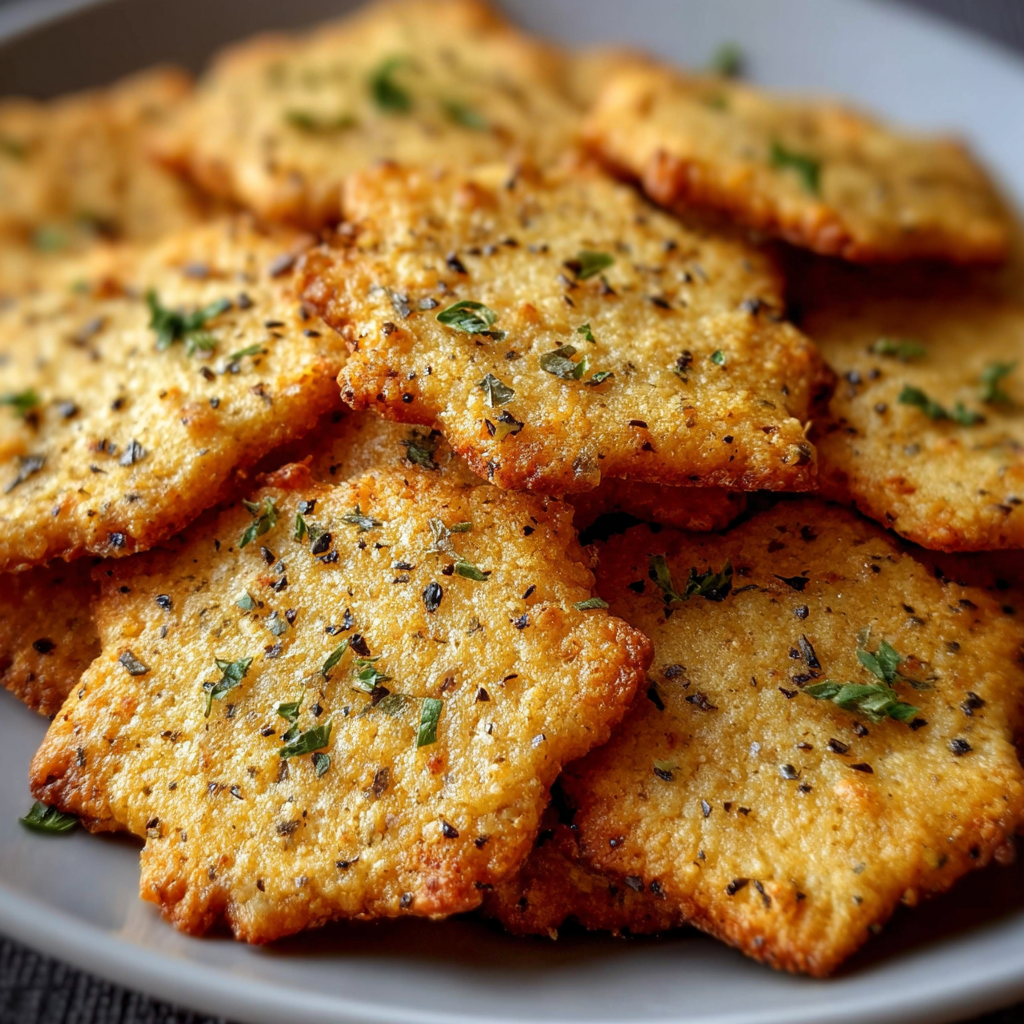
Introduction to Galletas de Garbanzo con Queso y Ajo
Hey there, fellow food lovers! If you’re anything like me, juggling work, family, and a million other things, you know how precious time can be. That’s why I’m excited to share my recipe for Galletas de Garbanzo con Queso y Ajo. These delightful little cookies are not just easy to whip up, but they also pack a punch of flavor that will impress your loved ones. Perfect as a quick snack or a tasty appetizer, they’re a fantastic solution for those busy days when you want something delicious without spending hours in the kitchen. Let’s dive in!
Why You’ll Love This Galletas de Garbanzo con Queso y Ajo
Let’s be real—life can get hectic, and finding time to cook can feel like a juggling act. That’s where these Galletas de Garbanzo con Queso y Ajo come in! They’re not only quick to prepare, but they also deliver a burst of flavor that will have your family asking for seconds. Plus, they’re a healthy option that even picky eaters will enjoy. What’s not to love?
Ingredients for Galletas de Garbanzo con Queso y Ajo
Now, let’s talk about the star players in our Galletas de Garbanzo con Queso y Ajo. Each ingredient brings something special to the table, and I promise you won’t need to hunt down anything too exotic. Here’s what you’ll need:
- Garbanzos cocidos: These little legumes are the backbone of our cookies. They’re packed with protein and fiber, making them a nutritious choice. You can use canned garbanzos for convenience or cook your own if you have the time.
- Queso feta: This crumbly cheese adds a tangy flavor that pairs beautifully with the garbanzos. If feta isn’t your thing, feel free to swap it out for goat cheese or even a sharp cheddar for a different twist.
- Ajo: Garlic lovers, rejoice! Fresh garlic gives these cookies a savory kick. If you’re short on time, garlic powder can work in a pinch, but fresh is always best for that robust flavor.
- Harina de garbanzo: This chickpea flour is what binds everything together. It’s gluten-free and adds a lovely nuttiness. If you can’t find it, regular flour or almond flour can be used, but the taste will vary slightly.
- Comino molido: A pinch of cumin adds warmth and depth to the flavor profile. If you’re not a fan, you can skip it or substitute with a bit of chili powder for a spicy kick.
- Pimentón dulce: This sweet paprika gives a beautiful color and a hint of smokiness. If you like it hot, try using smoked paprika instead!
- Sal y pimienta: Simple seasonings that enhance all the flavors. Adjust to your taste, but don’t be shy—seasoning is key!
- Huevo batido: This acts as a binder, helping our cookies hold their shape. If you’re looking for a vegan option, a flax egg (1 tablespoon of ground flaxseed mixed with 2.5 tablespoons of water) can do the trick.
- Aceite de oliva: A drizzle of olive oil adds richness and helps with browning. You can substitute with melted coconut oil or even avocado oil if you prefer.
- Perejil fresco: This is for garnish, adding a pop of color and freshness. If you don’t have parsley, cilantro or chives can work just as well.
For exact measurements, check the bottom of the article where you can find everything listed for easy printing. Now that we’ve got our ingredients lined up, let’s get cooking!
How to Make Galletas de Garbanzo con Queso y Ajo
Now that we have our ingredients ready, let’s get down to the fun part—making these delicious Galletas de Garbanzo con Queso y Ajo! Follow these simple steps, and you’ll have a tasty treat in no time.
Step 1: Preheat the Oven
First things first, let’s get that oven preheating to 200°C (about 400°F). Preheating is crucial because it ensures that our cookies bake evenly and get that lovely golden color. While the oven warms up, line a baking tray with parchment paper. This will prevent the cookies from sticking and make cleanup a breeze. Trust me, your future self will thank you!
Step 2: Prepare the Chickpeas
Next, it’s time to prepare our star ingredient: the chickpeas! If you’re using canned garbanzos, drain and rinse them well to remove excess sodium. Then, place them in a large bowl. Using a fork or a potato masher, mash the chickpeas until they’re mostly smooth but still have some small chunks. This texture is key—it gives the cookies a nice bite. If you over-mash, they might turn out too mushy, and we want a bit of character in our cookies!
Step 3: Mix the Ingredients
Now, let’s bring all those flavors together! Add the crumbled feta cheese, minced garlic, chickpea flour, cumin, sweet paprika, salt, and pepper to the mashed chickpeas. Grab a wooden spoon and mix everything until well combined. You want to make sure the cheese and spices are evenly distributed throughout the mixture. If you’re feeling adventurous, this is a great time to add any extra spices or herbs you love. Just remember, balance is key!
Step 4: Form the Cookies
With our mixture ready, it’s time to shape our cookies. Wet your hands slightly to prevent sticking, then scoop out a small amount of the mixture—about a tablespoon works well. Roll it into a ball and then gently flatten it into a cookie shape. Place each cookie on the prepared baking tray, leaving a little space between them. This allows for even cooking and prevents them from merging into one giant cookie (which, let’s be honest, would still be delicious but not quite what we’re going for!).
Step 5: Bake the Cookies
Finally, it’s time to bake! Pop the tray into your preheated oven and let those cookies work their magic for about 20-25 minutes. Keep an eye on them; you want them to be golden brown and crispy on the outside. To check for doneness, gently press the top of a cookie—if it feels firm and springs back, they’re ready! Once baked, remove them from the oven and let them cool on the tray for a few minutes before transferring them to a wire rack. This cooling step is essential for achieving that perfect crunch!
Tips for Success
- Make sure your chickpeas are well-drained to avoid a soggy mixture.
- Don’t skip the preheating step; it’s crucial for even baking.
- Experiment with spices! A pinch of chili powder can add a nice kick.
- Use a cookie scoop for uniform sizes, ensuring even cooking.
- Let the cookies cool slightly before serving for the best texture.
Equipment Needed
- Baking tray: A standard baking sheet works perfectly. If you don’t have one, a large oven-safe dish can do the trick.
- Parchment paper: This helps prevent sticking. If you’re out, a light coating of cooking spray will suffice.
- Mixing bowl: Any large bowl will do, even a pot if that’s what you have on hand.
- Potato masher or fork: For mashing the chickpeas. A sturdy spoon can also work in a pinch.
- Cookie scoop or spoon: For shaping the cookies. A regular tablespoon is just fine!
Variations
- Spicy Kick: Add a pinch of cayenne pepper or red pepper flakes to the mixture for a spicy version that will wake up your taste buds!
- Herb Infusion: Mix in fresh herbs like dill, basil, or oregano for an aromatic twist that complements the garlic and cheese beautifully.
- Cheese Swap: Try using different cheeses like mozzarella for a milder flavor or a sharp cheddar for a bolder taste. Each cheese brings its own unique flair!
- Veggie Boost: Incorporate finely chopped spinach or grated zucchini into the mixture for added nutrition and a pop of color.
- Gluten-Free Option: Stick with chickpea flour or use almond flour instead of regular flour to keep these cookies gluten-free while maintaining their deliciousness.
Serving Suggestions
- Pair your Galletas de Garbanzo con Queso y Ajo with a refreshing cucumber and tomato salad for a light meal.
- Serve with a tangy yogurt dip or hummus for an extra layer of flavor.
- For drinks, a chilled white wine or sparkling water with lemon complements these cookies beautifully.
- Garnish with extra parsley for a pop of color and freshness on your serving platter.
FAQs about Galletas de Garbanzo con Queso y Ajo
Got questions about these delightful Galletas de Garbanzo con Queso y Ajo? You’re not alone! Here are some common queries I’ve encountered, along with my answers to help you out:
1. Can I make Galletas de Garbanzo con Queso y Ajo ahead of time?
Absolutely! You can prepare the mixture a day in advance and store it in the fridge. Just shape the cookies and bake them when you’re ready to serve. This is a great time-saver for busy days!
2. How do I store leftover cookies?
These cookies can be stored in an airtight container at room temperature for up to three days. If you want to keep them longer, consider freezing them. Just pop them in the oven for a few minutes to reheat when you’re ready to enjoy!
3. Can I use other types of cheese in this recipe?
Definitely! While feta adds a lovely tang, you can experiment with other cheeses like goat cheese for a creamier texture or cheddar for a sharper flavor. Just keep in mind that the taste will vary slightly with each cheese.
4. What can I serve with Galletas de Garbanzo con Queso y Ajo?
These cookies are versatile! They pair wonderfully with dips like tzatziki or hummus. You can also serve them alongside a fresh salad or as part of a charcuterie board for a delightful appetizer spread.
5. Are Galletas de Garbanzo con Queso y Ajo suitable for a gluten-free diet?
Yes! By using chickpea flour, these cookies are naturally gluten-free. Just make sure to check any other ingredients you use, like dips or sauces, to ensure they fit your dietary needs.
Final Thoughts
Making Galletas de Garbanzo con Queso y Ajo is more than just whipping up a quick snack; it’s about creating a moment of joy in your busy day. The delightful aroma wafting through your kitchen, the satisfying crunch of each bite, and the smiles on your family’s faces as they enjoy these tasty treats are what cooking is all about. Whether you’re serving them at a gathering or enjoying them solo with a cup of tea, these cookies are sure to become a beloved staple in your home. So, roll up your sleeves and get baking—you won’t regret it!
“` Print
Galletas de Garbanzo con Queso y Ajo son deliciosas y fáciles.
- Total Time: 40 minutos
- Yield: 4 porciones 1x
- Diet: Vegetarian
Description
Galletas de Garbanzo con Queso y Ajo son deliciosas y fáciles de preparar, ideales como aperitivo o acompañamiento.
Ingredients
- 1 taza de garbanzos cocidos y escurridos
- 100 g de queso feta desmenuzado
- 2 dientes de ajo picados
- 60 g de harina de garbanzo
- 1/2 cucharadita de comino molido
- 1/2 cucharadita de pimentón dulce
- Sal y pimienta al gusto
- 1 huevo batido
- 2 cucharadas de aceite de oliva
- Perejil fresco picado para decorar
Instructions
- Precalienta el horno a 200°C y prepara una bandeja de horno con papel encerado.
- En un bol, tritura los garbanzos hasta obtener una pasta con algunos trozos pequeños.
- Añade el queso feta, el ajo, la harina de garbanzo, el comino, el pimentón, sal y pimienta. Mezcla con una cuchara de madera hasta que se integren bien.
- Agrega el huevo batido y mezcla nuevamente hasta que todos los ingredientes estén bien combinados.
- Con las manos húmedas, forma pequeñas galletas y colócalas en la bandeja.
- Rocía cada galleta con un poco de aceite de oliva y hornea durante 20-25 minutos, o hasta que estén doradas y crujientes.
- Saca del horno y deja enfriar unos minutos antes de servir. Espolvorea con perejil fresco picado antes de disfrutar.
- Estas galletas son perfectas como aperitivo o como un acompañamiento nutritivo.
Notes
- Se pueden almacenar en un recipiente hermético por hasta 3 días.
- Se pueden servir calientes o a temperatura ambiente.
- Se pueden acompañar con salsas o dips de tu elección.
- Prep Time: 15 minutos
- Cook Time: 25 minutos
- Category: Aperitivo
- Method: Horneado
- Cuisine: Mediterránea
Nutrition
- Serving Size: 1 galleta
- Calories: 120
- Sugar: 1 g
- Sodium: 200 mg
- Fat: 6 g
- Saturated Fat: 2 g
- Unsaturated Fat: 4 g
- Trans Fat: 0 g
- Carbohydrates: 12 g
- Fiber: 3 g
- Protein: 5 g
- Cholesterol: 30 mg