
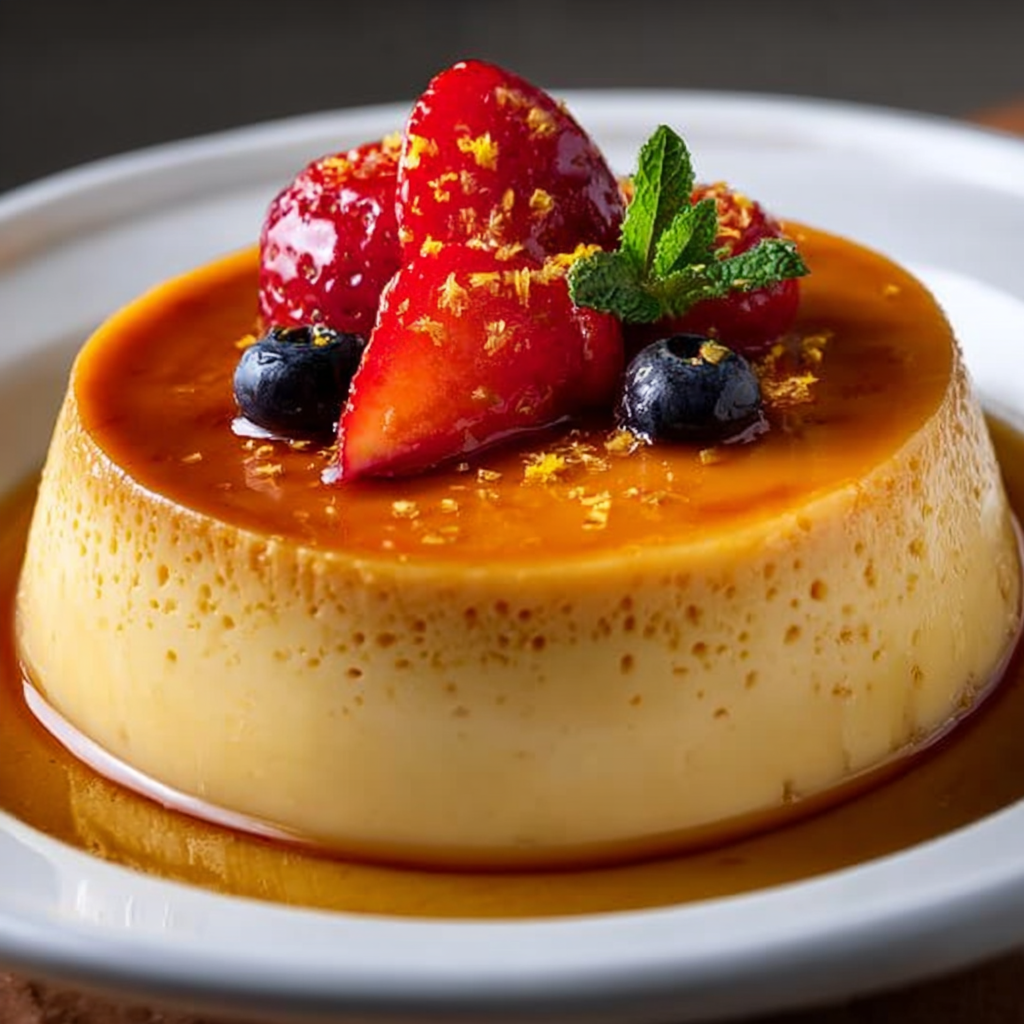
Introduction to Flan de Queso Crema
Hola, amigos! If you’re anything like me, you know that life can get pretty hectic, especially when juggling work, family, and everything in between. That’s why I’m excited to share my recipe for Flan de Queso Crema—a delightful dessert that’s not only creamy and delicious but also a breeze to whip up! This flan is perfect for impressing your loved ones after a busy day or simply treating yourself to something sweet. Trust me, once you try this, it’ll become your go-to dessert for any occasion!
Why You’ll Love This Flan de Queso Crema
Let’s be real—who doesn’t love a dessert that’s both easy to make and utterly delicious? This Flan de Queso Crema checks all the boxes! It’s quick enough to fit into your busy schedule, yet fancy enough to wow your family and friends. Plus, the creamy texture and rich flavor will have everyone asking for seconds. It’s the perfect sweet treat to brighten your day without breaking a sweat!
Ingredients for Flan de Queso Crema
Now, let’s dive into the ingredients that make this Flan de Queso Crema so irresistible! Each component plays a vital role in creating that creamy, dreamy texture and flavor. Here’s what you’ll need:
- Leche condensada: This sweetened condensed milk adds a rich sweetness and creamy base to the flan. It’s like a hug in a can!
- Leche evaporada: This evaporated milk gives the flan a smooth consistency without being overly sweet. It’s the secret to that perfect balance!
- Queso crema: Cream cheese is the star of the show! It brings a luscious creaminess and a slight tang that elevates the flavor profile. Make sure it’s at room temperature for easy mixing.
- Huevos: Eggs are essential for binding everything together and giving the flan its structure. They help create that silky texture we all love.
- Azúcar: You’ll need sugar for the caramel. It transforms into a beautiful amber color when melted, adding a delightful sweetness and a touch of elegance to the flan.
- Extracto de vainilla: A splash of vanilla extract enhances the overall flavor, making each bite taste like a little piece of heaven.
- Pizca de sal: Just a pinch of salt helps to balance the sweetness and brings out the flavors of the other ingredients.
For those of you who might be looking for alternatives, you can use low-fat versions of the milks or cream cheese if you’re watching your calories. And if you want to get creative, consider adding a splash of orange or lemon zest for a refreshing twist! You can find the exact quantities for each ingredient at the bottom of the article, ready for printing. Happy cooking!
How to Make Flan de Queso Crema
Now that we have our ingredients ready, let’s get into the fun part—making this delicious Flan de Queso Crema! Follow these simple steps, and you’ll have a stunning dessert that will impress everyone. Trust me, it’s easier than you think!
Preheat the Oven
First things first, let’s get that oven preheating! Set it to 180 °C (350 °F). Preheating is crucial because it ensures that your flan cooks evenly. While the oven warms up, grab a baking dish and fill it with hot water. This water bath will help create a gentle steam environment, preventing the flan from cracking and giving it that silky texture we all love. Place this dish on the bottom rack of the oven while it preheats.
Prepare the Caramel
Next, it’s time to make the caramel! In a medium saucepan over medium heat, pour in your sugar. Keep an eye on it as it melts—this part can be a bit tricky! Stir gently with a wooden spoon until the sugar turns a beautiful amber color. Be careful not to let it burn; burnt sugar is not a friend to our flan! Once it’s ready, quickly pour the caramel into the bottom of your flan mold, tilting it to coat the bottom evenly. Let it sit for a moment to harden.
Mix the Flan Ingredients
Now, let’s mix up that creamy goodness! In a large mixing bowl, add your room-temperature cream cheese. Using a hand mixer, beat it until it’s smooth and creamy—no lumps allowed! Then, slowly pour in the sweetened condensed milk and evaporated milk, mixing well. Next, crack in the eggs, add the vanilla extract, and sprinkle in that pinch of salt. Mix everything together until it’s well combined and smooth. You want a lovely, velvety mixture that’s just begging to be poured into the mold!
Bake the Flan
Time to bake! Carefully pour the flan mixture over the hardened caramel in your mold. Make sure not to splash any on the sides; we want a clean presentation! Now, gently place the mold into the water bath you prepared earlier. Close the oven door and let it bake for about 50-60 minutes. You’ll know it’s done when a toothpick inserted in the center comes out clean. If it jiggles a bit, that’s okay; it will firm up as it cools!
Cool and Refrigerate
Once your flan is baked to perfection, remove it from the oven and let it cool at room temperature for about 30 minutes. This step is super important! If you skip it, the flan might crack when you refrigerate it. After it’s cooled, cover it with plastic wrap and pop it in the fridge for at least 4 hours, or overnight if you can wait. Chilling allows the flavors to meld beautifully and gives you that perfect texture.
Serve the Flan
Finally, the moment we’ve all been waiting for—serving the flan! To unmold, run a knife around the edges of the flan to loosen it. Place a large plate over the top of the mold and flip it upside down. Give it a gentle shake, and voilà! Your flan should slide right out, with that gorgeous caramel sauce cascading down the sides. For an extra touch, you can garnish it with fresh fruit or a dollop of whipped cream. Enjoy every creamy, dreamy bite of your Flan de Queso Crema!
Tips for Success
- Make sure your cream cheese is at room temperature for easy mixing.
- Keep an eye on the caramel; it can go from perfect to burnt in seconds!
- Don’t skip the water bath; it’s key for a smooth, crack-free flan.
- Let the flan cool completely before refrigerating for the best texture.
- For a fun twist, try adding a splash of your favorite liqueur to the mixture!
Equipment Needed
- Flan mold: A traditional flan mold works best, but a round cake pan will do just fine!
- Medium saucepan: For melting the sugar; a non-stick pan makes cleanup easier.
- Mixing bowl: A large bowl for combining ingredients; a stand mixer can save time.
- Whisk or hand mixer: For blending the flan mixture smoothly.
- Toothpick: To check for doneness; a skewer works too!
Variations of Flan de Queso Crema
- Chocolate Flan: Add 1/2 cup of unsweetened cocoa powder to the flan mixture for a rich chocolate twist that chocolate lovers will adore!
- Coconut Flan: Substitute half of the evaporated milk with coconut milk and add 1/2 cup of shredded coconut for a tropical flair.
- Fruit-Infused Flan: Blend in pureed fruits like mango or strawberries into the mixture for a fruity flavor explosion. Just be sure to adjust the sugar to taste!
- Low-Sugar Version: Use sugar substitutes like stevia or erythritol to make a healthier version without sacrificing flavor.
- Spiced Flan: Add a pinch of cinnamon or nutmeg to the mixture for a warm, cozy flavor that’s perfect for fall or winter gatherings.
Serving Suggestions for Flan de Queso Crema
- Fresh Berries: Serve with a side of strawberries, blueberries, or raspberries for a pop of color and freshness.
- Whipped Cream: A dollop of whipped cream adds a light, airy touch that complements the flan’s richness.
- Coffee or Tea: Pair with a warm cup of coffee or herbal tea for a delightful after-dinner treat.
- Chocolate Sauce: Drizzle some chocolate sauce on top for an indulgent twist.
- Mint Leaves: Garnish with fresh mint leaves for a refreshing finish and a beautiful presentation!
FAQs about Flan de Queso Crema
As you embark on your journey to create the perfect Flan de Queso Crema, you might have a few questions. Don’t worry; I’ve got you covered! Here are some common queries that pop up when making this delightful dessert:
1. Can I make Flan de Queso Crema ahead of time?
Absolutely! In fact, making it a day in advance is a great idea. The flavors meld beautifully as it chills in the fridge, and it allows you to enjoy a stress-free dessert on the day of your gathering. Just be sure to cover it well to keep it fresh!
2. What can I do if my flan cracks while baking?
If your flan cracks, don’t panic! It can still taste delicious. To prevent this in the future, ensure you’re using a water bath, which helps maintain a gentle cooking temperature. Also, avoid overbaking; the flan should be slightly jiggly in the center when you take it out.
3. Can I use different types of cheese for this flan?
While cream cheese is the star of this Flan de Queso Crema, you can experiment with other soft cheeses like mascarpone or ricotta for a different flavor profile. Just keep in mind that the texture may vary slightly, so adjust your expectations accordingly!
4. How do I store leftover flan?
Store any leftover flan in an airtight container in the refrigerator. It should stay fresh for about 3-4 days. Just remember to let it come to room temperature before serving again, or enjoy it chilled for a refreshing treat!
5. Can I add flavors to my flan?
Definitely! Feel free to get creative with flavors. You can add a splash of coffee, a hint of almond extract, or even some citrus zest to the mixture. Just remember to balance the sweetness accordingly, and you’ll have a unique twist on the classic Flan de Queso Crema!
Final Thoughts
Making Flan de Queso Crema is more than just whipping up a dessert; it’s about creating sweet memories with your loved ones. The joy of serving this creamy delight, watching their faces light up with each bite, is truly priceless. Whether it’s a special occasion or just a Tuesday night, this flan brings a touch of elegance and comfort to any table. So, roll up your sleeves, gather your ingredients, and let this recipe become a cherished part of your family traditions. Trust me, you’ll be savoring every delicious moment!
“` Print
Flan de Queso Crema: ¡Deleita tu paladar con este postre!
- Total Time: 4 horas 20 minutos
- Yield: 8 porciones 1x
- Diet: Vegetarian
Description
Delicious and creamy flan made with cream cheese and vanilla, perfect for dessert lovers.
Ingredients
- 1 lata de leche condensada (397 g)
- 1 lata de leche evaporada (354 ml)
- 250 g de queso crema, a temperatura ambiente
- 4 huevos grandes
- 1 taza de azúcar (para el caramelo)
- 1 cucharadita de extracto de vainilla
- Pizca de sal
Instructions
- Comienza precalentando el horno a 180 °C (350 °F) y coloca una bandeja con agua caliente en la parte inferior del horno para crear vapor.
- En una cacerola a fuego medio, calienta el azúcar hasta que se derrita y adquiera un color ámbar. Vierte el caramelo en el fondo del molde para flan, asegurándote de que quede bien cubierto.
- En un bol grande, bate el queso crema con un batidor de mano hasta que esté suave. Luego, agrega la leche condensada, la leche evaporada, los huevos, el extracto de vainilla y la pizca de sal. Mezcla bien hasta que todos los ingredientes estén completamente integrados.
- Vierte la mezcla en el molde sobre el caramelo, asegurándote de no salpicar los bordes.
- Cubre el molde con papel aluminio y colócalo en la bandeja con agua caliente. Hornea durante 50-60 minutos, o hasta que al insertar un palillo en el centro, este salga limpio.
- Una vez horneado, retira del horno y deja enfriar a temperatura ambiente antes de refrigerar por al menos 4 horas.
- Para servir, desliza un cuchillo por los bordes del flan y voltea con cuidado sobre un plato. Disfruta de este exquisito flan de queso y vainilla bien frío.
Notes
- Es importante dejar enfriar el flan antes de refrigerarlo para obtener la mejor textura.
- Se puede decorar con frutas frescas o crema batida al servir.
- Prep Time: 20 minutos
- Cook Time: 60 minutos
- Category: Postre
- Method: Horneado
- Cuisine: Mexicana
Nutrition
- Serving Size: 1 porción
- Calories: 300
- Sugar: 30 g
- Sodium: 150 mg
- Fat: 15 g
- Saturated Fat: 8 g
- Unsaturated Fat: 5 g
- Trans Fat: 0 g
- Carbohydrates: 35 g
- Fiber: 0 g
- Protein: 6 g
- Cholesterol: 150 mg