
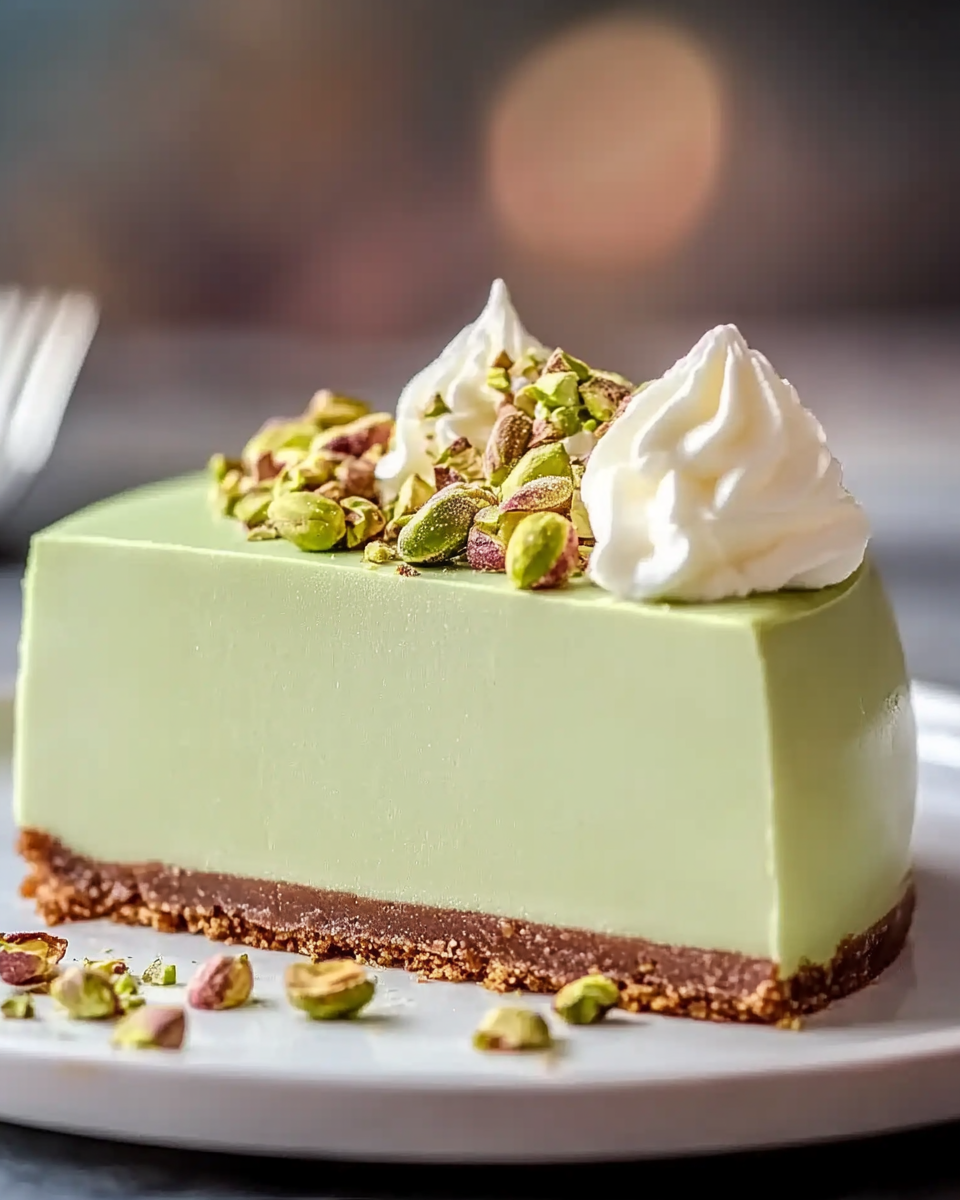
Introduction to Cheesecake Soñado de Pistacho
Hola, amigas! If you’re anything like me, your days are a whirlwind of work, family, and a million little tasks that seem to multiply like rabbits. That’s why I’m thrilled to share my Cheesecake Soñado de Pistacho with you! This delightful dessert is not just a treat; it’s a quick solution for those busy days when you want to impress your loved ones without spending hours in the kitchen. Imagine a creamy, dreamy cheesecake with a nutty twist that will have everyone asking for seconds. Trust me, this recipe is a game-changer!
Why You’ll Love This Cheesecake Soñado de Pistacho
Let’s be real: life can get hectic, and finding time to whip up something special can feel like a daunting task. That’s where my Cheesecake Soñado de Pistacho shines! It’s incredibly easy to make, requiring just a handful of ingredients and minimal prep time. Plus, the rich, nutty flavor of pistachio adds a gourmet touch that will wow your family and friends. You’ll love how quickly it disappears!
Ingredients for Cheesecake Soñado de Pistacho
Now, let’s dive into the delicious components of our Cheesecake Soñado de Pistacho. Each ingredient plays a vital role in creating that creamy, dreamy texture and flavor that we all crave. Here’s what you’ll need:
- Galletas tipo digestive: These cookies form the perfect crunchy base for our cheesecake. They’re buttery and slightly sweet, making them an ideal match for the creamy filling.
- Mantequilla derretida: This helps bind the crushed cookies together, creating a solid crust. You can use unsalted butter for a more controlled flavor.
- Queso crema: The star of the show! Cream cheese gives our cheesecake its rich and creamy texture. Make sure it’s at room temperature for easy mixing.
- Azúcar: A little sweetness goes a long way! Sugar balances the tanginess of the cream cheese and enhances the overall flavor.
- Huevos: Eggs are essential for binding the ingredients together and giving the cheesecake its structure. They also add a lovely richness.
- Nata para montar: Heavy cream adds a luxurious creaminess to the filling. It helps achieve that smooth, velvety texture we all love.
- Pasta de pistacho: This is where the magic happens! Pistachio paste infuses the cheesecake with a nutty flavor and beautiful green color. You can find it at specialty stores or online.
- Extracto de vainilla: A splash of vanilla enhances the overall flavor profile, making it even more delightful. It’s like a warm hug for your taste buds!
- Pistachos picados: These are for garnishing. They add a lovely crunch and a pop of color on top of your cheesecake.
For those of you who might have dietary restrictions or preferences, feel free to swap out the cream cheese for a vegan alternative or use gluten-free cookies for the crust. The exact quantities of each ingredient are listed at the bottom of the article, so you can easily print them out for your next baking adventure!
How to Make Cheesecake Soñado de Pistacho
Now that we have our ingredients ready, let’s get down to the fun part: making our Cheesecake Soñado de Pistacho! I promise, it’s easier than you think. Just follow these simple steps, and you’ll have a show-stopping dessert that will impress everyone.
Step 1: Preheat the Oven
First things first, let’s get that oven preheating to 180°C (350°F). Preheating is crucial because it ensures that your cheesecake bakes evenly. While the oven warms up, grab your springform pan and lightly grease it. This will help your cheesecake slide out easily once it’s done. Trust me, you don’t want to be wrestling with a stuck cheesecake!
Step 2: Prepare the Crust
Next, it’s time to make the crust. Take your digestive cookies and crush them into fine crumbs. You can do this by placing them in a zip-top bag and using a rolling pin, or you can use a food processor if you have one. Once you have your cookie crumbs, mix them with the melted butter in a bowl. This mixture should resemble wet sand. Press it firmly into the bottom of your prepared pan to create a solid base. Don’t be shy—use the back of a measuring cup to really pack it down!
Step 3: Make the Filling
Now, let’s whip up that creamy filling! In a large mixing bowl, combine the room-temperature cream cheese and sugar. Using an electric mixer, beat them together until the mixture is smooth and creamy. This step is key for avoiding lumps in your cheesecake. Next, add the eggs one at a time, mixing well after each addition. This helps to incorporate air, making your cheesecake light and fluffy. You’ll want to scrape down the sides of the bowl occasionally to ensure everything is well combined.
Step 4: Add Flavor
Here comes the fun part—adding flavor! Pour in the heavy cream, pistachio paste, and vanilla extract. Mix everything together until it’s fully combined and smooth. The pistachio paste is what gives our cheesecake that dreamy green color and nutty flavor. If you’re feeling adventurous, you can taste the mixture at this point and adjust the pistachio paste to your liking. Just remember, a little goes a long way!
Step 5: Bake the Cheesecake
Time to bake! Carefully pour the cheesecake filling over the crust in your springform pan. Use a spatula to smooth the top. Place the pan in the preheated oven and bake for 45-50 minutes. You’ll know it’s done when the edges are set, but the center still has a slight jiggle. This is important because it will continue to firm up as it cools. If you overbake it, you might end up with a dry cheesecake, and nobody wants that!
Step 6: Cool and Chill
Once your cheesecake is out of the oven, turn off the heat and crack the oven door open. Let the cheesecake cool in the oven for about an hour. This gradual cooling helps prevent cracks on the surface. After that, transfer it to the refrigerator and chill for at least 4 hours, but overnight is even better. Chilling allows the flavors to meld beautifully and gives you that perfect creamy texture.
Step 7: Garnish and Serve
Finally, it’s time to make your cheesecake look as good as it tastes! Once it’s chilled, carefully remove the sides of the springform pan. You can garnish your cheesecake with chopped pistachios and a drizzle of extra pistachio paste for that extra flair. Serve it up with a smile, and watch as your family and friends dive in. They won’t believe you made this stunning dessert at home!
Tips for Success
- Make sure your cream cheese is at room temperature for easy mixing.
- Don’t skip the chilling time; it’s crucial for the best texture.
- Use a water bath for baking if you want an ultra-smooth surface.
- Feel free to adjust the pistachio paste to suit your taste.
- For a fun twist, try adding a layer of fruit on top before serving!
Equipment Needed
- Springform pan: Essential for easy removal. If you don’t have one, a regular cake pan works too—just be careful when serving!
- Mixing bowls: A couple of medium-sized bowls will do the trick.
- Electric mixer: Makes mixing a breeze, but a whisk works if you’re feeling strong!
- Spatula: Perfect for smoothing the filling and scraping down the sides.
- Measuring cups and spoons: Accurate measurements are key for baking success!
Variations
- Chocolate Swirl: Add a swirl of melted chocolate to the filling before baking for a decadent chocolate-pistachio combo.
- Fruit Topping: Top your cheesecake with fresh berries or a fruit compote for a refreshing contrast to the rich filling.
- Nut-Free Option: Substitute the pistachio paste with almond or sunflower seed butter for a nut-free version that still packs a punch.
- Vegan Version: Use vegan cream cheese and coconut cream instead of heavy cream for a plant-based delight.
- Gluten-Free Crust: Swap out the digestive cookies for gluten-free graham crackers or almond flour for a gluten-free crust.
Serving Suggestions
- Pair with Coffee: A rich cup of coffee or espresso complements the creamy cheesecake beautifully.
- Fresh Berries: Serve with a side of fresh berries for a burst of color and flavor.
- Presentation: Use a cake stand to elevate your cheesecake and make it the star of the dessert table.
- Whipped Cream: A dollop of whipped cream adds a light, airy touch to each slice.
FAQs about Cheesecake Soñado de Pistacho
As you embark on your journey to create the perfect Cheesecake Soñado de Pistacho, you might have a few questions. Don’t worry; I’ve got you covered! Here are some common queries that pop up, along with my friendly advice.
1. Can I make this cheesecake ahead of time?
Absolutely! In fact, making your Cheesecake Soñado de Pistacho a day in advance is a great idea. The flavors have time to meld, and the texture becomes even creamier. Just be sure to keep it covered in the fridge until you’re ready to serve!
2. What if I can’t find pistachio paste?
No pistachio paste? No problem! You can make your own by blending roasted pistachios with a bit of oil until smooth. Alternatively, almond butter or sunflower seed butter can be used for a different yet delicious flavor. Just remember, it won’t have that signature pistachio taste, but it’ll still be tasty!
3. How do I know when my cheesecake is done baking?
Great question! The key is to look for a slight jiggle in the center of your cheesecake. It should be set around the edges but still have a little movement in the middle. This ensures a creamy texture once it cools. Overbaking can lead to a dry cheesecake, and we definitely want to avoid that!
4. Can I freeze the cheesecake?
Yes, you can freeze your Cheesecake Soñado de Pistacho! Just make sure it’s completely cooled and wrapped tightly in plastic wrap and then aluminum foil. It can last in the freezer for up to three months. When you’re ready to enjoy it, let it thaw in the fridge overnight.
5. What can I use instead of cream cheese for a lighter version?
If you’re looking for a lighter alternative, consider using Greek yogurt or ricotta cheese. They’ll give you a different texture but still provide that creamy goodness. Just keep in mind that the flavor will be slightly different, but it’s a great way to lighten things up!
Final Thoughts
Creating the Cheesecake Soñado de Pistacho is more than just baking; it’s about bringing joy to your kitchen and your loved ones. This delightful dessert is a testament to how simple ingredients can come together to create something truly special. Whether it’s a family gathering, a cozy dinner with friends, or just a treat for yourself after a long day, this cheesecake is sure to impress. So, roll up your sleeves, embrace the process, and enjoy every creamy, nutty bite. Trust me, the smiles you’ll receive will be worth every moment spent in the kitchen!
“` Print
Cheesecake Soñado de Pistacho: Delicia Irresistible Aquí
- Total Time: 5 horas 20 minutos
- Yield: 8 porciones 1x
- Diet: Vegetarian
Description
Deliciosa tarta de queso con un toque de pistacho, perfecta para cualquier ocasión.
Ingredients
- 200 g de galletas tipo digestive
- 100 g de mantequilla derretida
- 400 g de queso crema
- 150 g de azúcar
- 3 huevos
- 200 ml de nata para montar
- 100 g de pasta de pistacho
- 1 cucharadita de extracto de vainilla
- Un puñado de pistachos picados para decorar
Instructions
- Comienza precalentando el horno a 180°C y engrasa ligeramente un molde desmontable.
- Tritura las galletas hasta que queden como un polvo fino y mézclalas con la mantequilla derretida. Distribuye esta mezcla en el fondo del molde, presionando firmemente para formar una base compacta.
- En un recipiente grande, mezcla el queso crema con el azúcar hasta que la mezcla esté suave y homogénea. Incorpora los huevos uno a uno, batiendo bien después de cada adición.
- Añade la nata para montar, la pasta de pistacho y el extracto de vainilla, y mezcla todo hasta que se integre completamente.
- Vierte la mezcla de queso sobre la base de galleta en el molde y alisa la parte superior con una espátula.
- Hornea durante 45-50 minutos, o hasta que el centro esté casi firme. Luego, apaga el horno y deja que la tarta se enfríe dentro con la puerta entreabierta durante aproximadamente una hora.
- Una vez enfriada, coloca la tarta en el refrigerador durante al menos 4 horas, idealmente toda la noche.
- Al momento de servir, adorna con pistachos picados y un poco más de pasta de pistacho si lo prefieres. ¡Disfruta de esta exquisita y cremosa tarta!
Notes
- Para un sabor más intenso, puedes añadir más pasta de pistacho.
- Es recomendable dejar enfriar la tarta toda la noche para obtener una mejor textura.
- Prep Time: 30 minutos
- Cook Time: 50 minutos
- Category: Postre
- Method: Horneado
- Cuisine: Internacional
Nutrition
- Serving Size: 1 porción
- Calories: 450
- Sugar: 25 g
- Sodium: 200 mg
- Fat: 30 g
- Saturated Fat: 15 g
- Unsaturated Fat: 10 g
- Trans Fat: 0 g
- Carbohydrates: 35 g
- Fiber: 2 g
- Protein: 8 g
- Cholesterol: 100 mg