
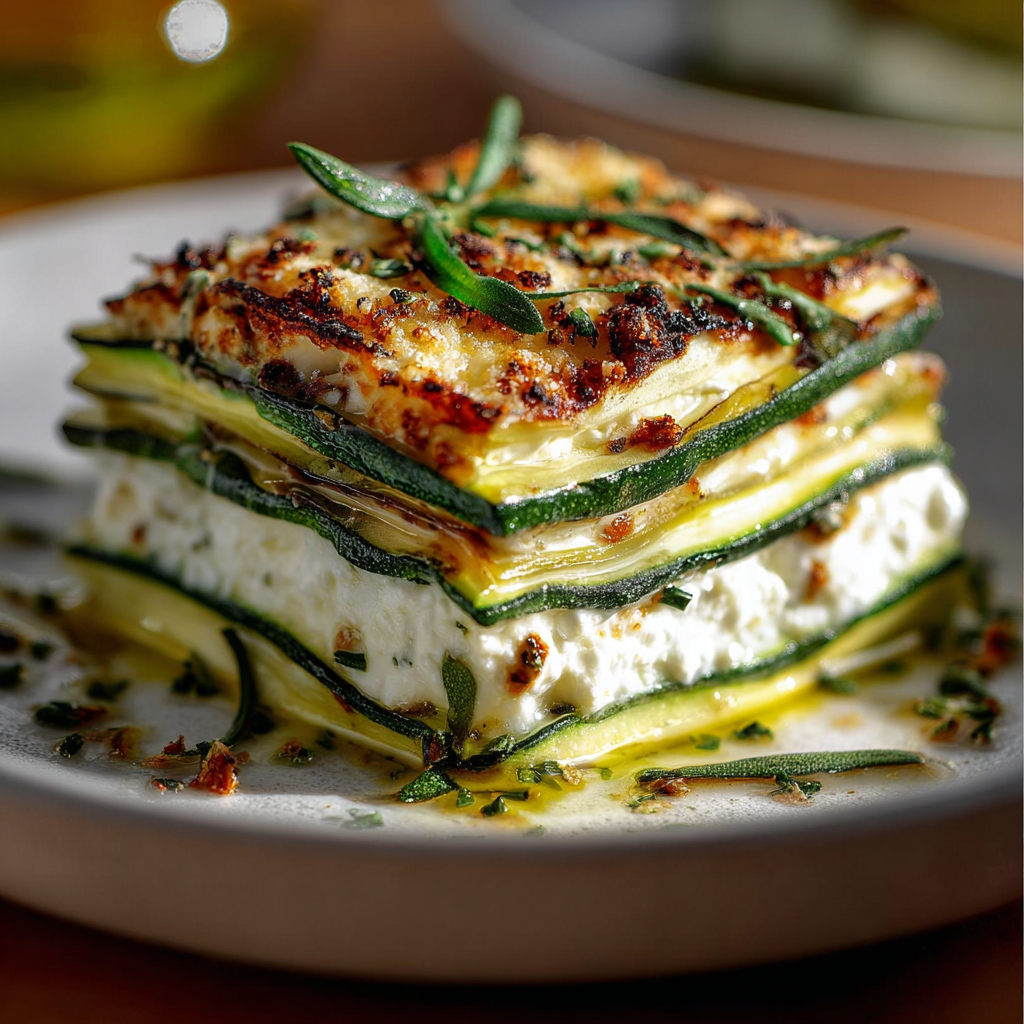
Introduction to Millefeuille de Calabacín a la Parrilla y Queso
Hola, amigas! If you’re anything like me, juggling work, family, and a million other responsibilities can feel like a circus act. That’s why I’m excited to share my recipe for Millefeuille de Calabacín a la Parrilla y Queso. This dish is not just a feast for the eyes; it’s a quick solution for those busy weeknights when you want to impress your loved ones without spending hours in the kitchen. With layers of grilled zucchini and creamy cheese, it’s a gourmet experience that’s surprisingly easy to whip up. Trust me, your family will be asking for seconds!
Why You’ll Love This Millefeuille de Calabacín a la Parrilla y Queso
This Millefeuille de Calabacín a la Parrilla y Queso is a game-changer for busy women like us! It’s not only quick to prepare—taking just 30 minutes from start to finish—but it also delivers a burst of flavor that will make your taste buds dance. Plus, it’s a fantastic way to sneak in some veggies without the fuss. Your family will love it, and you’ll feel like a culinary superstar!
Ingredients for Millefeuille de Calabacín a la Parrilla y Queso
Let’s dive into the delicious components of our Millefeuille de Calabacín a la Parrilla y Queso. Each ingredient plays a vital role in creating that mouthwatering flavor and texture. Here’s what you’ll need:
- Calabacines medianos: These fresh zucchinis are the star of the show! They’re mild in flavor and have a lovely texture when grilled. Look for firm, shiny ones for the best results.
- Queso feta desmenuzado: This tangy cheese adds a creamy richness that pairs beautifully with the zucchini. If you’re not a fan of feta, feel free to swap it out for goat cheese for a different twist!
- Queso mozzarella rallado: This cheese melts beautifully and adds a gooey, comforting layer to the dish. It’s the perfect finishing touch that brings everything together.
- Ajo: A little minced garlic goes a long way in enhancing the flavors. It adds a savory depth that complements the cheese and zucchini perfectly.
- Aceite de oliva: This is essential for grilling the zucchini. It helps achieve that lovely golden color and adds a hint of richness. Extra virgin olive oil is my go-to for its robust flavor.
- Sal y pimienta: Simple seasonings that elevate the dish. Don’t skip these; they’re crucial for bringing out the natural flavors of the ingredients.
- Hojas de menta fresca: These are optional but highly recommended! Fresh mint adds a refreshing touch that brightens up the dish and makes it feel gourmet.
- Tomillo seco: This herb adds an earthy aroma and flavor. If you have fresh thyme on hand, feel free to use that instead for an even fresher taste.
- Vinagre balsámico: A splash of balsamic vinegar in the cheese mixture adds a delightful tanginess that balances the richness of the cheeses.
For exact measurements, check the bottom of the article where you can find everything listed for easy printing. Now, let’s get cooking!
How to Make Millefeuille de Calabacín a la Parrilla y Queso
Now that we have our ingredients ready, let’s dive into the fun part—making our Millefeuille de Calabacín a la Parrilla y Queso! Follow these simple steps, and you’ll have a stunning dish that’s sure to impress.
Step 1: Prepare the Zucchini
First things first, let’s wash those zucchinis! Rinse them under cool water to remove any dirt. Then, grab a sharp knife and slice them into thin, even strips lengthwise. Aim for about 1/4 inch thick; this way, they’ll grill beautifully without falling apart. If you have a mandoline slicer, now’s the time to use it! It makes the job quick and ensures uniform slices. Set those aside and let’s move on!
Step 2: Make the Cheese Mixture
In a medium bowl, combine the crumbled feta cheese, minced garlic, dried thyme, and a splash of balsamic vinegar. Sprinkle in some salt and pepper to taste. Mix everything together until it’s well combined. The feta should be creamy and slightly chunky, giving it a lovely texture. This mixture is where the magic happens, so don’t be shy about tasting it—just be careful not to eat it all before it hits the dish!
Step 3: Grill the Zucchini
Time to fire up the grill! Heat your grill or a non-stick skillet over medium heat. While it’s warming up, brush both sides of the zucchini slices with olive oil. This not only helps them grill evenly but also adds a delicious flavor. Once the grill is hot, place the zucchini slices on it. Grill for about 4-5 minutes on each side, or until they’re golden brown and tender. You want them to have those beautiful grill marks, so resist the urge to flip them too soon!
Step 4: Layer the Ingredients
Now comes the fun part—layering! Grab a large serving dish and start with a layer of grilled zucchini at the bottom. Then, spoon some of that creamy cheese mixture over the zucchini. Sprinkle a little mozzarella on top for that gooey goodness. Repeat this process, alternating layers of zucchini and cheese until you reach the top. Finish with a final layer of zucchini, and don’t forget to save some mozzarella for the top!
Step 5: Final Touches
To finish off your Millefeuille de Calabacín a la Parrilla y Queso, sprinkle the remaining mozzarella over the top layer of zucchini. This will melt beautifully and create a lovely golden crust. For a pop of color and freshness, garnish with fresh mint leaves. You can serve this dish warm or let it cool and enjoy it cold. Either way, it’s a showstopper!
Tips for Success
- Use fresh zucchinis for the best flavor and texture.
- Don’t overcrowd the grill; give each slice space to cook evenly.
- Feel free to experiment with different cheeses—ricotta or goat cheese work well too!
- Let the dish sit for a few minutes after assembling; it helps the flavors meld.
- For a spicy kick, add a pinch of red pepper flakes to the cheese mixture.
Equipment Needed
- Grill or Non-Stick Skillet: A grill gives those beautiful marks, but a skillet works just as well.
- Sharp Knife: Essential for slicing the zucchini evenly.
- Mixing Bowl: For combining the cheese mixture.
- Spatula: Handy for flipping the zucchini slices.
- Serving Dish: To showcase your stunning creation!
Variations
- Herb Infusion: Add fresh basil or oregano to the cheese mixture for an aromatic twist.
- Spicy Kick: Mix in some chopped jalapeños or a dash of hot sauce to the cheese for a spicy version.
- Vegan Option: Substitute the feta and mozzarella with plant-based cheese alternatives and use olive oil for grilling.
- Grilled Veggie Medley: Layer in other grilled vegetables like bell peppers or eggplant for added flavor and nutrition.
- Nutty Crunch: Sprinkle some toasted pine nuts or walnuts between the layers for a delightful crunch.
Serving Suggestions
- Pair with a Salad: A light arugula or mixed greens salad drizzled with lemon vinaigrette complements the dish beautifully.
- Wine Selection: A crisp white wine, like Sauvignon Blanc, enhances the flavors of the zucchini and cheese.
- Presentation: Serve on a colorful platter and garnish with extra mint leaves for a pop of color.
FAQs about Millefeuille de Calabacín a la Parrilla y Queso
As you embark on your culinary adventure with Millefeuille de Calabacín a la Parrilla y Queso, you might have a few questions. Don’t worry; I’ve got you covered! Here are some common queries that pop up:
1. Can I make Millefeuille de Calabacín a la Parrilla y Queso ahead of time?
Absolutely! You can prepare the layers in advance and store them in the fridge. Just assemble the dish, cover it, and pop it in the refrigerator. When you’re ready to serve, simply bake it until heated through and the cheese is bubbly. It’s a great time-saver for busy weeknights!
2. What can I serve with this dish?
This Millefeuille de Calabacín a la Parrilla y Queso pairs wonderfully with a light salad or some crusty bread. You could also serve it alongside grilled chicken or fish for a heartier meal. The options are endless!
3. How do I store leftovers?
If you have any leftovers (which is rare, but it happens!), store them in an airtight container in the fridge. They’ll keep well for about 2-3 days. You can enjoy them cold or reheat them in the oven for a few minutes to bring back that melty goodness.
4. Can I use other vegetables instead of zucchini?
Of course! While zucchini is the star here, you can experiment with other veggies like eggplant or even sweet potatoes. Just make sure to slice them thinly so they cook evenly. It’s a fun way to mix things up!
5. Is this dish suitable for a vegetarian diet?
Yes! This Millefeuille de Calabacín a la Parrilla y Queso is a delightful vegetarian option. With its layers of grilled zucchini and creamy cheese, it’s perfect for anyone looking to enjoy a meat-free meal. Just be sure to check your cheese for any animal rennet if you’re strictly vegetarian!
Final Thoughts
Creating this Millefeuille de Calabacín a la Parrilla y Queso is more than just cooking; it’s about bringing joy to your table and delighting your loved ones. The vibrant layers of grilled zucchini and creamy cheese not only look stunning but also taste divine. Whether you serve it warm or cold, this dish is sure to spark smiles and compliments. So, the next time you’re pressed for time but want to impress, remember this recipe. It’s a little slice of gourmet heaven that fits perfectly into our busy lives!
“` Print
Millefeuille de Calabacín a la Parrilla y Queso: Sorprende a Todos con Esta Receta Gourmet
- Total Time: 30 minutos
- Yield: 4 porciones 1x
- Diet: Vegetarian
Description
Millefeuille de Calabacín a la Parrilla y Queso es un plato gourmet que combina la frescura del calabacín con la cremosidad del queso feta y mozzarella, ideal para sorprender a tus invitados.
Ingredients
- 2 calabacines medianos
- 250 g de queso feta desmenuzado
- 80 g de queso mozzarella rallado
- 1 diente de ajo, finamente picado
- 2 cucharadas de aceite de oliva
- Sal y pimienta al gusto
- Hojas de menta fresca para decorar
- 1 cucharadita de tomillo seco
- 2 cucharadas de vinagre balsámico
Instructions
- Comienza por calentar una plancha o sartén antiadherente a fuego medio. Lava los calabacines y córtalos en láminas delgadas a lo largo.
- En un tazón, combina el queso feta, el ajo picado, el tomillo, el vinagre balsámico, sal y pimienta. Mezcla bien y reserva.
- Pincela las láminas de calabacín con aceite de oliva y colócalas en la plancha caliente. Cocina durante 4-5 minutos por cada lado, hasta que estén doradas y tiernas.
- En un plato grande, coloca una primera capa de calabacín a la plancha, seguida de una porción de la mezcla de feta. Espolvorea un poco de queso mozzarella sobre la mezcla.
- Continúa alternando capas de calabacín y la mezcla de queso hasta que termines con una capa de calabacín en la parte superior.
- Termina con el resto de la mozzarella y decora con hojas de menta fresca.
- Disfruta de este plato tanto frío como caliente, deleitándote con su frescura y sofisticación.
Notes
- Este plato se puede servir como aperitivo o como plato principal ligero.
- Se recomienda utilizar calabacines frescos para obtener el mejor sabor.
- Se puede sustituir el queso feta por queso de cabra si se prefiere.
- Prep Time: 15 minutos
- Cook Time: 15 minutos
- Category: Entrante
- Method: A la plancha
- Cuisine: Mediterránea
Nutrition
- Serving Size: 1 porción
- Calories: 220
- Sugar: 3 g
- Sodium: 500 mg
- Fat: 15 g
- Saturated Fat: 6 g
- Unsaturated Fat: 8 g
- Trans Fat: 0 g
- Carbohydrates: 10 g
- Fiber: 2 g
- Protein: 12 g
- Cholesterol: 30 mg