
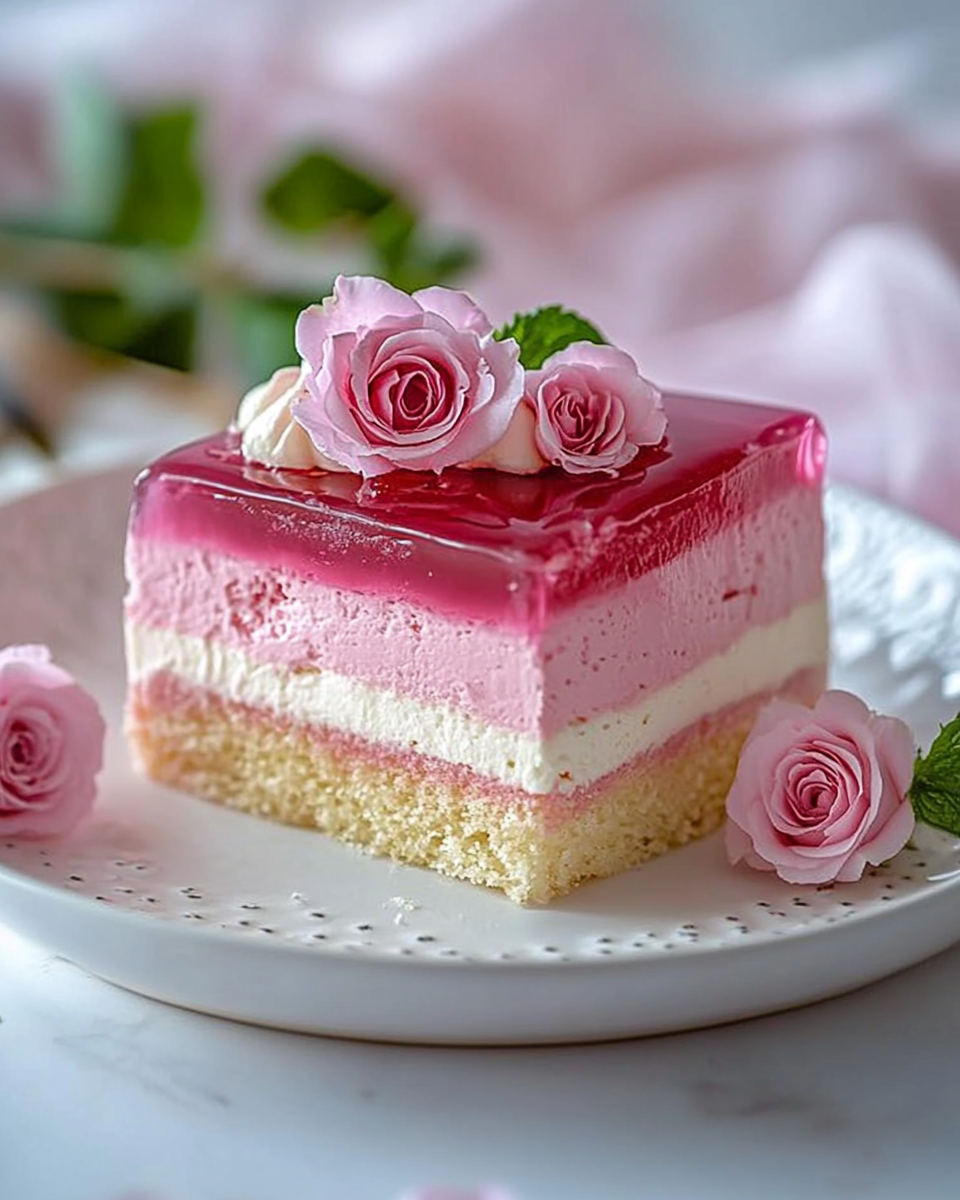
Introduction to Tarta de Gelatina Rosa
Hola, amigas! If you’re anything like me, your days can feel like a whirlwind of work, family, and endless to-do lists. That’s why I’m excited to share my recipe for Tarta de Gelatina Rosa. This delightful strawberry gelatin tart is not just a feast for the eyes; it’s also a quick solution for those busy days when you want to impress your loved ones without spending hours in the kitchen. With its vibrant colors and luscious flavors, this dessert is sure to bring smiles to your family’s faces, making it a perfect treat for any occasion!
Why You’ll Love This Tarta de Gelatina Rosa
Let me tell you, this Tarta de Gelatina Rosa is a game-changer! It’s incredibly easy to whip up, making it perfect for those hectic weeknights or last-minute gatherings. The taste? Oh, it’s like a sweet hug for your taste buds! Plus, the vibrant pink hue adds a pop of joy to your table. Trust me, your family will be asking for seconds, and you’ll love how little time it takes to create such a stunning dessert!
Ingredients for Tarta de Gelatina Rosa
Now, let’s dive into the ingredients that make this Tarta de Gelatina Rosa a delightful treat! Each component plays a vital role in creating that perfect balance of flavor and texture. Here’s what you’ll need:
- Harina de trigo: This is the backbone of our cake, providing structure and a soft crumb. You can use all-purpose flour for a reliable result.
- Azúcar: Sweetness is key! Sugar not only sweetens the cake but also helps it brown beautifully in the oven.
- Mantequilla a temperatura ambiente: Butter adds richness and moisture. Make sure it’s softened for easy mixing.
- Huevos grandes: Eggs are essential for binding the ingredients together and adding a lovely texture. They also help the cake rise!
- Leche: This adds moisture and a bit of creaminess to the batter. You can substitute with almond or oat milk if you prefer.
- Levadura en polvo: Baking powder is our leavening agent, ensuring the cake rises to fluffy perfection.
- Esencia de vainilla: A splash of vanilla enhances the flavor, making every bite taste like a little piece of heaven.
- Pizca de sal: Just a pinch of salt balances the sweetness and elevates the overall flavor.
- Gelatina de fresa: This is the star of the show! It gives our tart its beautiful pink color and fruity flavor. Feel free to experiment with other flavors if you’re feeling adventurous!
- Agua caliente: Hot water is used to dissolve the gelatin, ensuring it sets perfectly.
- Nata montada: Whipped cream is the cherry on top! It adds a light, airy finish to each slice.
- Pétalos de rosa comestibles (opcional): These are optional but add a stunning touch of elegance. They’re perfect for special occasions!
For exact measurements, don’t forget to check the bottom of the article where you can find everything listed for easy printing. Happy baking!
How to Make Tarta de Gelatina Rosa
Now that we have our ingredients ready, let’s get to the fun part—making the Tarta de Gelatina Rosa! Follow these simple steps, and you’ll have a stunning dessert that’s sure to impress.
Step 1: Preheat the Oven
First things first, preheat your oven to 180°C (350°F). This step is crucial because it ensures that your cake bakes evenly. While the oven is warming up, grab your tart pan and grease it with a little butter, then dust it with flour. This will help the cake slide out easily once it’s baked. Trust me, there’s nothing worse than a cake that sticks to the pan!
Step 2: Cream the Butter and Sugar
In a large mixing bowl, combine the softened butter and sugar. Using a hand mixer or a whisk, beat them together until the mixture is light and fluffy. This process is essential because it incorporates air into the batter, giving your cake that lovely, tender texture. It should look pale and creamy—like a cloud of sweetness!
Step 3: Add Eggs and Vanilla
Next, crack in the eggs, one at a time, mixing well after each addition. Eggs are the magic ingredient that binds everything together and helps the cake rise. Then, add the vanilla extract. This little splash of flavor is what makes your cake taste divine. It’s like adding a warm hug to your batter!
Step 4: Combine Dry Ingredients
In a separate bowl, whisk together the flour, baking powder, and salt. Mixing the dry ingredients separately is important because it ensures that the baking powder is evenly distributed throughout the flour. This way, your cake will rise beautifully without any lumps. Once mixed, gradually add this dry mixture to your wet ingredients, stirring gently until just combined. Be careful not to overmix; we want a soft, fluffy cake!
Step 5: Bake the Cake
Pour the batter into your prepared tart pan and smooth the top with a spatula. Pop it into the preheated oven and bake for about 25 to 30 minutes. To check for doneness, insert a toothpick into the center of the cake. If it comes out clean, you’re good to go! Once baked, let the cake cool in the pan for about 10 minutes before transferring it to a wire rack to cool completely. Patience is key here; a hot cake can be a crumbly mess!
Step 6: Prepare the Gelatin
While your cake is cooling, it’s time to prepare the star of the show—the gelatin! In a bowl, dissolve the strawberry gelatin powder in 250 ml of hot water. Stir it well until it’s completely dissolved. This step is crucial because any undissolved bits will ruin the smooth texture of your dessert. Once dissolved, let it cool to room temperature. You don’t want to pour hot gelatin over your cake; it’ll melt it away!
Step 7: Assemble the Dessert
Once your cake is completely cool, cut it into individual portions and place them on serving plates. Now, it’s time to pour that beautiful pink gelatin over each slice. Make sure each piece is generously covered. This is where the magic happens—the gelatin will create a lovely layer that not only looks stunning but also adds a burst of fruity flavor!
Step 8: Chill and Serve
After assembling, pop the plates into the refrigerator and let them chill for at least 2 hours. This allows the gelatin to set perfectly. Just before serving, add a dollop of whipped cream on top of each slice. If you’re feeling fancy, sprinkle some edible rose petals for that extra touch of elegance. And voilà! Your Tarta de Gelatina Rosa is ready to be devoured!
Tips for Success
- Always use room temperature ingredients for better mixing and texture.
- Don’t skip the cooling time for the cake; it helps maintain its structure.
- For a smoother gelatin layer, ensure it’s completely cooled before pouring.
- Experiment with different gelatin flavors for a fun twist!
- Keep an eye on the baking time; every oven is a little different.
Equipment Needed
- Tart pan: A round tart pan works best, but a regular cake pan will do in a pinch.
- Mixing bowls: Use at least two—one for wet ingredients and one for dry.
- Whisk or hand mixer: A whisk is great for small batches, while a hand mixer saves time.
- Spatula: Essential for smoothing the batter and serving the cake.
- Toothpick: Handy for checking if the cake is done baking.
Variations of Tarta de Gelatina Rosa
- Gelatina de Frutas Mixtas: Cambia la gelatina de fresa por una mezcla de sabores como piña, durazno o frutas del bosque para un toque tropical.
- Base de Galleta: En lugar de un bizcocho, utiliza una base de galleta triturada y mantequilla para un sabor crujiente y diferente.
- Versión Sin Gluten: Sustituye la harina de trigo por harina de almendra o una mezcla de harinas sin gluten para una opción apta para celíacos.
- Gelatina Vegana: Usa gelatina a base de plantas, como agar-agar, para hacer una versión vegana de esta deliciosa tarta.
- Adición de Frutas Frescas: Agrega fresas, frambuesas o kiwi en la parte superior de la gelatina antes de que se endurezca para un extra de frescura y color.
Serving Suggestions for Tarta de Gelatina Rosa
- Fresh Berries: Serve with a side of fresh strawberries or raspberries for a burst of flavor.
- Mint Leaves: Garnish with mint leaves for a refreshing touch.
- Tea or Coffee: Pair with a cup of herbal tea or coffee for a delightful afternoon treat.
- Elegant Plating: Use a cake stand to elevate the presentation and impress your guests.
FAQs about Tarta de Gelatina Rosa
As you embark on your journey to create the delightful Tarta de Gelatina Rosa, you might have a few questions. Don’t worry; I’ve got you covered! Here are some common queries that pop up when making this delicious dessert:
1. Can I use a different flavor of gelatin?
Absolutely! While strawberry is a classic choice, feel free to experiment with other flavors like raspberry, peach, or even tropical fruit blends. Each variation will give your Tarta de Gelatina Rosa a unique twist!
2. How long can I store the Tarta de Gelatina Rosa?
This tart can be stored in the refrigerator for up to 3 days. Just make sure to cover it well to keep it fresh. However, I doubt it will last that long—it’s just too delicious!
3. Can I make this dessert ahead of time?
Yes! The Tarta de Gelatina Rosa is perfect for making ahead. You can bake the cake a day in advance and prepare the gelatin layer the next day. Just remember to chill it for at least 2 hours before serving!
4. What can I use instead of whipped cream for decoration?
If you’re looking for alternatives to whipped cream, consider using Greek yogurt for a healthier option or coconut whipped cream for a dairy-free treat. Both will add a lovely creaminess to your tart!
5. Is this recipe suitable for special dietary needs?
Yes! You can easily adapt the Tarta de Gelatina Rosa to fit various dietary preferences. Use gluten-free flour for a gluten-free version, or opt for vegan gelatin to make it plant-based. The possibilities are endless!
Final Thoughts
Making a Tarta de Gelatina Rosa is more than just baking; it’s about creating sweet memories with your loved ones. This delightful dessert brings a splash of color and joy to any gathering, making it a perfect centerpiece for celebrations or a simple family dinner. I love how it combines the lightness of the cake with the fruity burst of gelatin, creating a treat that’s both refreshing and satisfying. So, whether you’re celebrating a special occasion or just want to brighten up a busy weeknight, this tart is sure to bring smiles and happiness to your table!
“` Print
Tarta de Gelatina Rosa: ¡Descubre su receta deliciosa!
- Total Time: 2 horas 30 minutos
- Yield: 8 porciones 1x
- Diet: Vegetarian
Description
Deliciosa tarta de gelatina de fresa, perfecta para cualquier ocasión.
Ingredients
- 1 taza de harina de trigo
- 100 g de azúcar
- 125 g de mantequilla a temperatura ambiente
- 2 huevos grandes
- 120 ml de leche
- 1 cucharadita de levadura en polvo
- 1 cucharadita de esencia de vainilla
- 1 pizca de sal
- 1 paquete de gelatina de fresa
- 250 ml de agua caliente
- 200 ml de nata montada para decorar
- Pétalos de rosa comestibles (opcional)
Instructions
- Comienza precalentando el horno a 180°C y engrasa un molde para tartas con mantequilla y un poco de harina.
- En un bol, mezcla la mantequilla con el azúcar hasta que la mezcla esté suave y cremosa. Añade los huevos uno a uno, asegurándote de que se integren bien.
- Agrega la leche y la esencia de vainilla, y mezcla hasta que todo esté bien combinado.
- En otro recipiente, combina la harina, la levadura y la sal. Incorpora esta mezcla seca a la mezcla húmeda gradualmente, batiendo hasta que no queden grumos.
- Vierte la masa en el molde y hornea durante 25 a 30 minutos, o hasta que al insertar un palillo, este salga limpio. Deja que se enfríe completamente en el molde.
- Mientras tanto, prepara la gelatina disolviendo el contenido en el agua caliente, revolviendo hasta que esté completamente disuelta. Deja enfriar a temperatura ambiente.
- Cuando la tarta esté fría, corta en porciones y colócala en platos individuales.
- Vierte la gelatina de fresa sobre cada porción de tarta, asegurándote de que quede bien cubierta. Lleva a la nevera durante al menos 2 horas para que la gelatina se endurezca.
- Justo antes de servir, añade una generosa porción de nata montada sobre cada rebanada y decora con pétalos de rosa comestibles si lo deseas.
- ¡Listo para disfrutar de tu deliciosa Tarta de Gelatina de Fresa!
Notes
- La gelatina puede ser sustituida por otro sabor si lo prefieres.
- Los pétalos de rosa son opcionales, pero añaden un toque decorativo especial.
- Prep Time: 30 minutos
- Cook Time: 30 minutos
- Category: Postre
- Method: Horneado y refrigerado
- Cuisine: Latina
Nutrition
- Serving Size: 1 porción
- Calories: 250
- Sugar: 20 g
- Sodium: 150 mg
- Fat: 12 g
- Saturated Fat: 7 g
- Unsaturated Fat: 3 g
- Trans Fat: 0 g
- Carbohydrates: 30 g
- Fiber: 1 g
- Protein: 3 g
- Cholesterol: 70 mg