
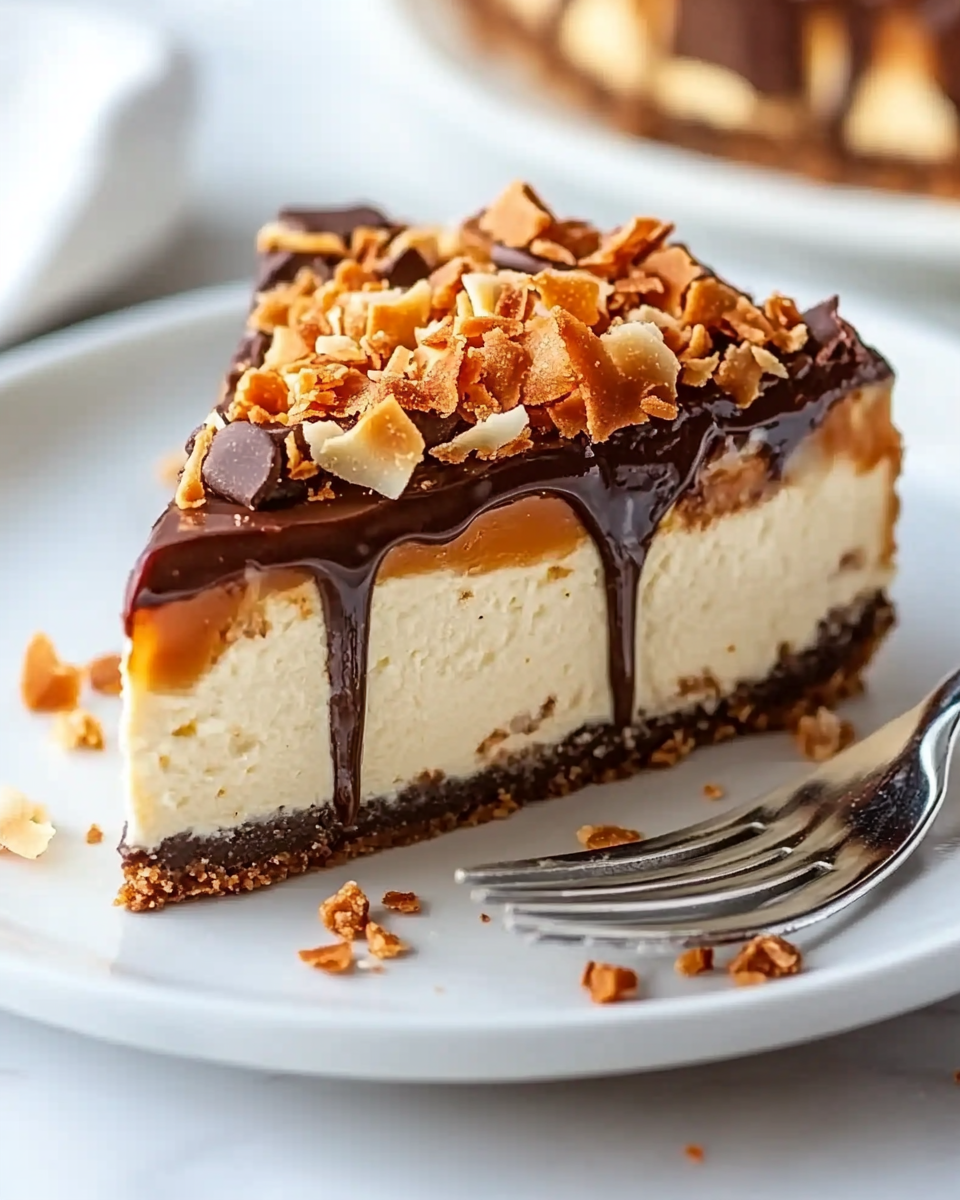
Introduction to Cheesecake Samoa
Hey there, fellow dessert lovers! If you’re anything like me, you know that life can get pretty hectic, especially when juggling work, family, and everything in between. That’s why I’m excited to share my recipe for Cheesecake Samoa—a delightful treat that’s not only easy to whip up but also sure to impress your loved ones. Imagine a creamy, dreamy cheesecake with a luscious coconut and chocolate twist, all sitting on a crunchy cookie crust. It’s the perfect solution for a busy day or a special occasion, bringing a little slice of paradise right to your kitchen!
Why You’ll Love This Cheesecake Samoa
Let’s be real—who doesn’t love a dessert that’s both delicious and easy to make? This Cheesecake Samoa is a game-changer for busy women like us. It comes together quickly, with minimal fuss, and the flavors are simply out of this world! Plus, it’s a crowd-pleaser, so whether you’re hosting a family gathering or just treating yourself after a long week, this cheesecake will have everyone asking for seconds. Trust me, you’ll be the star of the dessert table!
Ingredients for Cheesecake Samoa
Now, let’s dive into the delicious components that make up this Cheesecake Samoa. Each ingredient plays a vital role in creating that irresistible flavor and texture. Here’s what you’ll need:
- Chocolate Cookies: These are the foundation of our crust. You can use any chocolate cookie you love—think Oreos or even homemade chocolate cookies if you’re feeling adventurous!
- Melted Butter: This binds the cookie crumbs together, giving the crust that perfect, buttery crunch. If you’re looking for a lighter option, you can substitute with coconut oil.
- Cream Cheese: The star of the show! Make sure it’s at room temperature for easy mixing. You can also use a low-fat version if you want to cut down on calories.
- Sugar: This sweetens the cheesecake and balances the rich flavors. Feel free to experiment with alternatives like coconut sugar or a sugar substitute if you’re watching your sugar intake.
- Eggs: They help set the cheesecake, giving it that creamy, smooth texture. If you’re looking for an egg-free option, you can use flax eggs or a commercial egg replacer.
- Vanilla Extract: A splash of this adds warmth and depth to the flavor. Always opt for pure vanilla extract for the best taste, but imitation works in a pinch.
- Coconut Cream: This is where the tropical vibes come in! It adds richness and a lovely coconut flavor. If you can’t find coconut cream, you can use full-fat coconut milk instead.
- Shredded Coconut: This gives a delightful texture and enhances the coconut flavor. Toast it for an extra layer of flavor! If you’re not a fan of coconut, you can skip this or use crushed nuts instead.
- Dark Chocolate: Melted and drizzled on top, it adds a rich contrast to the sweetness of the cheesecake. You can use milk chocolate if you prefer a sweeter touch.
- Caramel Sauce: A drizzle of this on top brings everything together with a sweet finish. You can use store-bought or make your own if you’re feeling crafty!
For exact measurements, check the bottom of the article where you can find everything listed for easy printing. Now that we have our ingredients ready, let’s get cooking!
How to Make Cheesecake Samoa
Now that we have our ingredients ready, let’s dive into the fun part—making this Cheesecake Samoa! Follow these simple steps, and you’ll have a delicious dessert that will wow your family and friends.
Step 1: Prepare the Crust
First things first, let’s get that crust ready! Grab your chocolate cookies and toss them into a food processor. If you don’t have one, a good old-fashioned zip-top bag and a rolling pin will do the trick. Crush those cookies until they resemble fine crumbs—think sand at the beach! Once you’ve got your cookie crumbs, pour them into a mixing bowl and add the melted butter. Mix it all together until it resembles wet sand. This is the magic that will hold your crust together!
Step 2: Bake the Crust
Next, it’s time to form the crust. Take your cookie mixture and press it firmly into the bottom of a springform pan. Use the back of a measuring cup or your fingers to make sure it’s nice and compact. This step is crucial for a sturdy crust! Now, pop it into a preheated oven at 350°F (180°C) for about 10 minutes. This little bake will help set the crust. Once it’s done, let it cool completely while you prepare the filling. Trust me, the wait will be worth it!
Step 3: Make the Filling
Now onto the creamy goodness! In a large mixing bowl, beat the room-temperature cream cheese with sugar until it’s smooth and fluffy—think clouds on a sunny day! Add in the eggs, one at a time, mixing well after each addition. This helps to keep your cheesecake light and airy. Next, stir in the vanilla extract and coconut cream. The coconut cream is what gives this cheesecake its tropical flair! Mix until everything is well combined and creamy. You’ll want to taste it, but remember, it’s not ready yet!
Step 4: Bake the Cheesecake
Time to pour that luscious filling over your cooled crust! Carefully spread it out with a spatula, making sure it’s even. Now, pop the cheesecake into the oven and bake for about 50-60 minutes. You’ll know it’s done when the edges are set, but the center still has a slight jiggle—like a gentle wave. Once it’s baked, turn off the oven and crack the door open, letting the cheesecake cool slowly inside for about an hour. This helps prevent cracks, which is a common cheesecake woe!
Step 5: Chill the Cheesecake
After that hour of cooling, it’s time to let your cheesecake chill in the fridge. This is a crucial step for achieving that perfect texture. Ideally, you want to chill it for at least 4 hours, but if you can wait overnight, you’ll be rewarded with an even creamier cheesecake. Just imagine the anticipation as you wait for that first slice!
Step 6: Decorate and Serve
Finally, the moment we’ve all been waiting for—decorating! Start by toasting the shredded coconut in a dry skillet over medium heat. Keep an eye on it, as it can go from golden to burnt in a flash! Once it’s beautifully toasted, set it aside. Now, drizzle the melted dark chocolate over the chilled cheesecake, followed by a generous drizzle of caramel sauce. Sprinkle the toasted coconut on top, and voilà! Your Cheesecake Samoa is ready to impress. Slice it up, serve it to your loved ones, and watch their faces light up with joy!
Tips for Success
- Make sure your cream cheese is at room temperature for easy mixing—no one likes lumps!
- Don’t skip the chilling time; it’s essential for that perfect texture.
- Toast the coconut just before serving for maximum flavor and crunch.
- Use a water bath while baking to prevent cracks in your cheesecake.
- Feel free to customize toppings—add nuts or fresh fruit for a twist!
Equipment Needed
- Springform Pan: Ideal for cheesecakes, but a regular round cake pan works too.
- Food Processor: Great for crushing cookies; a zip-top bag and rolling pin can substitute.
- Mixing Bowls: Use any size you have on hand.
- Spatula: Perfect for spreading the filling evenly.
- Measuring Cups and Spoons: Essential for accurate ingredient amounts.
Variations
- Nutty Twist: Add crushed nuts like pecans or walnuts to the crust for an extra crunch and flavor.
- Fruit Infusion: Top your Cheesecake Samoa with fresh berries or sliced bananas for a fruity contrast.
- Chocolate Lovers: Mix in chocolate chips into the filling for an even richer chocolate experience.
- Gluten-Free Option: Use gluten-free chocolate cookies for the crust to make this dessert suitable for gluten-sensitive friends.
- Vegan Version: Substitute cream cheese with a vegan cream cheese alternative and use flax eggs for an egg-free option.
Serving Suggestions
- Pair with Coffee: A rich cup of coffee complements the sweetness of the Cheesecake Samoa beautifully.
- Fresh Fruit: Serve with a side of fresh berries for a refreshing contrast.
- Presentation: Garnish with mint leaves for a pop of color and freshness.
- Ice Cream: A scoop of vanilla ice cream on the side adds an extra creamy touch.
FAQs about Cheesecake Samoa
As you embark on your journey to create this delightful Cheesecake Samoa, you might have a few questions. Don’t worry; I’ve got you covered! Here are some common queries that pop up when making this delicious dessert:
1. Can I make Cheesecake Samoa ahead of time?
Absolutely! In fact, making it a day in advance is a great idea. The flavors meld beautifully overnight, and the texture becomes even creamier. Just make sure to keep it covered in the fridge until you’re ready to serve!
2. How do I prevent my cheesecake from cracking?
Cracks can be a cheesecake’s worst enemy! To avoid this, make sure not to overmix your filling, and consider using a water bath while baking. This gentle cooking method helps maintain moisture and temperature, resulting in a smooth surface.
3. Can I use different types of cookies for the crust?
Definitely! While chocolate cookies are traditional, you can experiment with graham crackers, vanilla wafers, or even gluten-free options. Just remember that the flavor will change slightly, but it can be just as delicious!
4. What can I substitute for cream cheese?
If you’re looking for a lighter option, you can use low-fat cream cheese. For a dairy-free alternative, try using vegan cream cheese or a blended mixture of silken tofu and coconut cream. It won’t be exactly the same, but it can still be tasty!
5. How should I store leftovers?
Store any leftover Cheesecake Samoa in an airtight container in the fridge. It should last for about 3-4 days. Just be sure to keep it covered to maintain its creamy texture and delicious flavor!
Final Thoughts
Making this Cheesecake Samoa is more than just baking; it’s about creating sweet memories with your loved ones. The joy of watching their faces light up as they take that first bite is priceless. This dessert brings a little slice of paradise to your table, making any occasion feel special. Plus, it’s a fantastic way to unwind after a busy day, indulging in something delicious that you made with your own hands. So, roll up your sleeves, gather your ingredients, and let the magic of this cheesecake transform your kitchen into a haven of happiness!
“` Print
Cheesecake Samoa: Descubre el sabor irresistible hoy!
- Total Time: 5 horas 30 minutos
- Yield: 8 porciones 1x
- Diet: Vegetarian
Description
Delicioso cheesecake de coco y chocolate con una base de galletas de chocolate, perfecto para cualquier ocasión.
Ingredients
- 200 g de galletas de chocolate
- 100 g de mantequilla derretida
- 500 g de queso crema a temperatura ambiente
- 200 g de azúcar
- 3 huevos
- 1 cucharadita de extracto de vainilla
- 200 ml de crema de coco
- 100 g de coco rallado
- 100 g de chocolate negro derretido
- 50 g de caramelo líquido
Instructions
- Comienza triturando las galletas de chocolate en un procesador hasta que queden como polvo. Mezcla este polvo con la mantequilla derretida hasta formar una pasta.
- Extiende la mezcla en el fondo de un molde desmontable, presionando firmemente para que quede compacta. Hornea a 180°C durante 10 minutos y deja que se enfríe completamente.
- En un bol grande, bate el queso crema con el azúcar hasta que esté bien integrado y suave. Agrega los huevos uno a uno, asegurándote de mezclar bien después de cada adición. Incorpora el extracto de vainilla y la crema de coco.
- Vierte la mezcla de queso crema sobre la base de galletas ya fría, alisando la superficie con una espátula. Hornea durante 50-60 minutos, o hasta que el centro esté casi firme. Luego, apaga el horno y deja el cheesecake dentro con la puerta entreabierta durante una hora para que se enfríe lentamente.
- Saca el cheesecake del horno y déjalo enfriar a temperatura ambiente. Después, refrigéralo por al menos 4 horas, aunque es mejor dejarlo toda la noche.
- Para decorar, tuesta el coco rallado en una sartén a fuego medio hasta que esté dorado. Justo antes de servir, espolvorea el coco tostado sobre el cheesecake, añade el chocolate derretido y un chorrito de caramelo líquido. ¡Listo para disfrutar!
Notes
- Es recomendable dejar el cheesecake en la nevera toda la noche para obtener una mejor textura.
- El coco rallado se puede tostar en el horno si se prefiere.
- Prep Time: 30 minutos
- Cook Time: 1 hora
- Category: Postre
- Method: Horneado
- Cuisine: Americana
Nutrition
- Serving Size: 1 porción
- Calories: 450
- Sugar: 30 g
- Sodium: 200 mg
- Fat: 30 g
- Saturated Fat: 18 g
- Unsaturated Fat: 8 g
- Trans Fat: 0 g
- Carbohydrates: 40 g
- Fiber: 2 g
- Protein: 6 g
- Cholesterol: 100 mg