
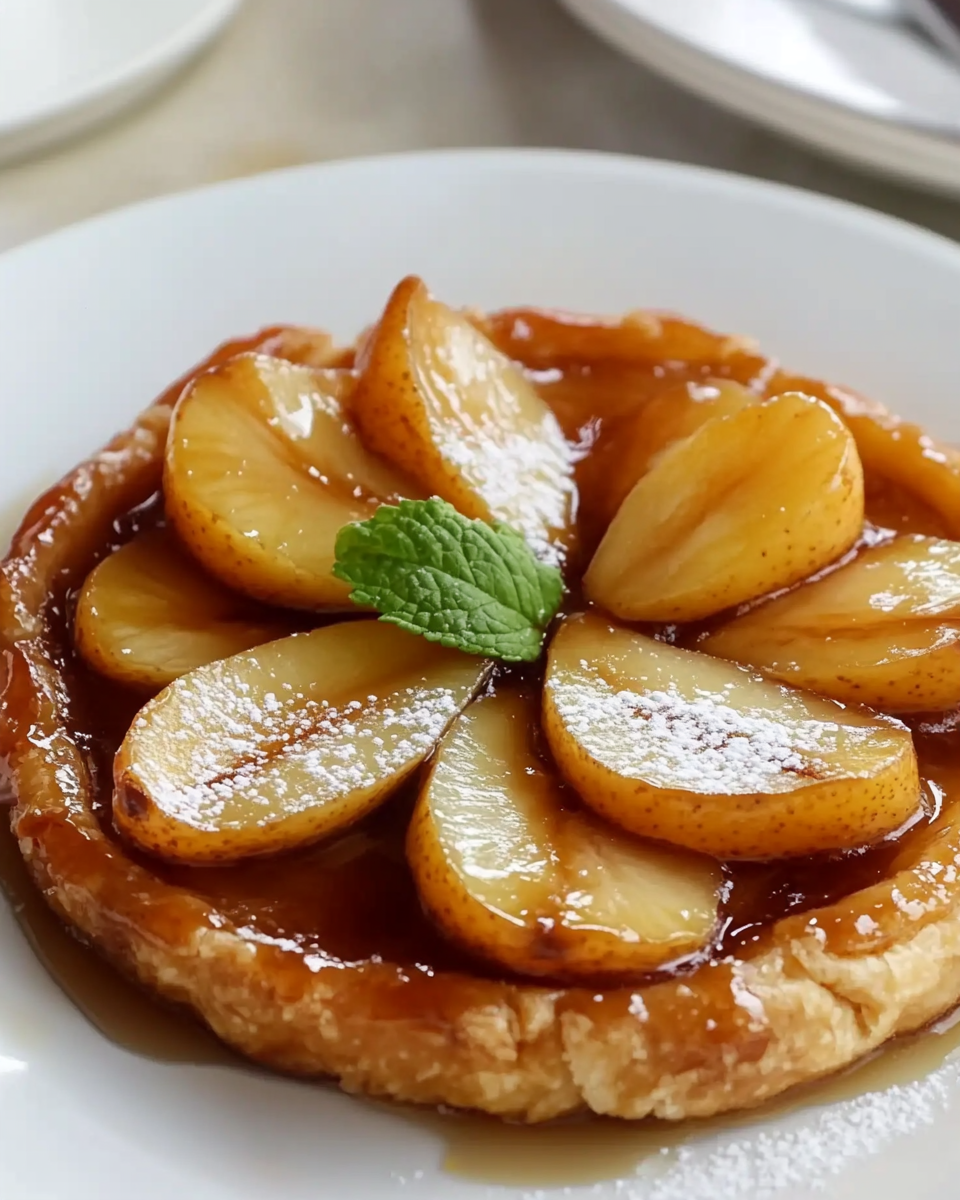
Introduction to Tarta Tatin de Pera
Hola, amigos! If you’re anything like me, life can get a bit hectic, especially when juggling work, family, and everything in between. That’s why I’m excited to share my go-to dessert: Tarta Tatin de Pera. This delightful upside-down pear tart is not just a feast for the eyes but also a quick solution for those busy days when you want to impress your loved ones without spending hours in the kitchen. With its caramelized pears and flaky crust, it’s the perfect way to end any meal, and trust me, your family will be asking for seconds!
Why You’ll Love This Tarta Tatin de Pera
This Tarta Tatin de Pera is a game-changer for busy women like us! It’s incredibly easy to whip up, taking just about 50 minutes from start to finish. The sweet, caramelized pears paired with a buttery crust create a taste sensation that feels fancy but is totally achievable. Plus, it’s a crowd-pleaser—perfect for family dinners or last-minute gatherings. You’ll love how it makes you look like a culinary superstar with minimal effort!
Ingredients for Tarta Tatin de Pera
Let’s dive into the delicious components that make up this Tarta Tatin de Pera! Each ingredient plays a vital role in creating that mouthwatering flavor and texture. Here’s what you’ll need:
- Peras maduras: Las estrellas de este postre. Asegúrate de elegir peras que estén bien maduras para obtener el mejor sabor y una textura suave. Variedades como la Bartlett o la Anjou son perfectas.
- Azúcar moreno: Este azúcar aporta un sabor profundo y caramelizado. Si no tienes azúcar moreno, puedes usar azúcar blanco, pero el sabor no será tan rico.
- Mantequilla sin sal: La mantequilla es esencial para crear ese caramelo delicioso. Opta por mantequilla sin sal para tener un mejor control sobre el sabor salado del postre.
- Nuez moscada: Esta especia añade un toque cálido y aromático. Si no tienes nuez moscada, la canela puede ser un buen sustituto.
- Masa quebrada: Puedes hacerla desde cero o comprarla ya preparada. La masa quebrada es la base crujiente que complementa las peras caramelizadas. Si buscas una opción más saludable, prueba con masa integral.
- Extracto de vainilla: Un chorrito de este extracto realza todos los sabores. Si no tienes extracto, puedes usar vainilla en polvo como alternativa.
- Pimienta negra: Aunque suene inusual, una pizca de pimienta negra realza el dulzor de las peras. Si prefieres un sabor más suave, puedes omitirla.
Recuerda que las cantidades exactas de cada ingrediente están al final del artículo, listas para que las imprimas y las lleves a la cocina. ¡Ahora que tienes todo lo que necesitas, vamos a cocinar!
How to Make Tarta Tatin de Pera
Now that we have our ingredients ready, let’s get down to the fun part—making this delicious Tarta Tatin de Pera! Follow these simple steps, and you’ll have a stunning dessert that will wow your family and friends.
Step 1: Preheat the Oven
First things first, let’s get that oven preheating to 190°C (375°F). Preheating is crucial because it ensures that your tart bakes evenly. If you skip this step, you might end up with a soggy crust or unevenly cooked pears. So, while the oven warms up, you can focus on the next steps!
Step 2: Prepare the Caramel
In a sturdy oven-safe skillet, melt 50 grams of unsalted butter over medium heat. Once the butter is melted, add 100 grams of brown sugar. Stir constantly as the sugar dissolves and begins to bubble. This is where the magic happens! Keep stirring until you see a beautiful caramel forming. It should be smooth and golden, not too dark—about 5 minutes should do the trick. Remember, patience is key here; if you stop stirring, the sugar can burn, and nobody wants that!
Step 3: Add the Pears
Now it’s time to add those luscious pear quarters to the caramel. Gently toss them in the pan, making sure they’re well-coated in that sweet, sticky goodness. Sprinkle in a teaspoon of nutmeg, a splash of vanilla extract, and a pinch of black pepper. Yes, you read that right! The black pepper enhances the sweetness of the pears, creating a delightful flavor contrast. Cook the pears for about 7 minutes, stirring occasionally, until they start to soften and caramelize. Your kitchen will smell heavenly!
Step 4: Cover with Pastry
Once your pears are perfectly caramelized, it’s time to cover them with the pastry. Take your sheet of pie crust and gently lay it over the pears, tucking the edges down around the sides of the skillet. This helps keep all that delicious caramel inside. Don’t forget to cut a few small slits in the pastry to allow steam to escape while baking. This step is essential to avoid a soggy tart!
Step 5: Bake the Tart
Pop the skillet into your preheated oven and bake for about 30 to 35 minutes. You’ll know it’s done when the pastry is golden brown and crisp to the touch. Keep an eye on it during the last few minutes—oven temperatures can vary, and you want that perfect golden crust!
Step 6: Serve the Tart
Once your Tarta Tatin de Pera is out of the oven, let it rest for about 10 minutes. This is the hardest part, I know! But trust me, it’s worth the wait. To serve, carefully flip the tart onto a large plate. Just place the plate over the skillet and give it a gentle but confident flip. Voilà! The caramelized pears should now be beautifully displayed on top. Serve it warm, either on its own or with a dollop of whipped cream or a scoop of vanilla ice cream. Enjoy every bite of this heavenly dessert!
Tips for Success
- Use ripe pears for the best flavor and texture—overripe is better than underripe!
- Keep stirring the caramel to prevent burning; it’s a labor of love!
- Don’t skip the venting slits in the pastry; they’re crucial for a crispy crust.
- Let the tart rest before flipping to avoid a caramel mess.
- Experiment with spices like cinnamon for a unique twist!
Equipment Needed
- Oven-safe skillet: A cast-iron skillet works wonders, but any oven-safe pan will do.
- Spatula: For flipping the tart; a wide one makes it easier.
- Measuring cups and spoons: Essential for accuracy, but eyeballing can work in a pinch!
- Cutting board and knife: For prepping those juicy pears.
Variations of Tarta Tatin de Pera
- Manzana en lugar de pera: Si no tienes peras a mano, las manzanas son una excelente alternativa. Opta por variedades como la Granny Smith para un toque ácido que complementa el caramelo.
- Agrega frutos secos: Incorpora nueces o almendras tostadas en la parte superior antes de hornear para un crujido extra y un sabor delicioso.
- Versión sin gluten: Usa una masa quebrada sin gluten para que todos puedan disfrutar de este postre. Hay muchas opciones disponibles en el mercado.
- Toque de licor: Añade un chorrito de licor como el brandy o el ron al caramelo para un sabor más profundo y sofisticado.
- Especias alternativas: Experimenta con especias como la canela o el jengibre para darle un giro diferente a la receta. ¡La creatividad es clave!
Serving Suggestions for Tarta Tatin de Pera
- Helado de vainilla: Una bola de helado de vainilla derretido sobre la tarta caliente es pura felicidad.
- Crema batida: Un poco de crema batida fresca añade un toque ligero y cremoso.
- Frutas frescas: Sirve con rodajas de kiwi o fresas para un contraste de color y frescura.
- Vino dulce: Un vino dulce o un espumoso complementa perfectamente los sabores de la tarta.
- Presentación: Decora con hojas de menta para un toque elegante y fresco.
FAQs about Tarta Tatin de Pera
Let’s tackle some common questions you might have about making this delightful Tarta Tatin de Pera. I know how important it is to have all the information at your fingertips, especially when you’re busy!
1. Can I use other fruits for Tarta Tatin?
Absolutely! While this recipe focuses on pears, you can easily swap them for apples, peaches, or even plums. Just keep in mind that different fruits may require slight adjustments in cooking time. Apples, for instance, might need a bit longer to soften.
2. How do I store leftovers?
If you happen to have any leftovers (which is rare, trust me!), store them in an airtight container in the fridge. They’ll keep well for about 2-3 days. Just reheat in the oven for a few minutes to bring back that delicious crispiness!
3. Can I make Tarta Tatin de Pera ahead of time?
Yes, you can! Prepare the tart up to the baking step, cover it, and refrigerate it for a few hours or overnight. When you’re ready to serve, just pop it in the oven. It’s a great way to save time on busy days!
4. What can I serve with Tarta Tatin de Pera?
This tart pairs beautifully with a scoop of vanilla ice cream or a dollop of whipped cream. You can also serve it with a side of fresh fruit or a glass of sweet dessert wine for a truly indulgent experience.
5. Is Tarta Tatin de Pera suitable for special diets?
While this recipe is vegetarian, you can make it gluten-free by using a gluten-free pastry. Just check the labels to ensure all your ingredients meet your dietary needs. It’s a versatile dessert that can cater to various preferences!
Final Thoughts
Making Tarta Tatin de Pera is more than just baking; it’s about creating sweet memories in the kitchen. The joy of watching those pears transform into a caramelized masterpiece is truly rewarding. This dessert not only satisfies your sweet tooth but also brings your family together around the table, sharing laughter and stories. Whether it’s a special occasion or a simple weeknight treat, this tart is sure to impress. So, roll up your sleeves, embrace the deliciousness, and enjoy every moment of this delightful culinary adventure. Trust me, your loved ones will thank you for it!
“` Print
Tarta Tatin de Pera: ¡Descubre el postre perfecto!
- Total Time: 50 minutos
- Yield: 8 porciones 1x
- Diet: Vegetarian
Description
Tarta Tatin de Pera es un delicioso postre que combina peras caramelizadas con una masa quebrada crujiente, ideal para cualquier ocasión.
Ingredients
- 4 peras maduras, peladas y cortadas en cuartos
- 100 g de azúcar moreno
- 50 g de mantequilla sin sal
- 1 cucharadita de nuez moscada
- 1 lámina de masa quebrada (puede ser comprada)
- Un chorrito de extracto de vainilla
- Una pizca de pimienta negra
Instructions
- Comienza precalentando el horno a 190°C. En una sartén que pueda ir al horno, derrite la mantequilla a fuego medio y añade el azúcar moreno, removiendo constantemente hasta que se forme un caramelo burbujeante.
- Incorpora los cuartos de pera a la sartén, asegurándote de que se impregnen bien con el caramelo. Espolvorea la nuez moscada, el extracto de vainilla y la pimienta negra. Cocina durante unos 7 minutos, moviendo las peras para que se caramelicen por todos lados.
- Retira la sartén del fuego y coloca la masa quebrada sobre las peras, presionando ligeramente los bordes hacia abajo. Haz un par de cortes en la masa para permitir que el vapor se escape durante la cocción.
- Hornea la tarta en el horno precalentado durante 30-35 minutos, o hasta que la masa esté dorada y crujiente al tacto.
- Al sacarla del horno, deja reposar la tarta durante 10 minutos. Con cuidado, voltea la sartén sobre un plato grande para que las peras caramelizadas queden en la parte superior.
- Disfruta de la tarta tibia, sola o con una cucharada de crema batida. ¡Es un postre irresistible!
Notes
- Se puede servir con helado o crema batida para un toque extra.
- Las peras deben estar maduras para obtener el mejor sabor y textura.
- Prep Time: 15 minutos
- Cook Time: 35 minutos
- Category: Postre
- Method: Horneado
- Cuisine: Francesa
Nutrition
- Serving Size: 1 porción
- Calories: 250
- Sugar: 20 g
- Sodium: 50 mg
- Fat: 10 g
- Saturated Fat: 6 g
- Unsaturated Fat: 4 g
- Trans Fat: 0 g
- Carbohydrates: 35 g
- Fiber: 2 g
- Protein: 2 g
- Cholesterol: 30 mg