
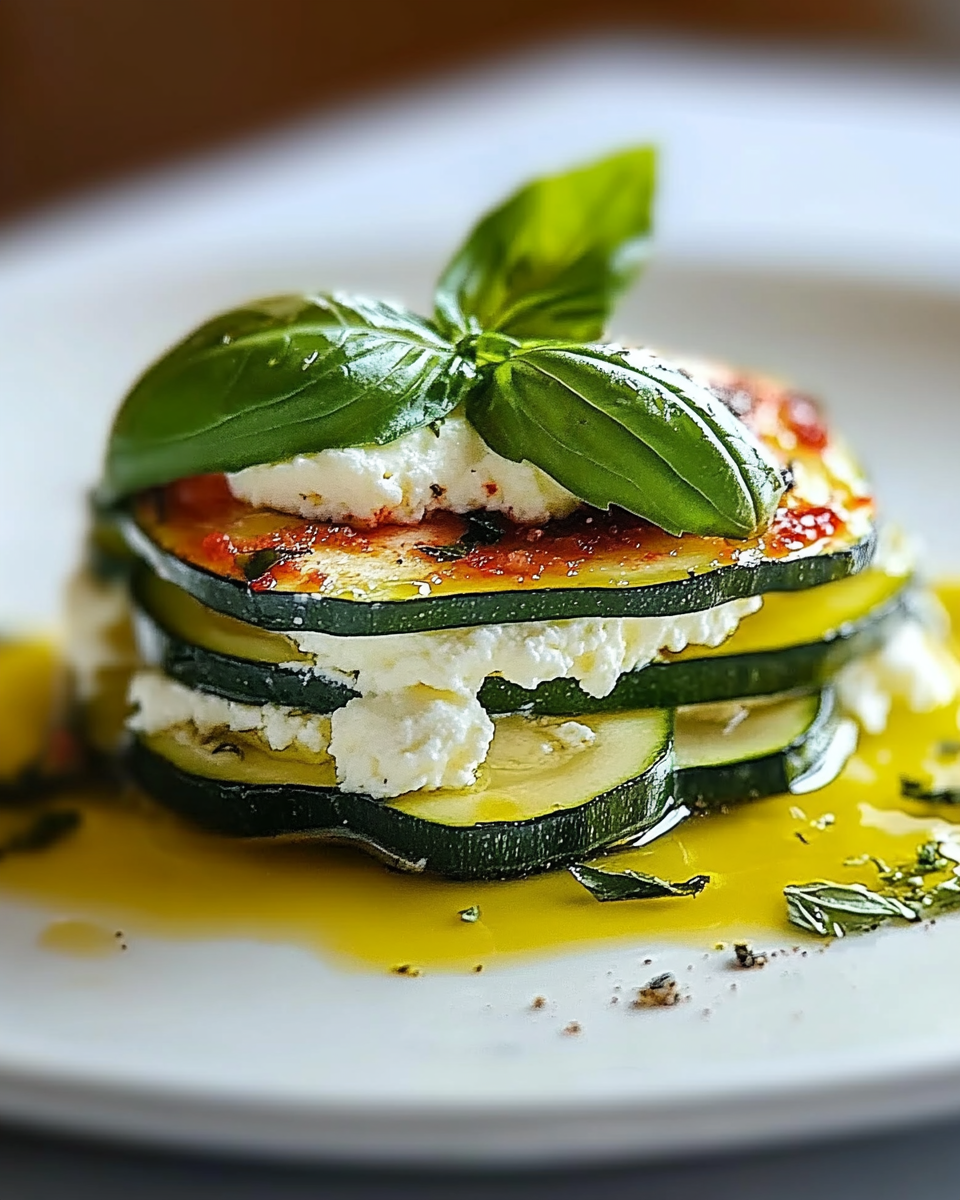
Introduction to Melteado de Calabacín y Ricotta en Capas
Hola, amigas! If you’re anything like me, juggling work, family, and a million other responsibilities can feel like a circus act. That’s why I’m excited to share my recipe for Melteado de Calabacín y Ricotta en Capas. This delightful layered zucchini and ricotta dish is not just a feast for the eyes but also a quick solution for those busy weeknights when you want to impress your loved ones without spending hours in the kitchen. Trust me, this recipe will have everyone asking for seconds, and you’ll feel like a culinary superstar!
Why You’ll Love This Melteado de Calabacín y Ricotta en Capas
Let’s be real—life can get hectic, and finding time to cook can feel like searching for a needle in a haystack. That’s why this Melteado de Calabacín y Ricotta en Capas is a game-changer! It’s not only easy to whip up, but it also packs a punch of flavor that will make your family rave. Plus, it’s a fantastic way to sneak in those veggies without anyone batting an eye!
Ingredients for Melteado de Calabacín y Ricotta en Capas
Before we dive into the cooking, let’s gather our ingredients for this scrumptious Melteado de Calabacín y Ricotta en Capas. Each component plays a vital role in creating that perfect balance of flavors and textures. Here’s what you’ll need:
- Calabacines medianos: These are the stars of our dish! They add a lovely, mild flavor and a satisfying texture. Look for firm zucchinis without blemishes for the best results.
- Queso ricotta: This creamy cheese is the heart of our filling. It brings richness and a slight sweetness. If you’re looking for a lighter option, feel free to swap it out for cottage cheese.
- Queso mozzarella rallado: This cheese melts beautifully, creating that gooey, cheesy goodness we all love. You can use part-skim mozzarella for a healthier twist.
- Queso parmesano rallado: A sprinkle of this sharp cheese adds depth and a savory kick. If you want to keep it lighter, you can skip this ingredient without sacrificing too much flavor.
- Huevo: This little guy helps bind the ricotta mixture together, ensuring every bite is creamy and cohesive.
- Diente de ajo picado: Garlic is a flavor powerhouse! It adds a fragrant aroma and a savory punch that elevates the entire dish.
- Orégano seco: This herb brings a warm, earthy flavor that complements the zucchini perfectly. If you have fresh oregano on hand, feel free to use that instead!
- Albahaca fresca picada: Fresh basil adds a burst of freshness and a hint of sweetness. It’s like a garden party in your mouth!
- Sal y pimienta: These are essential for seasoning. Don’t be shy—season to taste to bring out all the flavors.
- Aceite de oliva: A drizzle of olive oil helps sauté the zucchini to perfection, giving it a lovely golden color and enhancing the flavors.
- Salsa de tomate: This is the base of our lasagna layers. Choose a good-quality sauce or make your own for a personal touch.
- Hojas de albahaca para decorar: These are optional but add a beautiful finishing touch to your dish, making it look as good as it tastes!
For exact measurements, check the bottom of the article where you can find everything listed for easy printing. Now that we have our ingredients ready, let’s get cooking!
How to Make Melteado de Calabacín y Ricotta en Capas
Now that we have our ingredients ready, let’s dive into the fun part—making this delicious Melteado de Calabacín y Ricotta en Capas! Follow these simple steps, and you’ll have a mouthwatering dish that’s sure to impress.
Step 1: Preheat the Oven
First things first, let’s get that oven preheating to 190°C (375°F). Preheating is crucial because it ensures that your lasagna cooks evenly. While the oven warms up, wash your zucchinis and slice them into thin, even layers. I like to sprinkle a little salt on them and let them sit for about 10 minutes. This helps draw out excess moisture, so your dish doesn’t end up watery. Trust me, it makes a difference!
Step 2: Prepare the Ricotta Mixture
In a mixing bowl, combine the ricotta cheese, egg, minced garlic, dried oregano, fresh basil, and a pinch of salt and pepper. Mix everything together until it’s well blended. This creamy filling is the heart of our Melteado de Calabacín y Ricotta en Capas, so make sure it’s nice and smooth. If you’re feeling adventurous, you can even add a dash of red pepper flakes for a little kick!
Step 3: Sauté the Zucchini
Next, heat a couple of tablespoons of olive oil in a large skillet over medium heat. Once the oil is hot, add your zucchini slices in a single layer. Sauté them for about 3-4 minutes on each side until they’re golden brown and tender. Don’t overcrowd the pan; you want them to get that lovely caramelization. If you have to, do this in batches. The goal is to achieve a nice texture that will hold up in the layers!
Step 4: Layer the Ingredients
Now comes the fun part—layering! Grab a baking dish and pour a thin layer of tomato sauce at the bottom. This prevents sticking and adds flavor. Start with a layer of zucchini slices, followed by a generous scoop of the ricotta mixture. Sprinkle some mozzarella and parmesan cheese on top. Repeat this process until you run out of ingredients, finishing with a layer of sauce and a sprinkle of cheese on top. It’s like building a delicious tower of goodness!
Step 5: Bake the Dish
Pop your assembled dish into the preheated oven and bake for about 25-30 minutes. You’ll know it’s done when the cheese is bubbly and golden brown. Let it rest for a few minutes before serving. This allows the layers to set, making it easier to slice. When you cut into it, you’ll see those beautiful layers of zucchini and ricotta, and the aroma will have everyone gathering around the table!
Tips for Success
- Always slice your zucchini evenly for consistent cooking.
- Let the zucchini sit with salt to draw out moisture, preventing a soggy dish.
- Feel free to mix in other veggies like spinach or mushrooms for added flavor.
- Make it ahead of time! This dish reheats beautifully, making it perfect for busy nights.
- Don’t skip the resting time after baking; it helps the layers hold together.
Equipment Needed
- Oven: Essential for baking your Melteado de Calabacín y Ricotta en Capas. A toaster oven works too for smaller portions.
- Baking dish: A 9×13 inch dish is perfect, but any oven-safe dish will do.
- Skillet: A non-stick skillet makes sautéing the zucchini a breeze.
- Mixing bowl: For combining your ricotta mixture; any bowl will work!
- Knife and cutting board: For slicing your zucchini and garlic.
Variations
- Meat Lover’s Delight: Add cooked ground turkey or beef between the layers for a heartier version that will satisfy the meat lovers in your family.
- Gluten-Free Option: Use gluten-free pasta sheets instead of zucchini for a traditional lasagna feel without the gluten.
- Spicy Kick: Incorporate sliced jalapeños or a sprinkle of crushed red pepper flakes into the ricotta mixture for a spicy twist.
- Herb Infusion: Experiment with different herbs like thyme or rosemary to give your dish a unique flavor profile.
- Vegan Version: Substitute ricotta with a blend of blended tofu and nutritional yeast, and use vegan cheese for a plant-based delight.
Serving Suggestions
- Fresh Salad: Pair your Melteado de Calabacín y Ricotta en Capas with a crisp green salad drizzled with balsamic vinaigrette for a refreshing contrast.
- Garlic Bread: Serve with warm garlic bread to soak up the delicious sauce.
- Wine Pairing: A light white wine, like Pinot Grigio, complements the flavors beautifully.
- Presentation: Garnish with fresh basil leaves for a pop of color and added freshness.
FAQs about Melteado de Calabacín y Ricotta en Capas
As I’ve shared my recipe for Melteado de Calabacín y Ricotta en Capas, I know you might have a few questions swirling around in your mind. Let’s tackle some of the most common ones to help you feel confident in the kitchen!
1. Can I make Melteado de Calabacín y Ricotta en Capas ahead of time?
Absolutely! This dish is perfect for meal prep. You can assemble it a day in advance and store it in the fridge. Just pop it in the oven when you’re ready to serve. It reheats beautifully, making it a fantastic option for busy weeknights!
2. What can I substitute for ricotta cheese?
If ricotta isn’t your thing, you can easily swap it for cottage cheese or even a vegan alternative like blended tofu mixed with nutritional yeast. Both options will still give you that creamy texture we love in this Melteado de Calabacín y Ricotta en Capas.
3. How do I prevent the zucchini from becoming soggy?
Great question! The key is to slice the zucchini evenly and sprinkle it with salt before cooking. Letting it sit for about 10 minutes helps draw out excess moisture. Sautéing it until golden brown also adds a nice texture, preventing sogginess in your layers.
4. Can I add other vegetables to this recipe?
Definitely! Feel free to get creative. Spinach, mushrooms, or even bell peppers can be great additions. Just sauté them along with the zucchini or layer them in for extra flavor and nutrition. It’s a wonderful way to customize your Melteado de Calabacín y Ricotta en Capas to your family’s taste!
5. How do I know when the dish is done baking?
Your Melteado de Calabacín y Ricotta en Capas is ready when the cheese on top is bubbly and golden brown. If you want to be extra sure, you can insert a knife into the center; it should come out hot and clean. Let it rest for a few minutes before serving to help the layers set!
Final Thoughts
Cooking can sometimes feel like a chore, especially when life gets busy. But with this Melteado de Calabacín y Ricotta en Capas, you’ll find joy in the kitchen again! The vibrant layers of zucchini and creamy ricotta create a dish that’s not only delicious but also a feast for the eyes. It’s perfect for family dinners or impressing guests without breaking a sweat. Plus, the leftovers (if there are any!) make for a delightful lunch the next day. So roll up your sleeves, and let this recipe bring a little magic back to your mealtime!
“` Print
Melteado de Calabacín y Ricotta en Capas que Sorprende
- Total Time: 50 minutos
- Yield: 4 porciones 1x
- Diet: Vegetariano
Description
Deliciosa lasaña de calabacín y ricotta en capas, perfecta para sorprender a tus invitados.
Ingredients
- 2 calabacines medianos
- 250 g de queso ricotta
- 100 g de queso mozzarella rallado
- 50 g de queso parmesano rallado
- 1 huevo
- 1 diente de ajo picado
- 1 cucharadita de orégano seco
- 1 cucharadita de albahaca fresca picada
- Sal y pimienta al gusto
- 2 cucharadas de aceite de oliva
- 1 taza de salsa de tomate
- Hojas de albahaca para decorar
Instructions
- Comienza precalentando el horno a 190°C (375°F). Lava los calabacines y córtalos en láminas delgadas. Espolvorea sal sobre las láminas y déjalas reposar durante 10 minutos para que suelten el exceso de agua.
- En un tazón, combina la ricotta, el huevo, el ajo picado, el orégano, la albahaca, sal y pimienta. Mezcla bien hasta que todos los ingredientes estén integrados.
- Calienta el aceite de oliva en una sartén grande a fuego medio. Agrega las láminas de calabacín y cocínalas por aproximadamente 3-4 minutos de cada lado, hasta que estén doradas. Retira del fuego y reserva.
- En una fuente para horno, vierte una capa de salsa de tomate en el fondo. Coloca una capa de láminas de calabacín, seguida de una capa de la mezcla de ricotta. Espolvorea un poco de mozzarella y parmesano. Repite el proceso hasta que se terminen los ingredientes, asegurándote de finalizar con una capa de salsa y quesos en la parte superior.
- Hornea la lasaña durante 25-30 minutos, o hasta que el queso esté burbujeante y dorado. Una vez listo, saca del horno y deja reposar durante unos minutos.
- Añade hojas de albahaca fresca por encima antes de servir. ¡Disfruta de esta exquisita lasaña de calabacín y ricotta!
Notes
- Puedes sustituir el queso ricotta por queso cottage si lo prefieres.
- Para una versión más ligera, puedes omitir el queso parmesano.
- Esta receta se puede preparar con antelación y calentar antes de servir.
- Prep Time: 20 minutos
- Cook Time: 30 minutos
- Category: Plato principal
- Method: Horneado
- Cuisine: Italiana
Nutrition
- Serving Size: 1 porción
- Calories: 320
- Sugar: 4 g
- Sodium: 600 mg
- Fat: 18 g
- Saturated Fat: 8 g
- Unsaturated Fat: 8 g
- Trans Fat: 0 g
- Carbohydrates: 25 g
- Fiber: 3 g
- Protein: 15 g
- Cholesterol: 70 mg