
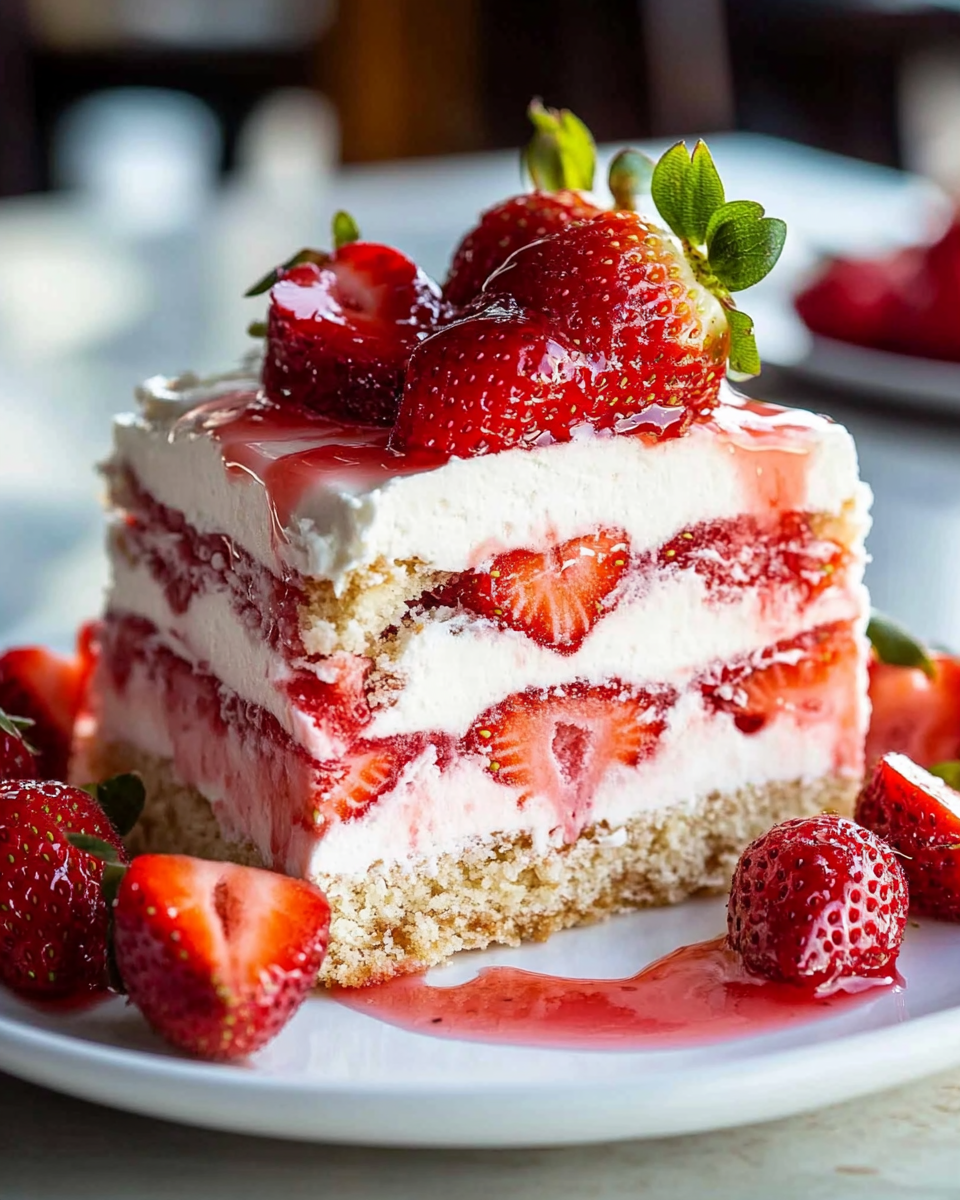
Introduction to Pastel Helado de Fresa y Queso Crema
Hey there, fellow busy bees! If you’re anything like me, juggling work, family, and a million other things, you know how precious time can be. That’s why I’m excited to share my go-to recipe for Pastel Helado de Fresa y Queso Crema. This delightful frozen cake is not just a treat for the taste buds; it’s a lifesaver on those sweltering summer days when you want something sweet but don’t have hours to spend in the kitchen. With its creamy texture and fresh strawberry flavor, it’s sure to impress your loved ones without breaking a sweat!
Why You’ll Love This Pastel Helado de Fresa y Queso Crema
Let’s be real—life can get hectic, and finding time to whip up a dessert can feel like climbing a mountain. But with this Pastel Helado de Fresa y Queso Crema, you’ll discover a sweet escape that’s as easy as pie! It’s quick to prepare, requires no baking, and is a crowd-pleaser. Plus, the combination of creamy cheese and fresh strawberries is simply irresistible. Your family will be begging for seconds!
Ingredients for Pastel Helado de Fresa y Queso Crema
Now, let’s dive into the delicious components that make up this Pastel Helado de Fresa y Queso Crema. Each ingredient plays a vital role in creating that creamy, dreamy dessert we all crave. Here’s what you’ll need:
- Fresas frescas: The star of the show! Fresh strawberries add a burst of flavor and a pop of color. You can also use frozen strawberries if fresh ones aren’t available.
- Queso crema: This creamy cheese is what gives our cake its rich texture. Make sure it’s at room temperature for easy mixing. If you’re feeling adventurous, try a flavored cream cheese for a twist!
- Azúcar en polvo: This powdered sugar sweetens the cream cheese mixture without the graininess of regular sugar. It dissolves beautifully, making your dessert smooth and luscious.
- Esencia de vainilla: A splash of vanilla extract enhances the flavors and adds a warm, inviting aroma. You can substitute it with almond extract for a different flavor profile.
- Nata para montar: Also known as heavy cream, this is what you’ll whip to create that light, airy texture. If you’re looking for a lighter option, you can use whipped topping instead.
- Galletas tipo graham: These sweet, crumbly cookies form the base of our cake. They add a delightful crunch. If you want to switch things up, try using chocolate cookies for a richer flavor.
- Fresas adicionales: These are for decoration, but they also add a fresh touch when serving. You can use any berries you like—blueberries or raspberries work beautifully too!
For exact measurements, check the bottom of the article where you can find everything listed for easy printing. Now that we have our ingredients ready, let’s get cooking!
How to Make Pastel Helado de Fresa y Queso Crema
Alright, my friends, let’s roll up our sleeves and dive into the delightful process of making this Pastel Helado de Fresa y Queso Crema. Trust me, it’s easier than you think! Follow these simple steps, and you’ll have a stunning dessert ready to impress your family and friends.
Step 1: Prepare the Cream Mixture
First things first, grab a large mixing bowl. You’ll want to add the queso crema, azúcar en polvo, and esencia de vainilla into the bowl. Using a hand mixer or a sturdy whisk, mix these ingredients together until they’re smooth and creamy. It should look like a fluffy cloud of deliciousness! Make sure there are no lumps; we want a silky texture that will melt in your mouth. This step is crucial because it sets the foundation for our cake.
Step 2: Whip the Cream
Now, let’s bring some air into our dessert! In a separate bowl, pour in the nata para montar. Using a hand mixer, whip the cream until it forms soft peaks. This means when you lift the beaters, the cream should hold its shape but still be a bit wobbly. Be careful not to over-whip it; we want it light and airy, not butter! Once you’ve achieved that perfect consistency, gently fold the whipped cream into the cream cheese mixture. Use a spatula and make sure to fold, not stir, to keep that lovely fluffiness intact.
Step 3: Layer the Ingredients
Time to assemble our masterpiece! Grab your rectangular mold and start with a layer of galletas tipo graham at the bottom. You can break them if needed to fit perfectly. Next, pour a generous portion of the cream mixture over the cookies, spreading it evenly. Then, add a layer of your fresh fresas on top. Repeat this process, alternating layers of graham crackers, cream, and strawberries until you’ve used all your ingredients. Make sure to finish with a layer of the cream mixture on top. It should look like a beautiful, colorful lasagna!
Step 4: Refrigerate
Once you’ve layered everything, it’s time to let it chill. Cover the mold tightly with plastic wrap. This will keep it fresh and prevent any unwanted odors from sneaking in. Pop it in the refrigerator for at least 4 hours, but if you can wait overnight, do it! The longer it sits, the better the flavors meld together, and the firmer it will be when you slice into it.
Step 5: Serve and Enjoy
Finally, the moment we’ve all been waiting for! When you’re ready to serve, take the mold out of the fridge and remove the plastic wrap. Use a sharp knife to cut it into squares or rectangles. For a lovely presentation, garnish each piece with some additional fresas on top. You can even drizzle a bit of chocolate sauce or sprinkle some crushed graham crackers for an extra touch. Now, gather your loved ones, serve up those slices, and watch their faces light up with joy as they dig into this creamy, fruity delight!
Tips for Success
- Make sure your queso crema is at room temperature for easy mixing.
- Don’t over-whip the cream; soft peaks are key for that light texture.
- Use a sharp knife to cut clean slices for a beautiful presentation.
- Feel free to experiment with different fruits or flavored cream cheese!
- For a quicker chill, place the mold in the freezer for 1-2 hours.
Equipment Needed
- Large mixing bowl: A sturdy bowl for mixing ingredients. A glass or metal bowl works great!
- Hand mixer or whisk: For whipping the cream and mixing the cheese. A whisk is a good workout if you’re feeling energetic!
- Rectangular mold: Any baking dish will do, but a glass dish makes for easy serving.
- Plastic wrap: To cover the mold while it chills. You can also use a lid if your dish has one.
Variations of Pastel Helado de Fresa y Queso Crema
- Frutas mixtas: Cambia las fresas por una mezcla de frutas como arándanos, frambuesas o kiwi para un pastel más colorido y lleno de sabor.
- Chocolate: Agrega trozos de chocolate o cacao en polvo a la mezcla de queso crema para un toque de chocolate decadente.
- Sin gluten: Usa galletas tipo graham sin gluten o incluso nueces trituradas como base para una opción apta para celíacos.
- Vegano: Sustituye el queso crema por un queso crema vegano y la nata por crema de coco para una versión completamente vegana.
- Almendra: Añade un poco de extracto de almendra en lugar de vainilla para un sabor diferente y delicioso.
Serving Suggestions for Pastel Helado de Fresa y Queso Crema
- Pair with a refreshing glass of iced tea or lemonade for a perfect summer treat.
- Serve alongside a scoop of vanilla ice cream for an extra indulgence.
- Garnish with mint leaves for a pop of color and freshness.
- Present on a beautiful platter to impress your guests.
FAQs about Pastel Helado de Fresa y Queso Crema
Got questions about this delightful Pastel Helado de Fresa y Queso Crema? You’re not alone! Here are some common queries I’ve encountered, along with my answers to help you navigate this delicious dessert.
1. Can I use frozen strawberries instead of fresh ones?
Absolutely! Frozen strawberries work just fine in this recipe. Just make sure to thaw and drain them before layering to avoid excess moisture. They’ll still give you that sweet, fruity flavor we all love!
2. How long can I store the pastel in the refrigerator?
This dessert can be stored in the refrigerator for up to 5 days. Just make sure it’s covered well to keep it fresh. However, I doubt it will last that long—it’s too delicious!
3. Can I make this dessert ahead of time?
Yes, you can! In fact, making it a day in advance is a great idea. It allows the flavors to meld beautifully, and you’ll have one less thing to worry about on the day you plan to serve it.
4. What can I substitute for the graham crackers?
If you’re not a fan of graham crackers, you can use any sweet cookie you like! Chocolate cookies add a rich flavor, or you could even use crushed nuts for a gluten-free option. Get creative!
5. Is this dessert suitable for a gluten-free diet?
Yes, it can be! Just swap out the graham crackers for gluten-free cookies or crushed nuts. The rest of the ingredients are naturally gluten-free, so you can enjoy this treat without worry!
Final Thoughts
Making this Pastel Helado de Fresa y Queso Crema is more than just whipping up a dessert; it’s about creating sweet memories with your loved ones. The joy of serving a dish that’s not only easy to prepare but also bursting with flavor is truly rewarding. Whether it’s a hot summer day or a special family gathering, this delightful treat will surely bring smiles all around. So, roll up your sleeves, gather your ingredients, and let the laughter and joy flow as you share this creamy, fruity delight with those you cherish most!
“` Print
Pastel Helado de Fresa y Queso Crema: ¡Delicia Fría!
- Total Time: 4 horas 30 minutos
- Yield: 8 porciones 1x
- Diet: Vegetarian
Description
Delicioso pastel helado de fresas y queso crema, perfecto para los días calurosos.
Ingredients
- 2 tazas de fresas frescas, limpias y en rodajas
- 1 paquete (225 g) de queso crema, a temperatura ambiente
- 1 taza de azúcar en polvo
- 1 cucharadita de esencia de vainilla
- 2 tazas de nata para montar
- 1 paquete (200 g) de galletas tipo graham
- Algunas fresas adicionales para la decoración
Instructions
- En un bol grande, mezcla el queso crema con el azúcar en polvo y la esencia de vainilla hasta que la mezcla esté bien integrada y suave.
- En un recipiente aparte, bate la nata hasta que esté espesa y forme picos suaves, luego incorpora esta mezcla a la crema de queso con movimientos envolventes.
- Toma un molde rectangular y coloca una capa de galletas tipo graham en la base.
- Vierte una porción de la mezcla de queso crema sobre las galletas y añade una capa de fresas en rodajas.
- Continúa alternando capas de galletas, crema y fresas hasta que utilices todos los ingredientes, finalizando con una capa de la mezcla de queso crema.
- Cubre el molde con papel film y refrigéralo por un mínimo de 4 horas o preferiblemente toda la noche para que tome consistencia.
- Al momento de servir, adorna con fresas adicionales y corta en porciones. ¡Disfruta de este exquisito pastel frío!
Notes
- Se puede preparar con antelación y mantener en el refrigerador.
- Las fresas pueden ser sustituidas por otras frutas de tu elección.
- Prep Time: 30 minutos
- Cook Time: 0 minutos
- Category: Postre
- Method: Refrigeración
- Cuisine: Mexicana
Nutrition
- Serving Size: 1 porción
- Calories: 250
- Sugar: 20g
- Sodium: 150mg
- Fat: 15g
- Saturated Fat: 8g
- Unsaturated Fat: 5g
- Trans Fat: 0g
- Carbohydrates: 30g
- Fiber: 1g
- Protein: 3g
- Cholesterol: 40mg