
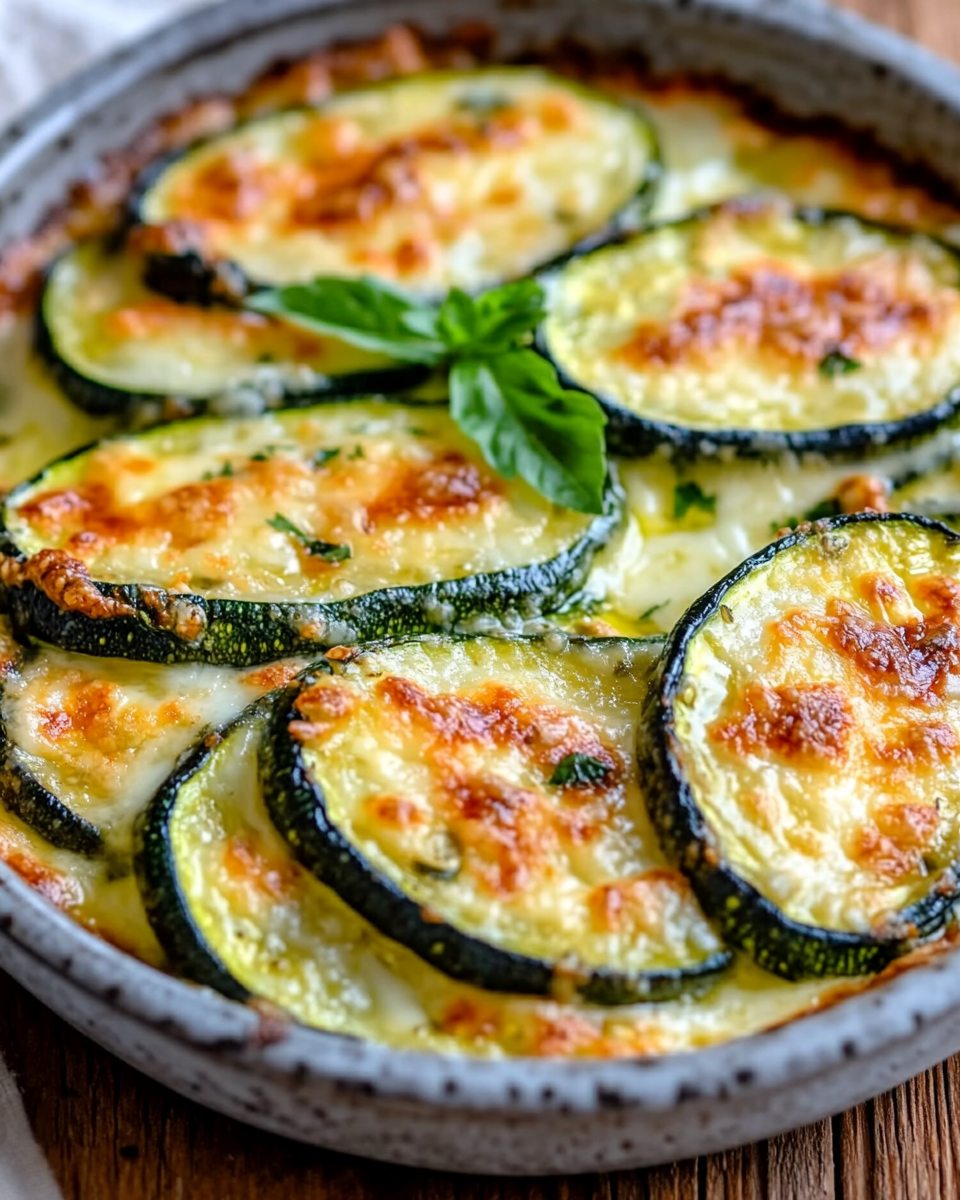
Introduction to Calabacín al Horno con Queso
Hey there, fellow food lovers! If you’re anything like me, juggling work, family, and a million other things, you know how precious time can be in the kitchen. That’s why I’m excited to share my go-to recipe for Calabacín al Horno con Queso. This dish is not just a quick solution for a busy day; it’s a delightful way to sneak in some veggies while satisfying those cheesy cravings. Imagine tender zucchini slices, perfectly baked and topped with gooey cheese—it’s comfort food that won’t weigh you down. Let’s dive into this deliciousness together!
Why You’ll Love This Calabacín al Horno con Queso
Let’s be real—life can get hectic, and finding time to cook can feel like a juggling act. That’s where this Calabacín al Horno con Queso shines! It’s incredibly easy to whip up, taking just 40 minutes from start to finish. Plus, the combination of fresh zucchini and melty cheese creates a flavor explosion that even picky eaters will love. It’s a win-win for busy families looking for a healthy yet satisfying meal!
Ingredients for Calabacín al Horno con Queso
Before we get our hands dirty, let’s gather everything we need for this scrumptious Calabacín al Horno con Queso. Here’s a quick rundown of the ingredients that will make this dish sing:
- Calabacines medianos: These are the stars of the show! Zucchini is not only low in calories but also packed with vitamins. Look for firm, shiny ones for the best flavor.
- Queso mozzarella rallado: This cheese melts beautifully, creating that gooey texture we all crave. If you want a little more flavor, consider using fresh mozzarella.
- Queso parmesano rallado: A sprinkle of this sharp cheese adds a delightful nuttiness. It’s like the cherry on top of your cheesy zucchini masterpiece!
- Aceite de oliva: This liquid gold not only helps the zucchini roast beautifully but also adds a rich flavor. Extra virgin olive oil is my go-to for its health benefits and taste.
- Ajo picado: Garlic is the secret weapon in many recipes. It brings a warm, aromatic flavor that elevates the dish. Fresh is best, but jarred works in a pinch!
- Orégano seco: This herb adds a Mediterranean flair. If you have fresh oregano, feel free to use that instead for a more vibrant taste.
- Sal y pimienta: Simple seasonings that enhance all the flavors. Don’t be shy—season to your taste!
- Perejil fresco picado: This is optional but adds a pop of color and freshness when sprinkled on top before serving. It’s like a little green confetti!
For those of you who like to get creative, feel free to add other vegetables like bell peppers or mushrooms. You can also swap out the mozzarella for cheddar if you’re in the mood for something a bit sharper. Remember, the exact quantities for each ingredient are listed at the bottom of the article, so you can easily print them out for your next cooking adventure!
How to Make Calabacín al Horno con Queso
Now that we have our ingredients ready, let’s get cooking! Making Calabacín al Horno con Queso is a breeze, and I promise you’ll feel like a kitchen superstar by the end. Follow these simple steps, and you’ll have a delicious dish that’s sure to impress!
Step 1: Preheat the Oven
First things first, let’s get that oven preheating to 200°C (400°F). Preheating is crucial because it ensures that your zucchini cooks evenly and the cheese melts to perfection. Think of it as warming up before a workout—your oven needs to be ready to perform! This step usually takes about 10 minutes, so you can use that time to prep your zucchini.
Step 2: Prepare the Zucchini
Next up, it’s time to wash and slice those zucchinis. Rinse them under cool water to remove any dirt, then pat them dry with a towel. Now, slice the zucchini into thin rounds, about a quarter-inch thick. This thickness is key for even cooking; too thick, and they’ll be crunchy, too thin, and they might turn mushy. Aim for that sweet spot, and you’ll be golden!
Step 3: Mix the Ingredients
In a large bowl, combine the olive oil, minced garlic, oregano, salt, and pepper. Give it a good stir to mix everything together. This mixture is where the magic happens! The garlic will infuse the zucchini with flavor, while the olive oil helps them roast beautifully. Don’t be afraid to taste a little of the mixture—just a tiny dip with your finger will do! Adjust the seasoning if you like it a bit spicier or more garlicky.
Step 4: Arrange on Baking Sheet
Now, it’s time to arrange the zucchini on a baking sheet. Line it with parchment paper for easy cleanup, then lay the zucchini slices in a single layer. Make sure they’re not overlapping; this allows them to roast evenly and get that lovely golden color. Once they’re all laid out, sprinkle the mozzarella and parmesan cheese generously over the top. The more cheese, the better, right?
Step 5: Bake to Perfection
Pop the baking sheet into your preheated oven and let it bake for about 25-30 minutes. Keep an eye on it! You’ll know it’s done when the cheese is bubbly and golden brown, and the zucchini is tender when you poke it with a fork. If you like a little extra crispiness, you can broil it for the last 2-3 minutes, but watch it closely so it doesn’t burn!
Step 6: Garnish and Serve
Once your Calabacín al Horno con Queso is out of the oven, let it rest for a couple of minutes. This helps the cheese set a bit. Then, sprinkle some fresh parsley on top for a pop of color and freshness. Serve it warm, and watch your family dig in with smiles on their faces. It’s not just a dish; it’s a moment of joy at the dinner table!
Tips for Success
- Always slice the zucchini evenly for consistent cooking.
- Don’t skip the preheating step; it makes a big difference!
- Feel free to experiment with different cheeses for unique flavors.
- For a crispy topping, add breadcrumbs mixed with cheese before baking.
- Let the dish cool slightly before serving to enhance the flavors.
Equipment Needed
- Baking Sheet: A standard baking sheet works great, but a cast-iron skillet can add a nice touch.
- Parchment Paper: This is optional, but it makes cleanup a breeze. Aluminum foil is a good alternative.
- Mixing Bowl: Any large bowl will do; a glass or ceramic bowl is perfect for mixing.
- Knife and Cutting Board: A sharp knife and a sturdy cutting board are essential for slicing the zucchini.
Variations
- Cheesy Spinach Addition: Mix in some fresh or frozen spinach with the zucchini for an extra nutrient boost. Just make sure to squeeze out excess moisture if using frozen!
- Herb Infusion: Experiment with different herbs like thyme or basil instead of oregano for a unique flavor profile. Fresh herbs can elevate the dish even more!
- Spicy Kick: Add a pinch of red pepper flakes to the oil mixture for a little heat. It’s a great way to spice things up if your family enjoys a bit of zing!
- Gluten-Free Option: If you want to keep it gluten-free, skip any breadcrumbs and focus on the cheesy goodness. You can also use gluten-free breadcrumbs for a crispy topping.
- Vegan Twist: Substitute the cheeses with vegan cheese alternatives or nutritional yeast for a cheesy flavor without the dairy. It’s a fantastic way to cater to plant-based diets!
Serving Suggestions
- Pair with a Fresh Salad: A light green salad with a tangy vinaigrette complements the richness of the Calabacín al Horno con Queso.
- Serve with Grilled Chicken: For a heartier meal, add some grilled chicken or fish on the side.
- Wine Pairing: A crisp white wine, like Sauvignon Blanc, enhances the flavors beautifully.
- Presentation Tip: Serve in a colorful dish and garnish with extra parsley for a pop of color!
FAQs about Calabacín al Horno con Queso
As you embark on your culinary adventure with Calabacín al Horno con Queso, you might have a few questions. Don’t worry; I’ve got you covered! Here are some common queries that pop up, along with my friendly advice:
1. Can I use other vegetables in this recipe?
Absolutely! This dish is versatile. You can add bell peppers, mushrooms, or even eggplant for a colorful veggie medley. Just remember to adjust the cooking time slightly if you use denser vegetables.
2. How do I store leftovers?
If you have any leftovers (which is rare in my house!), let them cool completely, then store them in an airtight container in the fridge. They’ll keep for about 3-4 days. Just reheat in the oven for the best texture!
3. Can I make this dish ahead of time?
Yes! You can prep everything in advance and store the assembled dish in the fridge. Just pop it in the oven when you’re ready to bake. It’s a great time-saver for busy weeknights!
4. What can I serve with Calabacín al Horno con Queso?
This dish pairs wonderfully with a fresh salad or grilled protein like chicken or fish. You can also serve it alongside some crusty bread to soak up all that cheesy goodness!
5. Is this recipe suitable for a vegetarian diet?
Yes, indeed! Calabacín al Horno con Queso is a delightful vegetarian option. Just make sure to check your cheese for any animal rennet if you’re strictly vegetarian. Enjoy the cheesy goodness without any guilt!
Final Thoughts
Cooking can sometimes feel like a chore, especially when life gets busy. But with Calabacín al Horno con Queso, you’re not just making a meal; you’re creating a moment of joy for yourself and your loved ones. The aroma of baked zucchini mingling with melted cheese fills your kitchen, inviting everyone to the table. It’s a dish that’s not only easy to prepare but also brings smiles and satisfaction. So, whether it’s a weeknight dinner or a special occasion, this recipe is sure to become a cherished favorite in your home. Enjoy every cheesy bite!
“` Print
Calabacín al Horno con Queso: Delicia Saludable Fácil
- Total Time: 40 minutos
- Yield: 4 porciones 1x
- Diet: Vegetarian
Description
Deliciosa receta de calabacín al horno con queso, fácil de preparar y saludable.
Ingredients
- 2 calabacines medianos
- 1 taza de queso mozzarella rallado
- 1/2 taza de queso parmesano rallado
- 2 cucharadas de aceite de oliva
- 2 dientes de ajo picados
- 1 cucharadita de orégano seco
- Sal y pimienta al gusto
- Perejil fresco picado para decorar
Instructions
- Comienza precalentando el horno a 200°C (400°F). Lava los calabacines y córtalos en rodajas finas.
- En un bol, combina el aceite de oliva, el ajo picado, el orégano, la sal y la pimienta. Mezcla bien y añade las rodajas de calabacín, asegurándote de que queden bien cubiertas con la mezcla.
- Dispón las rodajas en una bandeja para hornear, organizándolas en una sola capa. Cubre generosamente con el queso mozzarella y el parmesano.
- Hornea durante 25-30 minutos, o hasta que el queso esté dorado y burbujeante, y los calabacines estén tiernos al pincharlos con un tenedor.
- Saca del horno y deja reposar un par de minutos. Espolvorea perejil fresco picado antes de servir. ¡Listo para disfrutar!
Notes
- Se puede añadir otros vegetales al gusto.
- Para un sabor más intenso, se puede usar queso cheddar.
- Este plato es ideal como guarnición o plato principal ligero.
- Prep Time: 10 minutos
- Cook Time: 30 minutos
- Category: Plato principal
- Method: Hornear
- Cuisine: Mediterránea
Nutrition
- Serving Size: 1 porción
- Calories: 180
- Sugar: 3g
- Sodium: 400mg
- Fat: 12g
- Saturated Fat: 5g
- Unsaturated Fat: 6g
- Trans Fat: 0g
- Carbohydrates: 8g
- Fiber: 2g
- Protein: 10g
- Cholesterol: 20mg