
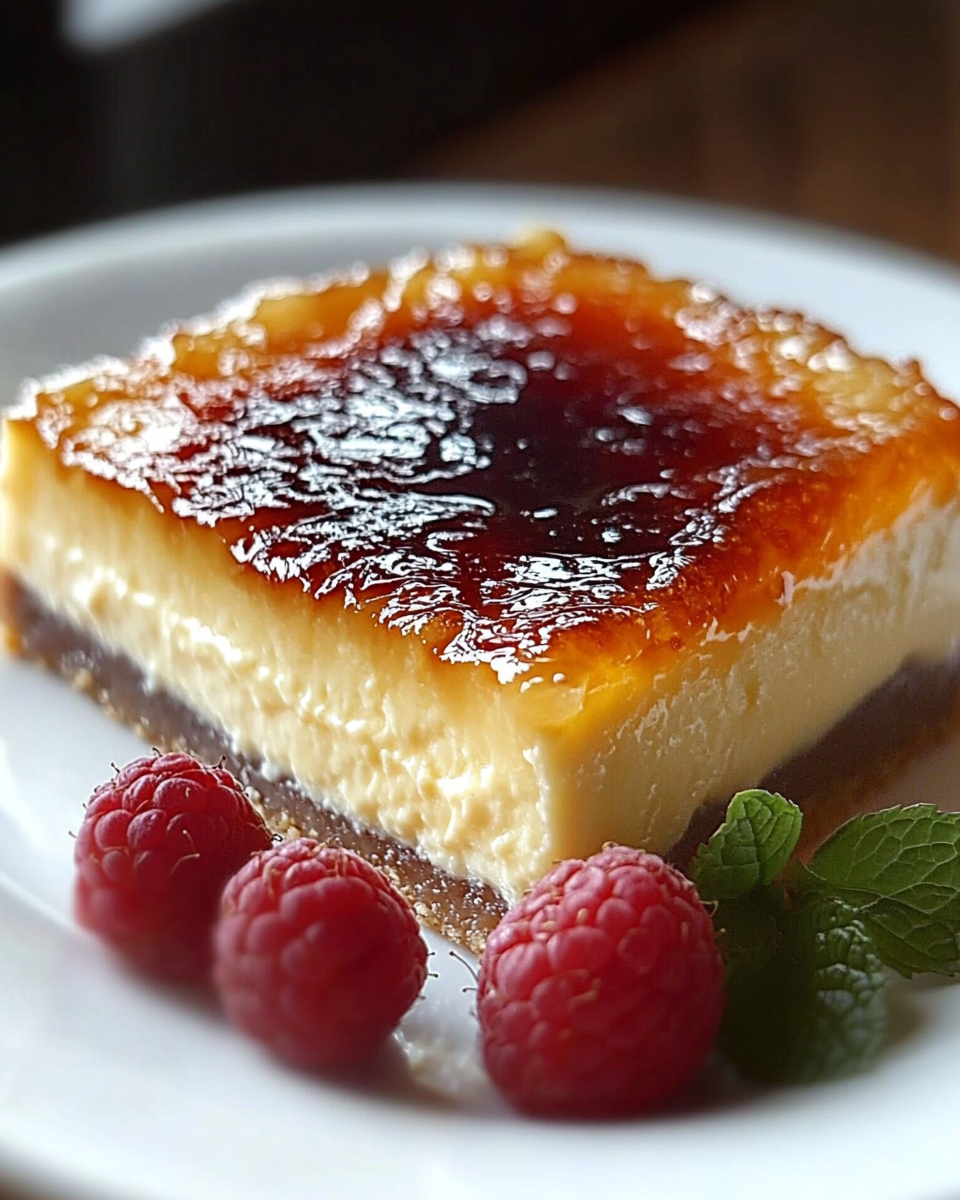
Introduction to Tarta de Queso Crème Brûlée
Hey there, fellow food lovers! If you’re anything like me, juggling work, family, and a million other things, you know how precious time can be. That’s why I’m excited to share my recipe for Tarta de Queso Crème Brûlée. This delightful dessert is not just a treat for the taste buds; it’s a quick solution for those busy days when you want to impress your loved ones without spending hours in the kitchen. With its creamy texture and that irresistible caramelized top, this tart is sure to become a favorite in your home!
Why You’ll Love This Tarta de Queso Crème Brûlée
This Tarta de Queso Crème Brûlée is a game-changer for busy women like us! It’s incredibly easy to whip up, taking just about 30 minutes of hands-on time. Plus, the combination of creamy cheesecake and that crunchy caramel top is simply divine. Whether you’re celebrating a special occasion or just want to treat your family, this dessert is sure to impress without the stress!
Ingredients for Tarta de Queso Crème Brûlée
Let’s dive into the delicious components that make up this Tarta de Queso Crème Brûlée! Each ingredient plays a vital role in creating that creamy, dreamy dessert we all crave. Here’s what you’ll need:
- Galletas tipo Digestive: These cookies form the perfect crunchy base for our tart. If you can’t find Digestive cookies, graham crackers work just as well!
- Mantequilla derretida: This helps bind the cookie crumbs together, giving our crust that rich flavor. You can substitute with coconut oil for a dairy-free option.
- Queso crema: The star of the show! Cream cheese provides that luscious, creamy texture. For a lighter version, you can use Neufchâtel cheese.
- Azúcar: This sweetens the filling, balancing the tartness of the cream cheese. Feel free to use coconut sugar or a sugar substitute if you’re watching your intake.
- Huevos: Eggs help set the filling, giving it that perfect cheesecake consistency. If you’re looking for an egg-free option, try using flax eggs instead.
- Crema para batir: Heavy cream adds richness and a velvety texture. You can swap it with a non-dairy cream for a vegan twist.
- Esencia de vainilla: This adds a warm, aromatic flavor that complements the cheese beautifully. Pure vanilla extract is best, but imitation vanilla works in a pinch.
- Azúcar moreno: This is for caramelizing the top, creating that signature crunchy layer. If you’re out of brown sugar, regular granulated sugar will do, but the flavor won’t be quite the same.
For exact measurements, check the bottom of the article where you can find everything listed for easy printing. Now that we have our ingredients ready, let’s get cooking!
How to Make Tarta de Queso Crème Brûlée
Now that we have our ingredients ready, let’s dive into the fun part—making this delicious Tarta de Queso Crème Brûlée! Follow these simple steps, and you’ll have a stunning dessert that will wow your family and friends.
Step 1: Preheat the Oven
First things first, let’s get that oven preheating to 180°C (350°F). Preheating is crucial because it ensures that your tart bakes evenly. While the oven warms up, grab your tart pan and lightly grease it. This will help the tart come out easily once it’s baked. Trust me, you don’t want to be wrestling with a stuck tart!
Step 2: Prepare the Crust
Next, it’s time to prepare the crust. Take your Digestive cookies and crush them into fine crumbs. You can do this by placing them in a zip-top bag and rolling over them with a rolling pin, or you can use a food processor if you have one handy. Once you have your cookie crumbs, mix them with the melted butter until it resembles wet sand. This mixture will form the base of your tart, so make sure it’s well combined. Press this mixture firmly into the bottom of your prepared tart pan. A flat-bottomed glass works wonders for this step!
Step 3: Mix the Filling
Now, let’s whip up that creamy filling! In a large mixing bowl, beat the cream cheese and sugar together until smooth. I like to use an electric mixer for this, but a whisk works too if you’re feeling strong! Add the eggs one at a time, mixing well after each addition. This helps to incorporate air into the mixture, making it light and fluffy. You want a smooth, creamy texture, so don’t rush this step!
Step 4: Combine Ingredients
Once your filling is nice and smooth, it’s time to add the heavy cream and vanilla extract. Gently fold these into the mixture until everything is well combined. The cream adds that luxurious richness we all love, while the vanilla brings a warm, inviting aroma. Just imagine how good your kitchen will smell!
Step 5: Bake the Tarta
Pour the creamy filling over your prepared crust, smoothing the top with a spatula. Now, pop it into the preheated oven and bake for about 50-60 minutes. Keep an eye on it! You’ll know it’s done when the edges are set, but the center still has a slight jiggle. This is key for that perfect cheesecake texture. If you overbake it, you’ll lose that creamy goodness!
Step 6: Cool and Refrigerate
Once your tart is out of the oven, let it cool at room temperature for about 30 minutes. This helps it set up a bit more. After that, cover it with plastic wrap and pop it in the fridge for at least 4 hours, but overnight is even better. This chilling time allows the flavors to meld beautifully and gives you that perfect slice when you’re ready to serve.
Step 7: Caramelize the Top
Finally, it’s time for the grand finale! Just before serving, sprinkle a thin layer of brown sugar over the top of the tart. Using a kitchen torch, carefully caramelize the sugar until it’s golden and bubbly. If you don’t have a torch, you can place it under the broiler for a minute or two, but watch it closely! You want that crunchy, caramelized layer that contrasts so beautifully with the creamy filling. Let it cool for a minute, then slice and serve!
Tips for Success
- Make sure your cream cheese is at room temperature for easy mixing.
- Don’t skip the chilling time; it’s essential for the best texture.
- Use a light hand when folding in the cream to keep the mixture airy.
- For a smoother crust, ensure the cookie crumbs are finely crushed.
- Practice patience while caramelizing the top; it’s worth the wait for that perfect crunch!
Equipment Needed
- Tart pan: A 9-inch tart pan works best, but a pie dish can be a great alternative.
- Mixing bowls: Use a large bowl for the filling and a smaller one for the crust.
- Electric mixer: A hand mixer is perfect, but a whisk will do if you’re feeling strong!
- Kitchen torch: Essential for caramelizing the top; a broiler can be used if you don’t have one.
- Spatula: A rubber spatula is great for smoothing the filling and crust.
Variations
- Chocolate Tarta de Queso Crème Brûlée: Add melted chocolate to the filling for a rich, decadent twist. Just fold in about 100g of melted dark chocolate after mixing in the cream.
- Fruit-Infused Version: Incorporate fresh fruit puree, like raspberry or mango, into the filling for a fruity flavor. Swirl it in before baking for a beautiful marbled effect!
- Gluten-Free Option: Substitute the Digestive cookies with gluten-free graham crackers or almond flour for a delicious gluten-free crust.
- Vegan Tarta de Queso Crème Brûlée: Use vegan cream cheese and coconut cream instead of heavy cream. Replace eggs with flax eggs (1 tablespoon of flaxseed meal mixed with 2.5 tablespoons of water equals one egg).
- Spiced Variation: Add a pinch of cinnamon or nutmeg to the filling for a warm, spiced flavor that’s perfect for fall or winter gatherings.
Serving Suggestions
- Fresh Berries: Serve with a side of mixed berries for a refreshing contrast to the creamy tart.
- Whipped Cream: A dollop of freshly whipped cream adds an extra touch of indulgence.
- Pair with Coffee: Enjoy with a cup of rich coffee or espresso for a delightful after-dinner treat.
- Elegant Presentation: Garnish with mint leaves or a dusting of powdered sugar for a beautiful finish.
FAQs about Tarta de Queso Crème Brûlée
1. Can I make Tarta de Queso Crème Brûlée ahead of time?
Absolutely! In fact, making it a day in advance is ideal. The flavors meld beautifully overnight, and it allows the tart to set properly in the fridge. Just remember to caramelize the top right before serving for that perfect crunch!
2. What can I use if I don’t have a kitchen torch?
If you don’t have a kitchen torch, no worries! You can place the tart under the broiler for a minute or two to caramelize the sugar. Just keep a close eye on it to prevent burning. It’s a great alternative that still gives you that delicious caramelized top.
3. How do I store leftovers of Tarta de Queso Crème Brûlée?
Store any leftovers in an airtight container in the fridge. It’s best to keep the caramelized top separate if possible, as it can lose its crunch. Just reheat the tart slightly before serving to bring back some of that creamy goodness!
4. Can I use low-fat cream cheese for this recipe?
Yes, you can! Low-fat cream cheese will work, but keep in mind that it may alter the texture slightly. The tart might not be as rich and creamy, but it will still be delicious. Just make sure to mix it well to achieve a smooth filling.
5. What’s the best way to serve Tarta de Queso Crème Brûlée?
Serve it chilled, garnished with fresh berries or a dollop of whipped cream. A sprinkle of powdered sugar or a few mint leaves can elevate the presentation. Pair it with a nice cup of coffee or tea for a delightful dessert experience!
Final Thoughts
Making Tarta de Queso Crème Brûlée is more than just baking; it’s about creating sweet memories with your loved ones. The joy of slicing into that creamy tart, revealing the crunchy caramel top, is simply unmatched. Whether it’s a family gathering or a quiet evening at home, this dessert brings a touch of elegance and indulgence to any occasion. Plus, knowing you whipped it up in no time makes it even sweeter! So, roll up your sleeves, gather your ingredients, and let this delightful tart become a cherished part of your dessert repertoire. Happy baking!
“` Print
Tarta de Queso Crème Brûlée: ¡Descubre la receta perfecta!
- Total Time: 4 horas 30 minutos
- Yield: 8 porciones 1x
- Diet: Vegetarian
Description
Deliciosa tarta de queso con un toque de crème brûlée, perfecta para cualquier ocasión.
Ingredients
- 200 g de galletas tipo Digestive
- 100 g de mantequilla derretida
- 500 g de queso crema
- 150 g de azúcar
- 3 huevos
- 200 ml de crema para batir
- 1 cucharadita de esencia de vainilla
- 2 cucharadas de azúcar moreno (para caramelizar)
Instructions
- Comienza precalentando el horno a 180°C y prepara un molde para tarta engrasándolo ligeramente.
- Tritura las galletas hasta que queden como un polvo fino y mézclalas con la mantequilla derretida. Vierte esta mezcla en el molde y presiona firmemente para formar una base uniforme.
- En un recipiente grande, bate el queso crema con el azúcar hasta que obtengas una textura suave. Agrega los huevos uno a uno, asegurándote de mezclar bien después de cada adición.
- Añade la crema para batir y la esencia de vainilla, y mezcla hasta que todos los ingredientes estén completamente integrados.
- Vierte la mezcla de queso sobre la base de galleta y alisa la parte superior con una espátula. Hornea durante aproximadamente 50-60 minutos, o hasta que el centro esté casi firme.
- Una vez horneada, deja que la tarta se enfríe a temperatura ambiente antes de refrigerarla por al menos 4 horas, idealmente toda la noche.
- Justo antes de servir, espolvorea el azúcar moreno sobre la superficie de la tarta y utiliza un soplete de cocina para caramelizarlo hasta que esté dorado y burbujeante.
- Permite que se enfríe un poco antes de cortar y servir. ¡Disfruta de esta exquisita tarta de queso con un delicioso caramelo crujiente!
Notes
- Es recomendable refrigerar la tarta durante toda la noche para obtener una mejor textura.
- El uso de un soplete de cocina es esencial para lograr el caramelo crujiente.
- Prep Time: 30 minutos
- Cook Time: 60 minutos
- Category: Postre
- Method: Horneado
- Cuisine: Francesa
Nutrition
- Serving Size: 1 porción
- Calories: 450
- Sugar: 30 g
- Sodium: 200 mg
- Fat: 30 g
- Saturated Fat: 15 g
- Unsaturated Fat: 10 g
- Trans Fat: 0 g
- Carbohydrates: 35 g
- Fiber: 1 g
- Protein: 6 g
- Cholesterol: 100 mg