
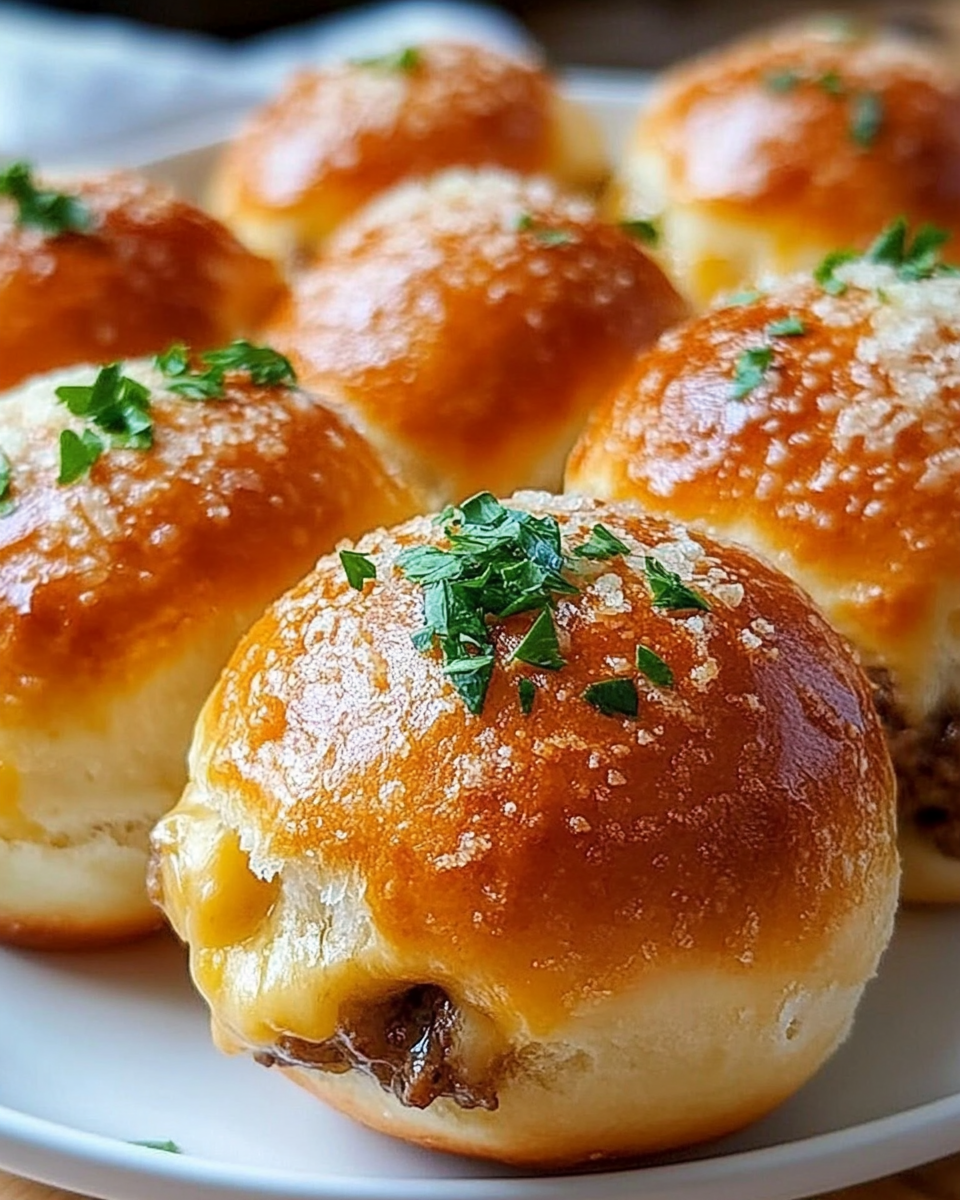
Introduction to Bolas de Queso Parmesano y Ajo
Hey there, fellow food lovers! If you’re anything like me, juggling work, family, and a million other things, you know how precious time can be. That’s why I’m excited to share my recipe for Bolas de Queso Parmesano y Ajo. These delightful little bites are not just a quick solution for a busy day; they’re also a surefire way to impress your loved ones. Imagine the aroma of garlic and parmesan wafting through your kitchen, making everyone’s mouth water. Trust me, these tasty morsels will become a go-to in your home!
Why You’ll Love This Bolas de Queso Parmesano y Ajo
Let’s be real—life can get hectic, and finding time to cook can feel like a juggling act. That’s where these Bolas de Queso Parmesano y Ajo shine! They’re quick to whip up, taking just 40 minutes from start to finish. Plus, the combination of savory cheese and aromatic garlic creates a flavor explosion that your family will adore. Whether it’s a busy weeknight or a weekend gathering, these bites are sure to please!
Ingredients for Bolas de Queso Parmesano y Ajo
Let’s dive into the deliciousness that makes up our Bolas de Queso Parmesano y Ajo. Here’s what you’ll need to create these mouthwatering bites:
- Carne de res molida: This is the star of the show! Ground beef adds a hearty flavor and protein to your bites. You can also use ground turkey or chicken for a lighter option.
- Queso parmesano rallado: The rich, nutty flavor of parmesan elevates these bites to a whole new level. If you’re feeling adventurous, try substituting with pecorino or a sharp cheddar for a twist!
- Ajo finamente picado: Garlic is the secret ingredient that brings everything together. It adds a fragrant kick that makes your kitchen smell divine. Fresh garlic is best, but you can use garlic powder in a pinch.
- Sal: A little salt enhances all the flavors. Don’t skip this step; it’s essential for a well-seasoned dish!
- Pimienta negra molida: Freshly ground black pepper adds a subtle heat. If you like it spicy, consider adding a pinch of cayenne pepper for an extra kick.
- Pimentón dulce: This sweet paprika gives a lovely color and a hint of smokiness. You can swap it for smoked paprika if you prefer a deeper flavor.
- Masa de hojaldre: Puff pastry is the perfect flaky wrapper for these bites. You can find it in the freezer section of your grocery store. If you’re feeling ambitious, homemade pastry is an option too!
- Huevo batido: This is used to brush on top of the pastries for a beautiful golden finish. If you’re avoiding eggs, a splash of milk or a vegan alternative works just as well.
- Perejil fresco picado: A sprinkle of fresh parsley not only adds a pop of color but also a fresh flavor. Feel free to use other herbs like basil or cilantro for a different twist.
- Aceite de oliva: A drizzle of olive oil before serving can enhance the flavor and add a touch of richness. It’s optional, but I highly recommend it!
For exact measurements, check the bottom of the article where you can find everything listed for easy printing. Now that we have our ingredients ready, let’s get cooking!
How to Make Bolas de Queso Parmesano y Ajo
Now that we have our ingredients ready, let’s dive into the fun part—making these delicious Bolas de Queso Parmesano y Ajo! Follow these simple steps, and you’ll have a plateful of tasty bites in no time.
Step 1: Preheat the Oven
First things first, let’s get that oven preheating to 200°C (about 400°F). Preheating is crucial because it ensures that your Bolas de Queso Parmesano y Ajo cook evenly and get that lovely golden color. While the oven warms up, prepare a baking tray by lining it with parchment paper. This will prevent sticking and make cleanup a breeze!
Step 2: Prepare the Filling
In a large bowl, combine the ground beef, grated parmesan, minced garlic, salt, black pepper, and sweet paprika. Mix everything together until it’s well combined. This step is key! A homogeneous mixture means every bite will be packed with flavor. I like to use my hands for this—just make sure they’re clean! It’s a bit messy, but trust me, it’s worth it.
Step 3: Roll Out the Puff Pastry
Next, let’s roll out that puff pastry. On a lightly floured surface, take your sheet of puff pastry and roll it out gently to about 1/8 inch thick. Then, cut it into squares, roughly 10 cm on each side. If you’re feeling fancy, you can use a pizza cutter for clean edges. Don’t worry if they’re not perfect; they’ll still taste amazing!
Step 4: Assemble the Balls
Now comes the fun part—assembling your Bolas de Queso Parmesano y Ajo! Place a generous tablespoon of the meat mixture in the center of each pastry square. Carefully fold the corners of the pastry over the filling, bringing them to the center. Pinch the edges together to seal them tightly. You want to make sure no filling escapes during baking. If you have any extra pastry, you can use it to create little decorations on top!
Step 5: Bake the Balls
Place your assembled balls on the prepared baking tray, making sure to leave some space between them. Brush the tops with the beaten egg for that beautiful golden finish. Pop them in the preheated oven and bake for 15 to 20 minutes. Keep an eye on them! You’ll know they’re done when they’re golden brown and crispy to the touch. The aroma wafting through your kitchen will be irresistible!
Tips for Success
- Prep your ingredients ahead of time to save precious minutes during cooking.
- Don’t overfill the pastry; a tablespoon of filling is just right!
- For extra flavor, let the filling sit for a few minutes before assembling.
- Experiment with different cheeses for a unique twist on the classic recipe.
- Keep an eye on the baking time; ovens can vary, and you want them perfectly golden!
Equipment Needed
- Baking tray: A standard baking sheet works perfectly. If you don’t have one, a large oven-safe dish will do.
- Parchment paper: This helps prevent sticking. If you’re out, a light coating of cooking spray can work in a pinch.
- Mixing bowl: Any large bowl will suffice for mixing your filling.
- Rolling pin: If you don’t have one, a wine bottle can serve as a great alternative!
- Pizza cutter or knife: For cutting the pastry into squares; a sharp knife will work just fine.
Variations
- Vegetarian Option: Swap the ground beef for a mix of sautéed mushrooms, spinach, and ricotta cheese for a delicious meat-free version.
- Spicy Kick: Add some chopped jalapeños or a dash of hot sauce to the meat mixture for those who love a little heat!
- Herb Infusion: Mix in fresh herbs like thyme or rosemary into the filling for an aromatic twist that elevates the flavor.
- Cheese Lovers: Combine different cheeses like mozzarella or feta with the parmesan for a melty, cheesy delight.
- Gluten-Free Option: Use gluten-free puff pastry to make these bites suitable for those with gluten sensitivities.
Serving Suggestions
- Pair your Bolas de Queso Parmesano y Ajo with a fresh garden salad for a light meal.
- Serve with a zesty marinara or garlic aioli for dipping—yum!
- A glass of crisp white wine complements the flavors beautifully.
- For a fun presentation, arrange them on a colorful platter with fresh herbs.
FAQs about Bolas de Queso Parmesano y Ajo
Got questions about these delightful Bolas de Queso Parmesano y Ajo? You’re not alone! Here are some common queries I’ve encountered, along with my answers to help you out:
Can I make Bolas de Queso Parmesano y Ajo ahead of time?
Absolutely! You can prepare the filling and assemble the balls a day in advance. Just store them in the fridge until you’re ready to bake. This is a lifesaver for busy weeknights or when you have guests coming over!
Can I freeze these bites?
Yes, you can! Assemble the Bolas de Queso Parmesano y Ajo and freeze them before baking. When you’re ready to enjoy them, bake them straight from the freezer, adding a few extra minutes to the cooking time. It’s like having a delicious snack ready at your fingertips!
What can I serve with Bolas de Queso Parmesano y Ajo?
These tasty bites pair wonderfully with a variety of sides. Consider serving them with a fresh salad, some roasted vegetables, or a dipping sauce like marinara or garlic aioli. They’re versatile enough to fit any occasion!
Can I use a different type of cheese?
Definitely! While parmesan is a classic choice, feel free to experiment with other cheeses. Cheddar, mozzarella, or even a spicy pepper jack can add a unique twist to your Bolas de Queso Parmesano y Ajo. Just remember to adjust the seasoning accordingly!
How do I know when they are done baking?
Your bites are ready when they’re golden brown and crispy to the touch. Keep an eye on them during the last few minutes of baking, as ovens can vary. The delicious aroma will also be a good indicator that they’re almost ready!
Final Thoughts
Making Bolas de Queso Parmesano y Ajo is more than just cooking; it’s about creating moments of joy in the kitchen. The delightful aroma that fills your home, the smiles on your family’s faces as they take that first bite, and the satisfaction of serving something homemade are truly priceless. Whether you’re whipping these up for a busy weeknight dinner or a special gathering, they’re bound to become a cherished favorite. So roll up your sleeves, embrace the mess, and enjoy the delicious journey of making these irresistible bites. Happy cooking!
“` Print
Bolas de Queso Parmesano y Ajo: Deliciosos bocaditos caseros.
- Total Time: 40 minutos
- Yield: 4 porciones 1x
- Diet: Gluten Free
Description
Deliciosos bocaditos de carne y queso parmesano con un toque de ajo, perfectos como aperitivo o plato principal.
Ingredients
- 500 g de carne de res molida
- 100 g de queso parmesano rallado
- 4 dientes de ajo finamente picados
- 1 cucharadita de sal
- 1/2 cucharadita de pimienta negra molida
- 1 cucharadita de pimentón dulce
- 1 paquete de masa de hojaldre (aproximadamente 400 g)
- 1 huevo batido (para barnizar)
- Perejil fresco picado (para decorar)
- Aceite de oliva (opcional, para rociar)
Instructions
- Comienza precalentando el horno a 200°C y prepara una bandeja para hornear con papel de hornear.
- En un bol grande, combina la carne molida, el queso parmesano, el ajo, la sal, la pimienta y el pimentón, mezclando bien hasta obtener una mezcla homogénea.
- Sobre una superficie enharinada, extiende la masa de hojaldre y córtala en cuadrados de unos 10 cm de lado.
- Pon una cucharada generosa de la mezcla de carne en el centro de cada cuadrado.
- Cierra la masa llevando los bordes hacia el centro y presiona firmemente para sellar cada bocadito.
- Dispón los bocaditos en la bandeja para hornear y barniza la superficie con el huevo batido.
- Hornea durante 15 a 20 minutos, o hasta que estén dorados y crujientes al tacto.
- Si lo prefieres, añade un toque de aceite de oliva sobre los bocaditos recién horneados y espolvorea con perejil fresco picado antes de servir.
- Saborea estos irresistibles bocaditos de carne y queso como un aperitivo o un plato principal.
Notes
- Se pueden preparar con antelación y hornear justo antes de servir.
- Se pueden congelar antes de hornear y cocinarlos directamente del congelador, aumentando el tiempo de cocción.
- Prep Time: 20 minutos
- Cook Time: 20 minutos
- Category: Aperitivo
- Method: Hornear
- Cuisine: Internacional
Nutrition
- Serving Size: 1 bocadito
- Calories: 250
- Sugar: 1 g
- Sodium: 400 mg
- Fat: 15 g
- Saturated Fat: 5 g
- Unsaturated Fat: 8 g
- Trans Fat: 0 g
- Carbohydrates: 20 g
- Fiber: 1 g
- Protein: 10 g
- Cholesterol: 50 mg