
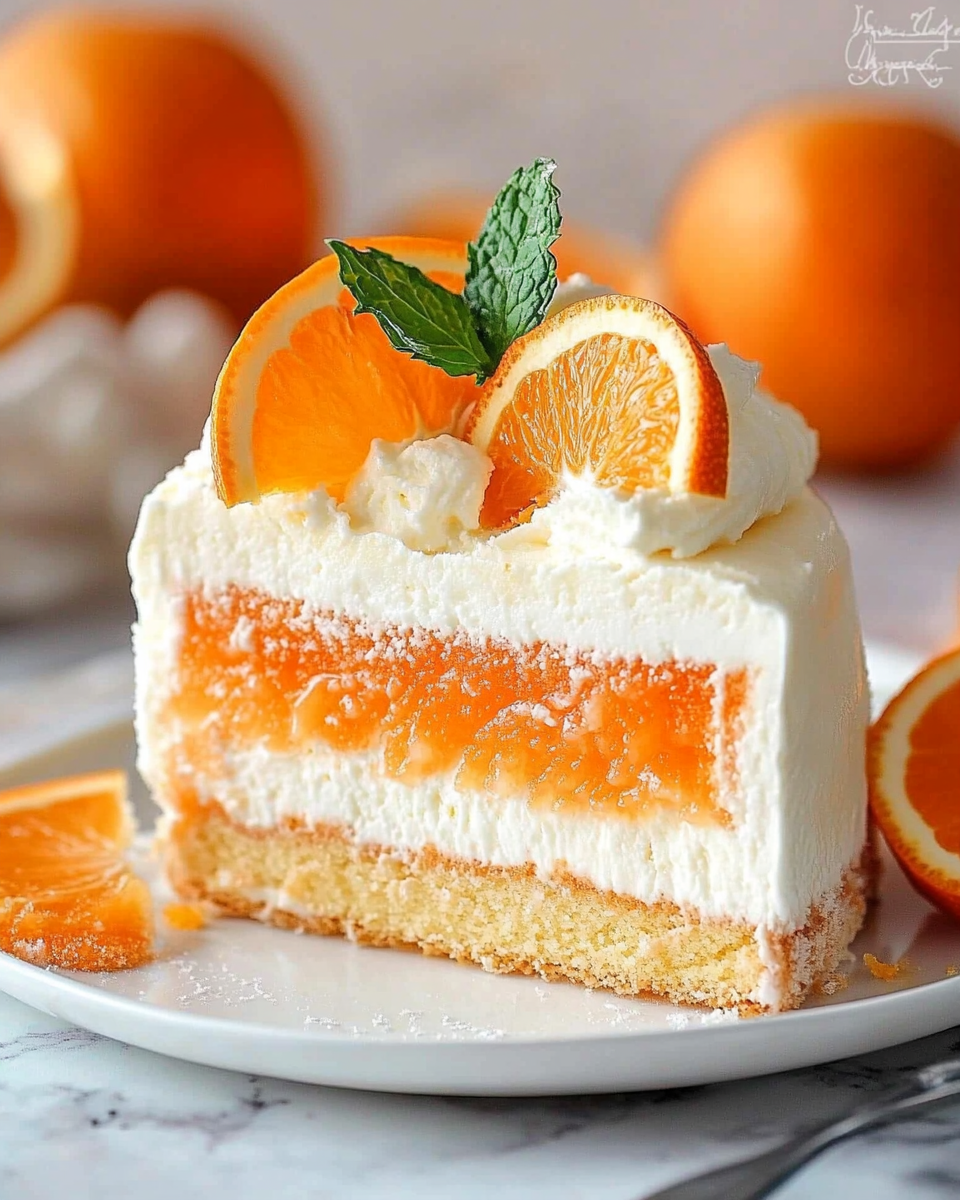
Introduction to Tarta Helada de Naranja y Crema
Hola, amigas! If you’re anything like me, you know that life can get a bit hectic, especially when juggling work, family, and everything in between. That’s why I’m excited to share my recipe for Tarta Helada de Naranja y Crema. This delightful frozen tart is not just a treat for the taste buds; it’s a quick solution for those busy days when you want to impress your loved ones without spending hours in the kitchen. With its refreshing orange flavor and creamy texture, this dessert is sure to bring smiles all around the table!
Why You’ll Love This Tarta Helada de Naranja y Crema
This Tarta Helada de Naranja y Crema is a lifesaver for busy women like us! It’s incredibly easy to whip up, requiring minimal hands-on time. Plus, the vibrant orange flavor paired with creamy goodness is a crowd-pleaser, even for picky eaters. You can prepare it ahead of time, making it perfect for unexpected guests or family gatherings. Trust me, this dessert will become your go-to for sweet surprises!
Ingredients for Tarta Helada de Naranja y Crema
Let’s dive into the delicious components that make up this Tarta Helada de Naranja y Crema. Each ingredient plays a vital role in creating that perfect balance of flavors and textures. Here’s what you’ll need:
- Galletas tipo digestive: These crunchy cookies form the base of our tart. They add a delightful texture and a hint of sweetness. If you can’t find digestive biscuits, graham crackers work just as well!
- Mantequilla derretida: This melted butter binds the crushed cookies together, creating a sturdy base. You can substitute with coconut oil for a dairy-free option.
- Helado de vainilla: The creamy vanilla ice cream adds a rich layer to the tart. Feel free to use a dairy-free version if you prefer!
- Helado de naranja: This is where the magic happens! The orange ice cream brings a refreshing citrus flavor that pairs beautifully with the vanilla. If you can’t find orange ice cream, a sorbet can be a great alternative.
- Nata para montar: Also known as heavy cream, this ingredient is whipped to create a light and airy topping. You can use a non-dairy whipped topping if you’re looking for a lighter option.
- Azúcar glas: This powdered sugar sweetens the whipped cream without adding graininess. If you’re watching your sugar intake, you can use a sugar substitute.
- Esencia de vainilla: A splash of vanilla extract enhances the overall flavor of the tart. It’s a small addition that makes a big difference!
- Ralladura de una naranja: This adds a burst of fresh orange flavor and a lovely aroma. Make sure to zest only the orange part, avoiding the bitter white pith.
- Rodajas de naranja para decorar: These not only make the tart look beautiful but also add a fresh touch when serving. You can use any citrus fruit for decoration, like lime or lemon!
For exact measurements, check the bottom of the article where you can find everything listed for easy printing. Now that we have our ingredients ready, let’s get cooking!
How to Make Tarta Helada de Naranja y Crema
Now that we have our ingredients ready, let’s get into the fun part—making this delightful Tarta Helada de Naranja y Crema! Follow these simple steps, and you’ll have a stunning dessert that’s sure to impress.
Step 1: Prepare the Base
First things first, we need to create a solid foundation for our tart. Grab your galletas tipo digestive and toss them into a food processor. Pulse them until they resemble fine crumbs—think of sand on a beach! If you don’t have a food processor, you can place the cookies in a zip-top bag and crush them with a rolling pin. Once you have your crumbs, pour them into a bowl and mix in the melted mantequilla. This buttery goodness will help bind everything together. Stir until the mixture looks like wet sand, and you can easily form it into a ball.
Step 2: Freeze the Base
Now that our base is ready, it’s time to give it some chill time! Press the cookie mixture firmly into the bottom of a springform pan or a tart pan. Make sure it’s even and compact—this will help it hold together when we slice it later. Pop it into the freezer for about 30 minutes. This step is crucial because it allows the base to firm up, making it easier to layer the ice cream on top. Trust me, you don’t want a crumbly mess when it’s time to serve!
Step 3: Soften the Ice Cream
While the base is freezing, let’s prepare our ice cream layers. Take the helado de vainilla and helado de naranja out of the freezer and let them sit at room temperature for about 10-15 minutes. This softening process is key! It makes spreading the ice cream much easier, so you won’t end up with a lumpy layer. Just keep an eye on it—too soft, and it’ll melt into a puddle!
Step 4: Whip the Cream
Next up, let’s whip some cream! In a mixing bowl, pour in the nata para montar and add the azúcar glas and esencia de vainilla. Using an electric mixer, beat the cream on medium speed until it forms soft peaks. This means when you lift the beaters, the cream should hold its shape but still be a bit wobbly. If you overbeat it, you’ll end up with butter, and nobody wants that! So, keep an eye on it and stop when it looks fluffy and delicious.
Step 5: Layer the Ice Cream
Now comes the fun part—layering! Take your frozen base out of the freezer and spread a generous layer of the softened helado de vainilla over it. Use a spatula to smooth it out evenly. Then, add a layer of helado de naranja on top, and sprinkle the ralladura de una naranja over it for that extra zing! Smooth it out again, making sure it’s all nice and even. This layering creates a beautiful contrast of flavors and colors that will wow your guests!
Step 6: Final Freeze
Once you’ve layered the ice cream, it’s time for the final freeze. Cover the tart with plastic wrap or a lid and pop it back into the freezer for at least an hour. This step is essential for achieving that perfect texture. When you slice into it later, you want it to hold its shape beautifully. So, resist the urge to dig in right away—patience is a virtue, especially in the kitchen!
Step 7: Serve and Decorate
Finally, the moment we’ve all been waiting for! Carefully remove the tart from the freezer and take it out of the pan. If it’s a bit stubborn, run a warm knife around the edges to help it release. Now, it’s time to decorate! Use the remaining whipped cream to dollop on top and add those lovely rodajas de naranja for a pop of color. Slice it into portions, and watch as everyone’s eyes light up with delight. Serve it up, and enjoy the sweet smiles all around!
Tips for Success
- Make sure your ice cream is just soft enough to spread easily, but not too melted.
- Use a spatula to smooth out the layers for a professional look.
- For a fun twist, try adding a splash of orange liqueur to the ice cream layers.
- Let the tart sit at room temperature for a few minutes before slicing for cleaner cuts.
- Don’t skip the freezing time; it’s crucial for the perfect texture!
Equipment Needed
- Food Processor: Essential for crushing cookies. A zip-top bag and rolling pin work too!
- Springform Pan or Tart Pan: Ideal for easy removal. A regular pie dish can also do the trick.
- Mixing Bowl: For whipping cream. Any large bowl will suffice.
- Electric Mixer: Makes whipping cream a breeze. A whisk can work, but it’ll take longer!
- Spatula: Perfect for smoothing layers. A large spoon can be a handy substitute.
Variations
- Chocolate Layer: Add a layer of chocolate ice cream between the vanilla and orange for a decadent twist!
- Fruit Swirl: Incorporate a fruit puree, like raspberry or strawberry, into the layers for a fruity surprise.
- Nutty Crunch: Sprinkle crushed nuts, like almonds or hazelnuts, between the layers for added texture and flavor.
- Dairy-Free Option: Use coconut or almond milk ice cream and a non-dairy whipped topping for a delicious vegan version.
- Herbal Infusion: Infuse the whipped cream with fresh mint or basil for a refreshing herbal note that complements the orange.
Serving Suggestions
- Pair with a light fruit salad for a refreshing contrast.
- Serve alongside a scoop of sorbet for an extra chill.
- Complement with a glass of sparkling water or a citrus-infused iced tea.
- Garnish with fresh mint leaves for a pop of color.
- Present on a colorful platter to make it visually stunning!
FAQs about Tarta Helada de Naranja y Crema
As you embark on your journey to create this delightful Tarta Helada de Naranja y Crema, you might have a few questions. Don’t worry; I’ve got you covered! Here are some common queries that pop up when making this refreshing dessert:
1. Can I make Tarta Helada de Naranja y Crema in advance?
Absolutely! This tart is perfect for preparing ahead of time. You can make it a day or two in advance and keep it in the freezer until you’re ready to serve. Just remember to let it sit at room temperature for a few minutes before slicing for easier serving!
2. What if I can’t find orange ice cream?
No problem at all! If orange ice cream is hard to find, you can substitute it with orange sorbet or even a creamy mango ice cream. Both options will still give you that fruity flavor we love in this Tarta Helada de Naranja y Crema.
3. How can I make this dessert healthier?
If you’re looking to lighten things up, consider using low-fat ice cream or yogurt instead of regular ice cream. You can also reduce the sugar in the whipped cream or use a sugar substitute. It’s all about finding that balance while still enjoying a delicious treat!
4. Can I use different flavors of ice cream?
Of course! Feel free to get creative with your ice cream choices. Chocolate, strawberry, or even coffee ice cream can add a unique twist to your tart. Just remember to keep the layers balanced for the best flavor experience!
5. How do I store leftovers?
If you have any leftovers (which is rare, but it happens!), simply cover the tart with plastic wrap or place it in an airtight container and return it to the freezer. It should stay fresh for up to a week. Just be sure to let it soften a bit before serving again!
Final Thoughts
Creating this Tarta Helada de Naranja y Crema is more than just making a dessert; it’s about bringing joy to your family and friends. The smiles on their faces as they take that first bite are priceless! This recipe is a reminder that even on our busiest days, we can whip up something special without breaking a sweat. So, whether it’s a family gathering or a simple weeknight treat, this tart is sure to impress. I hope you enjoy making it as much as I do, and may it bring sweet moments to your table!
“` Print
Tarta Helada de Naranja y Crema: ¡Sorpresa Dulce Ahora!
- Total Time: 2 horas
- Yield: 8 porciones 1x
- Diet: Vegetarian
Description
Deliciosa tarta helada de naranja y crema, perfecta para sorprender a tus invitados con un postre refrescante.
Ingredients
- 200 g de galletas tipo digestive
- 100 g de mantequilla derretida
- 500 ml de helado de vainilla
- 500 ml de helado de naranja
- 250 ml de nata para montar
- 100 g de azúcar glas
- 1 cucharadita de esencia de vainilla
- Ralladura de una naranja
- Rodajas de naranja para decorar
Instructions
- Comienza triturando las galletas digestive en un procesador hasta que queden finas. Mezcla con la mantequilla derretida hasta que se integren bien.
- Vierte la mezcla de galletas en un molde desmontable y presiona firmemente para formar una base. Coloca en el congelador durante 30 minutos para que se endurezca.
- Mientras la base se enfría, saca los helados de vainilla y naranja para que se ablanden un poco a temperatura ambiente.
- En un bol, bate la nata con el azúcar glas y la esencia de vainilla hasta que esté bien montada y forme picos suaves.
- Saca la base del congelador y coloca una capa uniforme de helado de vainilla sobre ella, alisando con una espátula. Regresa al congelador por 30 minutos.
- Después, añade una capa de helado de naranja y espolvorea la ralladura de naranja por encima. Alisa la superficie y congela por una hora adicional.
- Para servir, desmolda la tarta con cuidado y decora con la nata montada restante y las rodajas de naranja. Corta en porciones y disfruta de esta deliciosa tarta congelada.
Notes
- Se puede preparar con antelación y mantener en el congelador hasta el momento de servir.
- Para un toque extra, puedes añadir un poco de licor de naranja a la mezcla de helado.
- Prep Time: 20 minutos
- Cook Time: 0 minutos
- Category: Postre
- Method: Congelado
- Cuisine: Española
Nutrition
- Serving Size: 1 porción
- Calories: 350
- Sugar: 30 g
- Sodium: 150 mg
- Fat: 20 g
- Saturated Fat: 10 g
- Unsaturated Fat: 5 g
- Trans Fat: 0 g
- Carbohydrates: 40 g
- Fiber: 1 g
- Protein: 4 g
- Cholesterol: 30 mg