
gutenberg
Introduction to Quesada Pasiega
Hey there, fellow food lovers! If you’re anything like me, juggling work, family, and a million other things, you know how precious time can be. That’s why I’m excited to share my go-to recipe for Quesada Pasiega. This delightful Spanish dessert is not only a breeze to whip up, but it also brings a touch of elegance to your table. Imagine serving a creamy, citrus-infused treat that leaves everyone asking for seconds! Whether it’s a busy weeknight or a special occasion, this recipe is your secret weapon to impress your loved ones without breaking a sweat.
Why You’ll Love This Quesada Pasiega
Let’s be real—life can get hectic, and finding time to bake something special can feel like a luxury. That’s where Quesada Pasiega shines! It’s incredibly easy to make, requiring just a handful of ingredients and minimal prep time. Plus, the creamy texture and zesty flavor are sure to delight your family and friends. You’ll love how this dessert transforms an ordinary day into something extraordinary, all while keeping your sanity intact!
Ingredients for Quesada Pasiega
Now, let’s dive into the ingredients that make this Quesada Pasiega so special. You’ll find that most of these items are staples in your kitchen, making it easy to whip this up on a whim. Here’s what you’ll need:
- Ricotta cheese: The star of the show! This creamy cheese gives the quesada its rich texture. If you’re feeling adventurous, you can swap half of it with cream cheese for an even creamier delight.
- All-purpose flour: This helps bind everything together. It’s the backbone of your dessert, giving it structure without being too heavy.
- Sugar: A must for sweetness! You can adjust the amount based on your taste or even use a sugar substitute if you’re watching your intake.
- Large eggs: These add moisture and richness, helping to create that lovely custard-like consistency.
- Baking powder: This little leavening agent is key to achieving that perfect rise, making your quesada light and fluffy.
- Vanilla extract: A splash of this adds warmth and depth to the flavor profile. It’s like a cozy hug in dessert form!
- Lemon zest: This brightens up the dish with a refreshing citrus note. If you want to mix things up, try adding some orange zest for a different twist.
- Cinnamon: A sprinkle of this spice brings warmth and a hint of nostalgia, making every bite feel like a comforting embrace.
- Salt: Just a pinch enhances all the flavors, balancing the sweetness beautifully.
- Milk: This helps to create a smooth batter. You can use whole milk for richness or a lower-fat option if you prefer.
- Powdered sugar: Optional, but a light dusting on top before serving adds a lovely finishing touch and makes it look extra special.
For exact measurements, don’t forget to check the bottom of the article where you can find everything listed for easy printing. Happy baking!
How to Make Quesada Pasiega
Now that we have our ingredients ready, let’s get down to the fun part—making this delicious Quesada Pasiega! Follow these simple steps, and you’ll have a delightful dessert that’s sure to impress.
Step 1: Preheat the Oven
First things first, preheat your oven to 350°F (175°C). This is crucial because a hot oven helps your quesada rise beautifully. While that’s heating up, grab your 9-inch round cake pan or springform pan and give it a good greasing. You want to ensure that your dessert slides out easily once it’s baked.
Step 2: Mix the Base
In a large mixing bowl, combine the ricotta cheese, sugar, and eggs. Using a whisk or an electric mixer, mix until everything is smooth and well combined. This is where the magic begins! The ricotta cheese will create a creamy base that’s simply irresistible. Don’t be shy—mix it well until you can’t see any lumps!
Step 3: Combine Dry Ingredients
Next, it’s time to add the dry ingredients. Toss in the all-purpose flour, baking powder, vanilla extract, lemon zest, cinnamon, and salt to the ricotta mixture. Stir gently until just combined. You don’t want to overmix here; a few lumps are perfectly fine. This step is where the flavors start to come together, and the aroma will make your kitchen smell heavenly!
Step 4: Add Milk
Now, gradually add the milk to the batter. Mix until the batter is smooth and creamy. This is the moment when your mixture transforms into a luscious batter that’s ready to be baked. If you find it too thick, feel free to add a splash more milk. Remember, we want it to be pourable but not too runny!
Step 5: Bake
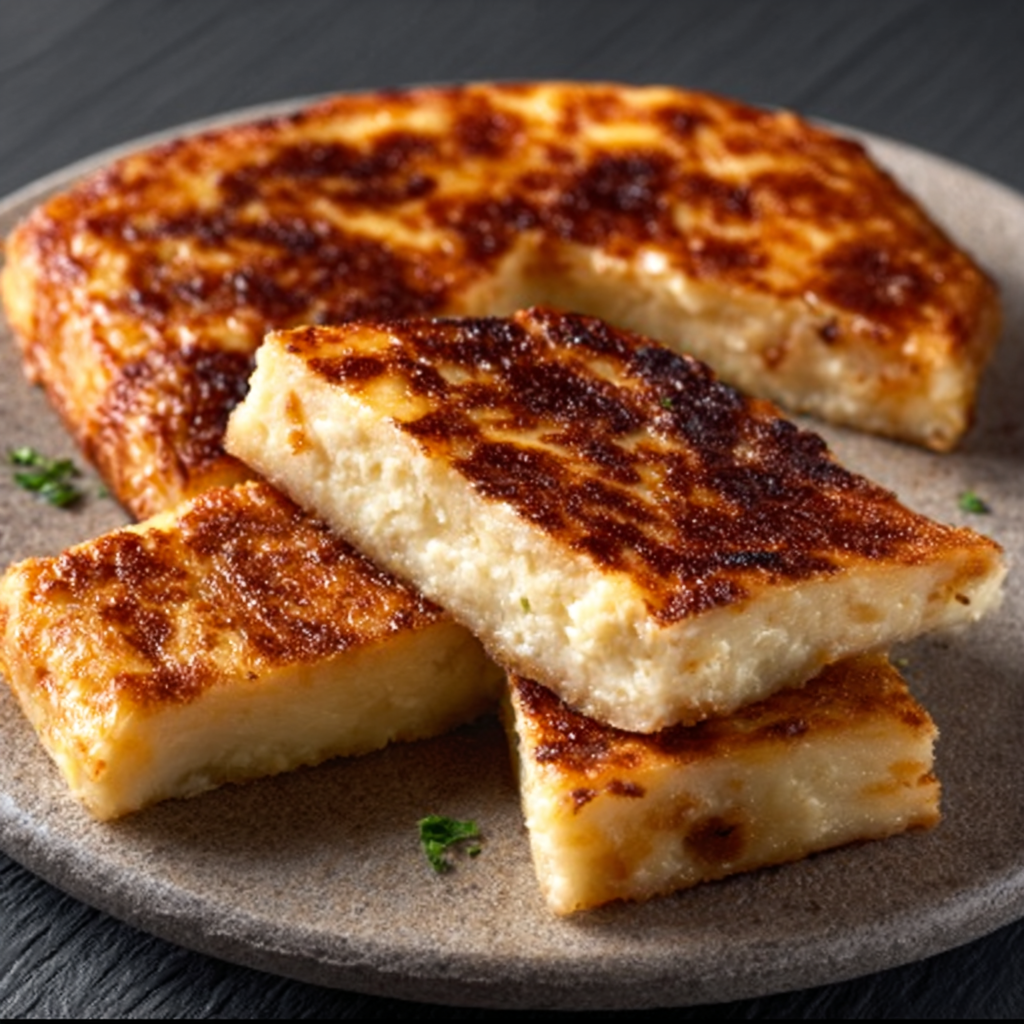
Pour the batter into your prepared cake pan, spreading it evenly. Pop it into the preheated oven and bake for 40-45 minutes. You’ll know it’s done when the top is golden brown and a toothpick inserted in the center comes out clean. The anticipation will be real, but trust me, it’s worth the wait!
Step 6: Cool and Serve
Once your quesada is baked to perfection, allow it to cool in the pan for about 10 minutes. This helps it set and makes it easier to transfer. After that, gently move it to a wire rack to cool completely. If you’re feeling fancy, dust it with powdered sugar before slicing and serving. It’s the perfect finishing touch that adds a little sweetness and elegance!
Tips for Success
- Make sure your ricotta cheese is at room temperature for easier mixing.
- Don’t skip the cooling step; it helps the quesada set properly.
- For a fun twist, try adding a splash of almond extract for extra flavor.
- Use a toothpick to check for doneness; it should come out clean.
- Store leftovers in the fridge for up to three days—if there are any!
Equipment Needed
- 9-inch round cake pan or springform pan: If you don’t have one, a square baking dish works too!
- Mixing bowl: A large bowl is essential; a sturdy plastic or glass bowl will do the trick.
- Whisk or electric mixer: Either works for mixing; a fork can also suffice in a pinch!
- Measuring cups and spoons: Accurate measurements are key, but eyeballing can work for experienced cooks.
Variations
- Fruit Add-Ins: Toss in some fresh berries or diced apples for a fruity twist. They add a pop of color and flavor!
- Chocolate Lovers: Mix in chocolate chips or cocoa powder for a decadent chocolate version of Quesada Pasiega. Who can resist chocolate?
- Nutty Delight: Add chopped nuts like walnuts or almonds for a crunchy texture that complements the creamy base.
- Gluten-Free Option: Substitute all-purpose flour with a gluten-free blend to make this dessert suitable for gluten-sensitive friends.
- Vegan Version: Use a plant-based ricotta and flax eggs instead of regular eggs for a vegan-friendly adaptation.
Serving Suggestions
- Pair your Quesada Pasiega with a dollop of whipped cream for added creaminess.
- Serve alongside fresh fruit, like berries or citrus slices, to enhance the citrus notes.
- A cup of coffee or herbal tea makes for a delightful afternoon treat.
- For a festive touch, garnish with mint leaves or edible flowers.
FAQs about Quesada Pasiega
As you embark on your journey to make this delightful Quesada Pasiega, you might have a few questions. Don’t worry; I’ve got you covered! Here are some common queries that pop up when making this creamy Spanish dessert:
1. Can I make Quesada Pasiega ahead of time?
Absolutely! This dessert actually tastes even better the next day as the flavors meld together. Just bake it, let it cool, and store it in the fridge. When you’re ready to serve, dust it with powdered sugar for that fresh touch!
2. What can I substitute for ricotta cheese?
If you’re not a fan of ricotta, you can use cottage cheese or even cream cheese for a richer texture. Just remember to blend it well to avoid any lumps. Each option will give your Quesada Pasiega a unique twist!
3. How do I know when my quesada is done baking?
The best way to check is by inserting a toothpick into the center. If it comes out clean or with just a few moist crumbs, your quesada is ready! The top should also be a lovely golden brown.
4. Can I freeze Quesada Pasiega?
Yes, you can! Just make sure it’s completely cooled before wrapping it tightly in plastic wrap and then aluminum foil. It can be frozen for up to three months. When you’re ready to enjoy it, let it thaw in the fridge overnight.
5. What’s the best way to serve Quesada Pasiega?
Serve it chilled or at room temperature, and don’t forget that dusting of powdered sugar! Pair it with fresh fruit or a scoop of ice cream for an extra special treat. Your family and friends will be raving about it!
Final Thoughts
Making Quesada Pasiega is more than just baking a dessert; it’s about creating moments of joy and connection with your loved ones. The creamy texture and zesty flavor bring a little taste of Spain right into your kitchen, making it a delightful treat for any occasion. Whether you’re celebrating a special milestone or simply enjoying a quiet evening at home, this recipe is sure to bring smiles all around. So, roll up your sleeves, gather your ingredients, and let the magic happen. Trust me, your family will thank you for this deliciously sweet experience!
“`
Print
Quesada Pasiega: A Delightful Recipe to Savor
- Total Time: 1 hour
- Yield: 8 servings 1x
- Diet: Vegetarian
Description
Quesada Pasiega is a delightful Spanish dessert made with ricotta cheese, offering a creamy texture and a hint of citrus flavor.
Ingredients
- 2 cups ricotta cheese
- 1 cup all-purpose flour
- 1 cup sugar
- 3 large eggs
- 1 teaspoon baking powder
- 1 teaspoon vanilla extract
- 1 teaspoon lemon zest
- 1 teaspoon cinnamon
- 1/4 teaspoon salt
- 1/2 cup milk
- Powdered sugar for dusting (optional)
Instructions
- Preheat your oven to 350°F (175°C) and grease a 9-inch round cake pan or springform pan.
- In a large mixing bowl, combine the ricotta cheese, sugar, and eggs. Mix until smooth and well combined.
- Add the flour, baking powder, vanilla extract, lemon zest, cinnamon, and salt to the ricotta mixture. Stir until just combined.
- Gradually add the milk to the batter, mixing until the batter is smooth and creamy.
- Pour the batter into the prepared cake pan and spread it evenly.
- Bake in the preheated oven for 40-45 minutes, or until the top is golden brown and a toothpick inserted in the center comes out clean.
- Allow the quesada to cool in the pan for about 10 minutes before transferring it to a wire rack to cool completely.
- Once cooled, dust with powdered sugar if desired before slicing and serving.
Notes
- For a richer flavor, try adding a tablespoon of orange zest along with the lemon zest.
- You can also substitute half of the ricotta cheese with cream cheese for a creamier texture.
- Prep Time: 15 minutes
- Cook Time: 45 minutes
- Category: Dessert
- Method: Baking
- Cuisine: Spanish
Nutrition
- Serving Size: 1 slice
- Calories: 210
- Sugar: 26g
- Sodium: 150mg
- Fat: 8g
- Saturated Fat: 4g
- Unsaturated Fat: 2g
- Trans Fat: 0g
- Carbohydrates: 26g
- Fiber: 0g
- Protein: 6g
- Cholesterol: 70mg