
gutenberg
Introduction to Pan dulce con crema y coco (Skolebrød)
Hey there, fellow kitchen warriors! If you’re anything like me, you know that life can get pretty hectic, especially when juggling work, family, and everything in between. That’s why I’m excited to share my recipe for pan dulce con crema y coco (Skolebrød). This delightful sweet bread is not just a treat; it’s a little hug for your taste buds! Perfect for a quick breakfast or a sweet afternoon snack, these buns are sure to impress your loved ones without taking up your entire day. Let’s dive into this delicious adventure together!
Why You’ll Love This Pan dulce con crema y coco (Skolebrød)
Let’s be real—finding time to whip up something delicious can feel like searching for a needle in a haystack. That’s where pan dulce con crema y coco (Skolebrød) shines! It’s easy to make, and the sweet, creamy filling paired with the coconut topping is a flavor explosion. Plus, it’s a fantastic way to bring a little Scandinavian charm to your kitchen without spending hours slaving away. Your family will adore it, and you’ll feel like a superstar!
Ingredients for Pan dulce con crema y coco (Skolebrød)
Before we roll up our sleeves and get baking, let’s gather our ingredients for this delightful pan dulce con crema y coco (Skolebrød). Each component plays a vital role in creating that perfect balance of sweetness and texture. Here’s what you’ll need:
- All-purpose flour: The backbone of our dough, providing structure and chewiness. You can use whole wheat flour for a healthier twist, but it may alter the texture slightly.
- Granulated sugar: This sweetener adds just the right amount of sweetness to the dough and pastry cream. If you’re looking to cut back on sugar, consider using a sugar substitute like stevia.
- Salt: A pinch of salt enhances the flavors and balances the sweetness. Don’t skip it; it’s essential!
- Active dry yeast: This little powerhouse helps our dough rise and become fluffy. Make sure it’s fresh for the best results!
- Whole milk: Used in both the dough and the pastry cream, it adds richness. You can substitute with almond or oat milk for a dairy-free option.
- Unsalted butter: Adds a lovely richness to the dough. If you’re in a pinch, you can use margarine, but the flavor won’t be quite the same.
- Egg: This binds everything together and gives the dough a beautiful color. If you’re vegan, a flax egg can work as a substitute.
- Vanilla extract: A splash of this aromatic extract elevates the flavor of both the dough and the pastry cream. Pure vanilla is best, but imitation works in a pinch.
- Pastry cream ingredients: For the creamy filling, you’ll need more whole milk, sugar, cornstarch (to thicken), an egg yolk (for richness), and vanilla extract. This creamy goodness is what makes each bite heavenly!
- Sweetened shredded coconut: This is the crowning glory of our buns! It adds a delightful texture and tropical flavor. If you’re not a coconut fan, feel free to swap it out for chopped nuts.
- Powdered sugar: Used in the coconut topping to add sweetness and a touch of elegance. You can skip it if you prefer a less sweet finish.
- Milk (for topping): Just a splash to help bind the coconut topping together. You can use any milk you have on hand.
For exact measurements, check the bottom of the article where you can find everything listed for easy printing. Now that we have our ingredients ready, let’s get to the fun part—baking!
How to Make Pan dulce con crema y coco (Skolebrød)
Now that we have our ingredients ready, let’s roll up our sleeves and dive into the delightful process of making pan dulce con crema y coco (Skolebrød). I promise, it’s easier than it sounds, and the end result is absolutely worth it!
Prepare the Dough
First things first, let’s get that dough going! In a large mixing bowl, combine the all-purpose flour, granulated sugar, salt, and active dry yeast. Give it a good stir to mix everything together. It’s like a little dance party for your dry ingredients!
In a separate bowl, whisk together the warmed whole milk, melted unsalted butter, egg, and vanilla extract. This mixture is the magic potion that brings our dough to life. Once it’s well combined, pour it into the dry ingredients. Mix until a dough forms. It might look a bit shaggy at first, but don’t worry; it’ll come together!
Now, it’s time to knead! Dust your countertop with a little flour and turn the dough out. Knead it for about 5-7 minutes until it’s smooth and elastic. Think of it as a mini workout—your arms will thank you later! Once it’s ready, place the dough in a greased bowl, cover it with a clean towel, and let it rise in a warm spot for about an hour or until it doubles in size. This is the perfect time to catch up on your favorite show or enjoy a cup of tea.
Make the Pastry Cream
While the dough is rising, let’s whip up that luscious pastry cream! In a saucepan, heat the additional whole milk over medium heat until it’s just simmering. Keep an eye on it; we don’t want it to boil over!
In a separate bowl, whisk together the granulated sugar, cornstarch, and egg yolk until smooth. Slowly pour the hot milk into this mixture, whisking constantly. This step is crucial; it prevents the egg from scrambling. Once combined, return the mixture to the saucepan and cook over medium heat, stirring constantly until it thickens—this should take about 2-3 minutes. When it’s thick enough to coat the back of a spoon, remove it from the heat and stir in the vanilla extract. Let it cool while we shape the buns.
Shape the Buns
Once your dough has risen, it’s time to punch it down—literally! Give it a gentle punch to release the air, then divide it into 8 equal pieces. Shape each piece into a ball and place them on a greased baking sheet. They should be cozy but not squished together.
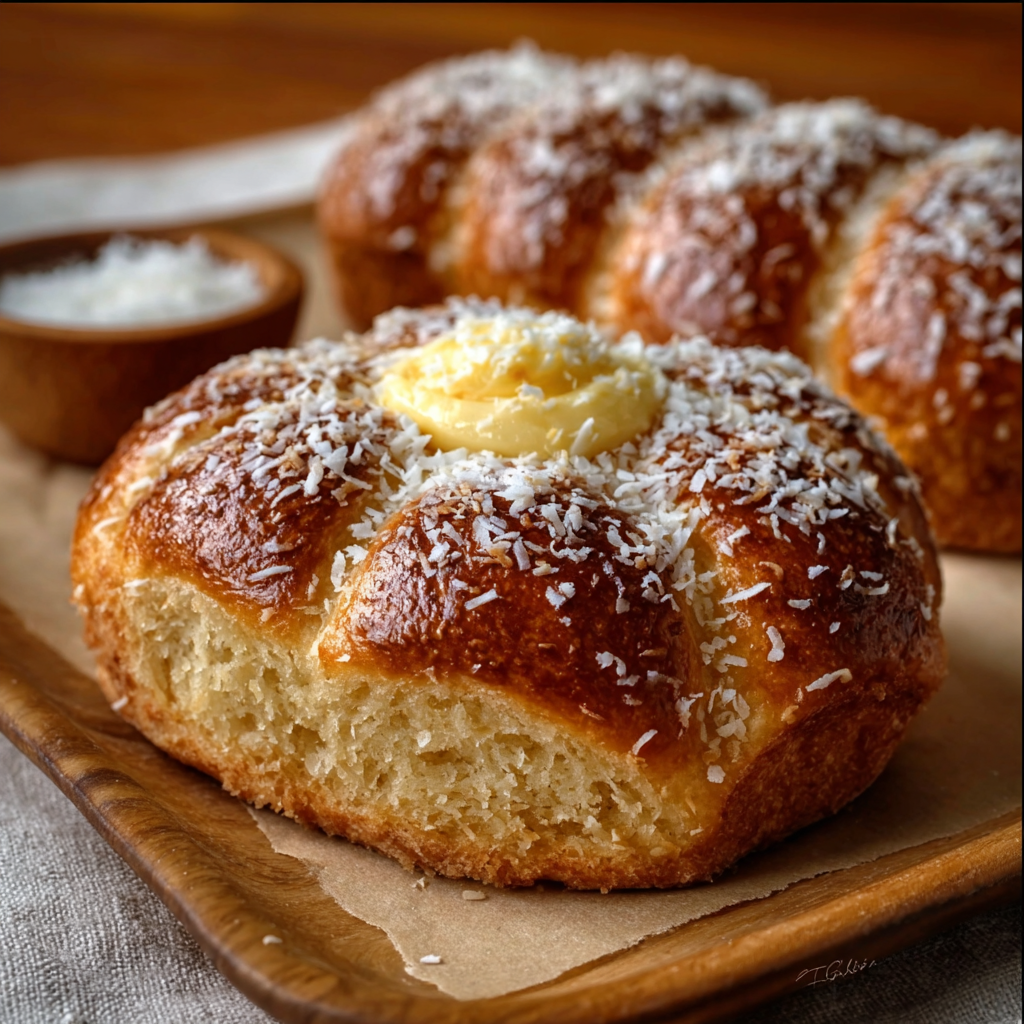
Now, here comes the fun part! Use your finger to make a deep indentation in the center of each ball. This is where the magic happens—fill each indentation with a generous spoonful of that creamy pastry cream we just made. Don’t be shy; it’s the star of the show!
Cover the filled dough balls with a towel and let them rise for another 30 minutes. This second rise is essential for that fluffy texture we all love. While you wait, you can start preheating your oven to 375°F (190°C). The aroma of baking bread is just around the corner!
Bake the Buns
Once the buns have puffed up nicely, it’s time to bake! Pop them in the preheated oven and let them bake for 15-20 minutes or until they’re golden brown. Keep an eye on them; every oven is a little different. You want them to look like little golden clouds!
When they’re done, take them out and let them cool slightly on a wire rack. The smell wafting through your kitchen will be heavenly, and your family will be eagerly waiting for a taste!
Add the Coconut Topping
While the buns are cooling, let’s prepare the coconut topping. In a bowl, mix together the sweetened shredded coconut, powdered sugar, vanilla extract, and a splash of milk. This mixture should be thick but spreadable. If it’s too dry, add a little more milk until you reach the desired consistency.
Once the buns have cooled slightly, spread the coconut mixture generously on top of each bun. This is where the fun really begins! The coconut adds a delightful crunch and a tropical twist that pairs perfectly with the creamy filling. And just like that, your pan dulce con crema y coco (Skolebrød) is ready to be devoured!
Tips for Success
- Make sure your yeast is fresh for the best rise—check the expiration date!
- For a fluffier dough, knead it well; it’s like giving it a little love!
- Let the dough rise in a warm, draft-free area; a turned-off oven works wonders.
- Don’t rush the cooling process; let the buns cool slightly before adding the topping for better texture.
- Feel free to experiment with flavors—add a pinch of cinnamon for a warm twist!
Equipment Needed
- Mixing bowls: A large bowl for the dough and a smaller one for the pastry cream. Any size will do!
- Whisk: Essential for mixing ingredients smoothly. A fork can work in a pinch.
- Baking sheet: A standard one will suffice; line it with parchment paper for easy cleanup.
- Measuring cups and spoons: Accurate measurements are key! If you don’t have them, use a regular coffee mug as a rough guide.
- Wire rack: For cooling the buns. If you don’t have one, a plate will work just fine.
Variations
- Chocolate Twist: Drizzle melted chocolate over the coconut topping for a decadent treat that chocolate lovers will adore!
- Nutty Delight: Swap out the shredded coconut for chopped nuts like almonds or hazelnuts for a crunchy texture.
- Fruit-Filled: Add a spoonful of your favorite jam or fresh fruit in the center along with the pastry cream for a fruity surprise.
- Gluten-Free Option: Use a gluten-free all-purpose flour blend to make this recipe suitable for those with gluten sensitivities.
- Vegan Version: Substitute the egg with a flax egg and use plant-based milk and butter to create a delicious vegan-friendly version.
Serving Suggestions
- Pair your pan dulce con crema y coco (Skolebrød) with a steaming cup of coffee or tea for a delightful afternoon treat.
- Serve with fresh fruit like berries or sliced bananas for a refreshing contrast.
- For a special touch, dust with extra powdered sugar before serving.
- These buns make a lovely addition to brunch spreads or dessert tables.
FAQs about Pan dulce con crema y coco (Skolebrød)
1. Can I make pan dulce con crema y coco (Skolebrød) ahead of time?
Absolutely! You can prepare the dough and pastry cream a day in advance. Just store the dough in the fridge after the first rise. When you’re ready to bake, let it come to room temperature before shaping and baking. This way, you can enjoy fresh buns without the last-minute rush!
2. What can I substitute for the coconut topping?
If coconut isn’t your thing, no worries! You can swap it out for chopped nuts like almonds or pecans for a delightful crunch. Alternatively, a simple glaze made from powdered sugar and milk can add a sweet finish without the coconut.
3. How do I store leftover pan dulce con crema y coco (Skolebrød)?
To keep your buns fresh, store them in an airtight container at room temperature for up to 2 days. If you want to keep them longer, you can freeze them! Just wrap each bun tightly in plastic wrap and place them in a freezer bag. They’ll be good for up to a month!
4. Can I use a bread machine for this recipe?
Yes, you can! If you have a bread machine, you can use it to knead the dough. Just add the ingredients in the order recommended by your machine, and let it do the work for you. Once the dough is ready, follow the shaping and baking steps as usual.
5. Is pan dulce con crema y coco (Skolebrød) suitable for special diets?
This recipe can be adapted for various dietary needs! For a gluten-free version, use a gluten-free flour blend. To make it vegan, substitute the egg with a flax egg and use plant-based milk and butter. Enjoying this treat is possible for everyone!
Final Thoughts
Making pan dulce con crema y coco (Skolebrød) is more than just baking; it’s about creating sweet moments with your loved ones. The joy of pulling those golden buns from the oven, the aroma filling your kitchen, and the smiles on your family’s faces as they take their first bite—priceless! This recipe is a delightful way to bring a touch of Scandinavian charm to your home, all while keeping it simple and enjoyable. So, whether it’s a busy weekday or a special occasion, these buns are sure to become a cherished favorite in your household!
“`
Print
Pan dulce con crema y coco: A Delightful Recipe Awaits!
- Total Time: 1 hour 50 minutes
- Yield: 8 servings 1x
- Diet: Vegetarian
Description
Pan dulce con crema y coco (Skolebrød) is a delightful sweet bread filled with creamy pastry and topped with coconut, perfect for any occasion.
Ingredients
- 2 cups all-purpose flour
- 1/4 cup granulated sugar
- 1/2 teaspoon salt
- 1 packet (2 1/4 teaspoons) active dry yeast
- 1/2 cup whole milk, warmed
- 1/4 cup unsalted butter, melted
- 1 large egg
- 1/2 teaspoon vanilla extract
- 1 cup whole milk (for pastry cream)
- 1/4 cup granulated sugar (for pastry cream)
- 2 tablespoons cornstarch
- 1 large egg yolk
- 1 teaspoon vanilla extract (for pastry cream)
- 1 cup sweetened shredded coconut (for topping)
- 1/4 cup powdered sugar (for topping)
- 1/2 teaspoon vanilla extract (for topping)
- 1 tablespoon milk (for topping)
Instructions
- In a large mixing bowl, combine the flour, sugar, salt, and yeast. Mix well.
- In a separate bowl, whisk together the warmed milk, melted butter, egg, and vanilla extract.
- Pour the wet ingredients into the dry ingredients and mix until a dough forms. Knead the dough on a floured surface for about 5-7 minutes until smooth and elastic.
- Place the dough in a greased bowl, cover with a clean towel, and let it rise in a warm place for about 1 hour or until doubled in size.
- While the dough is rising, prepare the pastry cream. In a saucepan, heat the milk over medium heat until just simmering.
- In a bowl, whisk together the sugar, cornstarch, and egg yolk until smooth. Slowly pour the hot milk into the mixture, whisking constantly.
- Return the mixture to the saucepan and cook over medium heat, stirring constantly, until thickened (about 2-3 minutes). Remove from heat and stir in the vanilla extract. Let cool.
- Once the dough has risen, punch it down and divide it into 8 equal pieces. Shape each piece into a ball and place them on a greased baking sheet.
- Use your finger to make a deep indentation in the center of each ball. Fill the indentation with a spoonful of pastry cream.
- Cover the filled dough balls with a towel and let them rise for another 30 minutes.
- Preheat the oven to 375°F (190°C).
- Bake the dough for 15-20 minutes or until golden brown.
- While the buns are baking, prepare the coconut topping by mixing the shredded coconut, powdered sugar, vanilla extract, and milk in a bowl until well combined.
- Once the buns are out of the oven and slightly cooled, spread the coconut mixture on top of each bun.
Notes
- For a richer flavor, consider adding a pinch of cinnamon to the dough.
- You can also substitute the shredded coconut with chopped nuts for a different texture.
- If you prefer a chocolate twist, drizzle melted chocolate over the coconut topping once it has set.
- Prep Time: 1 hour 30 minutes
- Cook Time: 20 minutes
- Category: Dessert
- Method: Baking
- Cuisine: Scandinavian
Nutrition
- Serving Size: 1 bun
- Calories: 250
- Sugar: 15g
- Sodium: 150mg
- Fat: 10g
- Saturated Fat: 5g
- Unsaturated Fat: 3g
- Trans Fat: 0g
- Carbohydrates: 30g
- Fiber: 1g
- Protein: 4g
- Cholesterol: 30mg